Contrary to a previous email that I received, Microsoft started rebooting Azure VMs yesterday, instead of the 9th. Microsoft also confirmed that this is because of the Intel CPU security flaw. The following email was sent out to customers:
Dear Azure customer,
An industry-wide, hardware-based security vulnerability was disclosed today. Keeping customers secure is always our top priority and we are taking active steps to ensure that no Azure customer is exposed to these vulnerabilities.
The majority of Azure infrastructure has already been updated to address this vulnerability. Some aspects of Azure are still being updated and require a reboot of some customer VMs for the security update to take effect.
You previously received a notification about Azure planned maintenance. With the public disclosure of the security vulnerability today, we have accelerated the planned maintenance timing and began automatically rebooting the remaining impacted VMs starting at PST on January 3, 2018. The self-service maintenance window that was available for some customers has now ended, in order to begin this accelerated update.
You can see the status of your VMs, and if the update completed, within the Azure Service Health Planned Maintenance Section in the Azure Portal.
During this update, we will maintain our SLA commitments of Availability Sets, VM Scale Sets, and Cloud Services. This reduces impact availability and only reboots a subset of your VMs at any given time. This ensures that any solution that follows Azure’s high availability guidance remains available to your customers and users. Operating system and data disks on your VM will be retained during this maintenance.
You should not experience noticeable performance impact with this update. We’ve worked to optimize the CPU and disk I/O path and are not seeing noticeable performance impact after the fix has been applied. A small set of customers may experience some networking performance impact. This can be addressed by turning on Azure Accelerated Networking (Windows, Linux), which is a free capability available to all Azure customers.
This Azure infrastructure update addresses the disclosed vulnerability at the hypervisor level and does not require an update to your Windows or Linux VM images. However, as always, you should continue to apply security best practices for your VM images.
For more information, please see the Azure blog post.
That email reads like Microsoft has done quite a bit of research on the bug, the fix, and the effects of bypassing the flawed CPU performance feature. It also sounds like the only customers that might notice a problem are those with large machines with very heavy network usage.
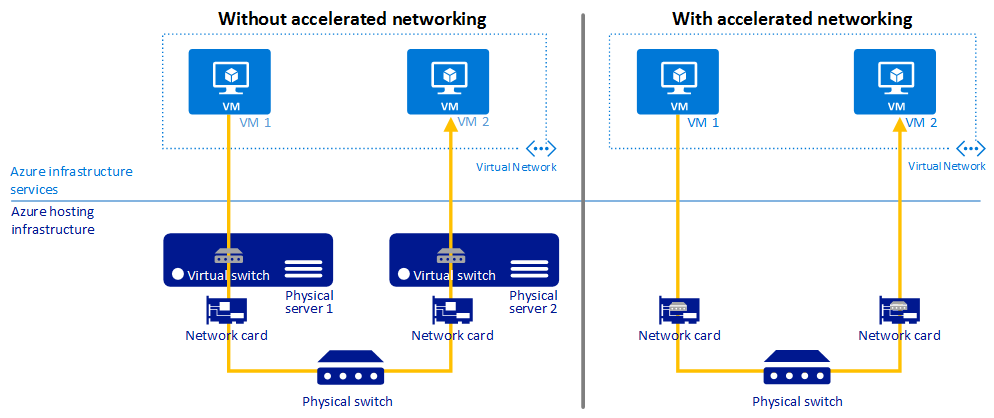
Accelerated networking is Azure’s implementation of Hyper-V’s SR-IOV. The virtual switch (in user mode in the host parent partition) is bypassed, and the NIC of the VM (in kernel mode) connects directly to a physical function (PF) on the host’s NIC via a virtual function (VF) or physical NIC driver in the VM’s guest OS. There are fewer context switches because there is no loop from the the NIC, via the VM bus, to the virtual switch, and then back to the host’s NIC drivers. Instead, with SR-IOV/Accelerated Networking, everything stays in kernel mode.
If you find that your networking performance is impacted, and you want to enable Accelerated Networking, then there are a few things to note:
Thanks to Neil Bailie of P2V for spotting that I’d forgotten something in the below, stricken out, points:
You cannot enable Accelerated Networking on an existing NIC. You need to create a new NIC.If your existing VM doesn’t have Accelerated Networking enabled on the NIC, then you can replace the NIC with one that has.- You cannot enable Accelerated Networking on an existing VM. You must delete the VM (keep the disks), and create a new VM from the existing disks using a previously created NIC with Accelerated Networking enabled. This is not a trivial process for the uninitiated. You will not lose any data/settings/program files/OS files – you’re replacing VM metadata.
- Your VM series/size, guest OS, and region must be in the supported list. Note that Accelerated Networking is GA on Windows and in Preview with Linux.
Was This Post Useful?
If you found this information useful, then imagine what 2 days of training might mean to you. I’m delivering a 2-day course in Amsterdam on April 19-20, teaching newbies and experienced Azure admins about Azure Infrastructure. There’ll be lots of in-depth information, covering the foundations, best practices, troubleshooting, and advanced configurations. You can learn more here.