Errors When You Add A Cert To Application Gateway Listener From Key Vault

This post is dealing with a situation where you attempt to add a certificate to a v2 Azure Application Gateway/Firewall (WAG_v2/WAF_v2) from an Azure Key Vault. The attempt fails and any further attempt to delete/modify the certificate fails with this error:

Invalid value for the identities ‘/subscriptions/xxxxxxx/resourcegroups/myapp/providers/Microsoft.ManagedIdentity/userAssignedIdentities/myapp-waf-id’. The ‘UserAssignedIdentities’ property keys should only be empty json objects, null or the resource exisiting property.

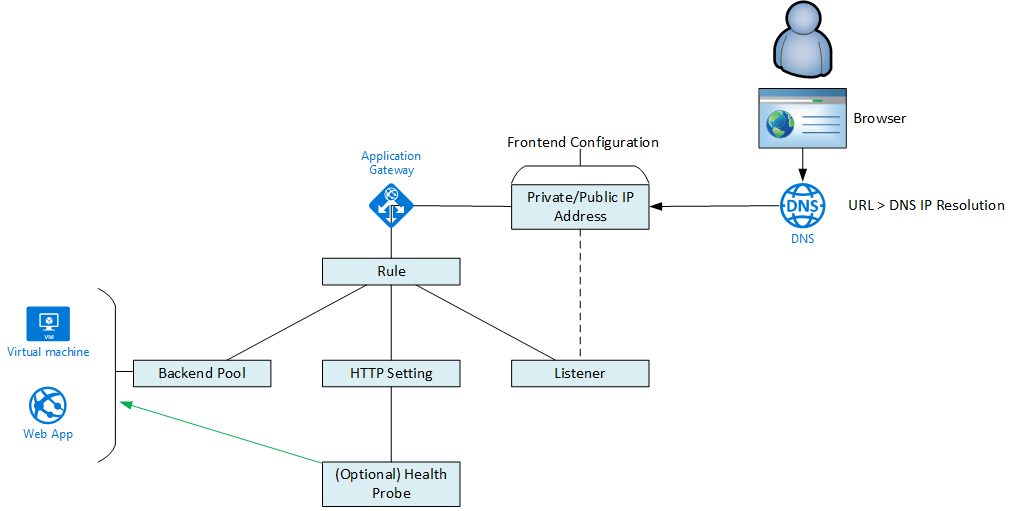
Application Gateway v2 and Key Vault

Azure Key Vault is the best place to store secrets in Microsoft Azure – particularly SSL certificates. Key Vault has a nice system for abstracting versions of a certificate so you can put in newer versions without changing references to the older one. There is also a feature for automatic renewal of expiring certs from certain issuers. I also like the separation of exposed resource from organisation secrets that you get with this approach; the legacy method was that you had to upload the cert into the WAG/WAF, but now WAG_v2/WAF_v2 allow you to store the certs in a Key Vault, and that limited access is done using a managed user ID (an Azure resource, not an Azure AD resource, which makes it more agile).

The Problem

I was actually going to write a blog post about how to obtain the secret ID of a certificate from the Key Vault so you could add it to the WAGv2/WAFv2. But as I was setting up the lab, I realised that during the day, Microsoft had updated the Azure Portal blade so certs were instead presented as a drop-down list box; now my post was pointless. But I continued setting things up and hit the above issue.

The Cause/Fix

When you use this architecture, WAF_v2/WAG_v2 requires that you have enabled soft delete on the Key Vault. And that’s the only check that they have been doing. The default setting for Key Vault soft delete is 90 days. I was in a lab, I was mucking around, so I set soft delete in my Key Vault to 7 days – a perfectly legit value for Key Vault. However, the Application Gateway (AppGW) requires it to be set to 90 days minimum … even though it does not check it!

To undo the damage you can run the following PowerShell cmdlets:

  • Set-AzApplicationGatewayIdentity
  • Remove-AzApplicationGatewaySslCertificate
  • Remove-AzApplicationGatewayHttpListener
  • Set-AzApplicationGateway to update the WAF

Thanks to Cat in the Azure network team for the help!

Creating an Azure Service for Slow Moving Organisations

In this post, I will explain how you can use Azure’s Public IP Prefix feature to pre-create public IP addresses to access Azure services when you are working big/government organisations that can take weeks to configure a VPN tunnel, outbound firewall rule, and so on.

In this scenario, I need a predictable IP address so that means I must use the Standard SKU address tier.

The Problem

It normally only takes a few minutes to create a firewall rule, a VPN tunnel, etc in an on-premises network. But sometimes it seems to take forever! I’ve been in that situation – you’ve set up an environment for the customer to work with, but their on-premises networking team(s) are slow to do anything. And you only wish that you had given them all the details that they needed earlier in the project so their configuration work would end when your weeks of engineering was wrapping up.

But you won’t know the public IP address until you create it. And that is normally only created when you create the virtual network gateway, Azure Firewall, Application Firewall, etc. But what if you had a pool of Azure public IP addresses that were pre-reserved and ready to share with the network team. Maybe they could be used to make early requests for VPN tunnels, firewall rules, and so on? Luckily, we can do that!

Public IP Prefix

An Azure Public IP Prefix is a set of reserved public IP addresses (PIPs). You can create an IP Prefix of a certain size, from /31 (2 addresses) to /24 (256 addresses), in a certain region. The pool of addresses is a contiguous block of predictable addresses. And from that pool, you can create public IP addresses for your Azure resources.

In my example, I want a Standard tier IP address and this requires a Standard tier Public IP Prefix. Unfortunately, the Azure Portal doesn’t allow for this with Public IP Prefix, so we need some PowerShell. First, we’ll define some reused variables:

$rgName = "test"
$region = "westeurope"
$ipPrefixName = "test-ipfx"

Now we will create the Publix IP Prefix. Note that the length refers to the subnet mask length. In my example that’s a /30 resulting in a prefix with 4 reserved public IP addresses:

$ipPrefix = New-AzPublicIpPrefix -Name $ipPrefixName -ResourceGroupName $rgName -PrefixLength 30 -Sku Standard -Location $region

You’ll note above that I used Standard in the command. This creates a pool of static Standard tier public IP addresses. I could have dropped the Standard, and that would have created a pool of static Basic tier IP addresses – you can use the Azure Portal to deploy Basic tier Public IP Prefix and public IP addresses from that prefix. The decision to use Standard tier or Basic tier affects what resources I can deploy with the addresses:

  • Standard: Azure Firewall, zone-redundant virtual network gateways, v2 application gateways/firewalls, standard tier load balancers, etc.
  • Basic static: Basic tier load balancers, v1 application gateways/firewalls, etc.

Note that the non-zone redundant virtual network gateways cannot use static public IP addresses and therefore cannot use Public IP Prefix.

Creating a Public IP Address

Let’s say that I have a project coming up where I need to deploy an Application Firewall and I know the on-premises network team will take weeks to allow outbound access to my new web service. Instead of waiting until I build the application, I can reserve the IP address now, tell the on-premises firewall team to allow it, and then work on my project. Hopefully, by the time I have the site up and running and presented to the Internet by my Application Firewall, they will have created the outbound firewall rule from the company network.

Browse to the Public IP Prefix and make sure that it is in the same region as the new virtual network and virtual network gateway. Open the prefix and check Allocated IP Addresses in the Overview. Make sure that there is free capacity in the reserved block.

Now I can continue to use my variables from above and create a new public IP address from one of the reserved addresses in the Public IP Prefix:

New-AzPublicIpAddress -Name "test-vpn-pip" -ResourceGroupName $rgName -AllocationMethod Static -DomainNameLabel "test-vpn" -Location $region -PublicIpPrefix $ipPrefix -Sku Standard

Use the Public IP Address

I now have everything I need to pass onto the on-premises network team in my request. In my example, I am going to create a v2 Application Firewall.

Once I configure the WAF, the on-premises firewall will (hopefully) already have the rule to allow outbound connections to my pre-reserved IP address and, therefore, my new web service.

Understanding How Azure Application Gateway Works

In this post, I will explain how things such as frontend configurations, listeners, HTTP settings, probes, backend pools, and rules work together to enable service publication in the Azure Web Application Gateway (WAG)/Web Application Firewall (WAF).

Introduction

The WAF/WAG is a scary beast at first. When you open one up there are just so many settings to be tweaked. If you are publishing just a simple test HTTP server, it’s easy: you populate the default backend pool and things just start to work. But if you want HTTPS, or to service many pools/sites, then things get complicated. And frustratingly slow 🙂 – Things have improved in v1 and v2 is significantly faster to configure, although it has architectural limitations (force public IP address and lack of support for route tables) that prevent me from using v2 in my large network deployments. Hopefully, the above map and following text will simplify things by explaining what all the pieces do and how they work together.

The below is not feature complete, and things will change in the future. But for 99% of you, this should (hopefully) be helpful.

Backend Pool

The backend pool describes a set of machines/services that will work together. The members of a backend pool must be all of the same type from one of these types:

  • IP address/hostname: a common choice in large Azure deployments – you can span peering connections to other VNets
  • Virtual machine: Select a machine from the same VNet as the WAG/WAF
  • VMSS: Virtual machine scale sets in the same VNet as the WAG/WAF
  • App Services: In the same subscription as the WAG/WAF

From here on out, I’ll be using the term “web server” to describe the above.

Note that this are the machines that host your website/service. They will all run the same website/service. And you can configure an optional custom probe to test the availability of the service on these machines.

(Optional) Health Probe

You can create a HTTP/HTTPS probe to do deeper probe tests of a service running on a backend pool. The probe is configured for HTTP or HTTPS and tests a hostname on the web server. You specify a path on the website, a frequency, timeout and allowed number of retries before designating a web site on a web server as being unhealthy and no longer a candidate for load balancing.

HTTP Setting

The HTTP setting configures how the WAG/WAF will talk to the members of the backend pool. It does not configure how clients talk to the site (Listener). So anything you see below here is for configuring WAG/WAF to web server communications (see HTTPS).

  • Control cookie-based affinity for load balancing
  • Configure connection draining when a machine is removed from a backend pool
  • Specify if this is for a HTTP or a HTTPS connection to the webserver. This is for end-to-end encryption.
    • For HTTPS, you will upload a certificate that will match the web servers’ certificate.
  • The port that the web server is listening on.
  • Override the path
  • Override the hostname
  • Use a custom probe

Remember that the above HTTPS setting is not required for website to be published as SSL. It is only required to ensure that encryption continues from the WAG/WAF to the web servers.

Frontend IP Configuration

A WAG/WAF can have public or private frontend IP addresses – the variation depends on if you are using V1 (you have a choice on the mix) or V2 (you must use public and private). The public front end is a single public IP address used for publishing services publicly. The private frontend is a single virtual network address used for internal service publication, requiring virtual network connectivity (virtual network, VPN, ExpressRoute, etc).

The DNS records for your sites will point at the frontend IP address of the WAG/WAF. You can use third-party or Azure DNS – Azure DNS has the benefit of being hosted in every Azure region and in edge sites around the world so it is faster to resolve names than some DNS hoster with 3 servers in a single continent.

A single frontend can be shared by many sites. http://www.aidanfinn.com, http://www.cloudmechanix.com and http://www.joeeleway.com can all point to the same IP address. The hostname configuration that you have in the Listener will determine what happens to the incoming traffic afterwards.

Listener

A Listener is configured to listen for traffic destined to a particular hostname and port number and forward it, eventually, to the correct backend pool. There are two kinds of listener:

  • Basic: For very simple configurations where a site has exclusive ownership over a port number on one of the frontends. Typically this is for point solutions where a WAG/WAF is dedicated to a service.
  • Multi-Site: A listener shares a frontend configuration with other listeners, and is looking for traffic destined to a specific hostname/port/protocol.

Note that the Listner is where you place the certificate to secure client > WAG/WAF communications. This is known as SSL offloading. If you enable HTTPS you will place the “site certificate” on the WAG/WAF via the Listener. You can optionally re-encrypt traffic to the webserver from the WAG/WAF using the previously discussed HTTP Setting. WAGv2/WAFv2 have a no-support preview to use certs that are securely stored in Key Vault.

The configuration of a basic listener is:

  • Frontend
  • Frontend port
  • HTTP or HTTPS protocol
    • The certificate for securing client > WAG/WAF traffic
  • Optional custom error pages

The multi-site listener is adds an extra configuration: hostname. This is because now the listener is sharing the frontend and is only catching traffic for its website. So if I want 3 websites on my WAG/WAF sharing a frontend, I will have 3 x HTTPS listeners and maybe 3 x HTTP listeners.

Rules

A rule glues together the configuration. A basic rule is pretty easy:

  1. Traffic comes into a Listener
  2. The HTTP Setting determines how to forward that traffic to the backend pool
  3. The Backend Pool lists the web servers that host the site

A path-based rule allows you to extend your site across many backend pools. You might have a set of content for /media on pool1. Therefore all http://www.aidanfinn.com/media content is pulled from that pool1. All video content might be on http://www.aidanfinn.com/video, so you’ll redirect /video to pool2. And so on. And you can have individual HTTP settings for each redirection.

My Tips

  • There’s nothing like actually setting this up at scale to try this out. You will need a few DNS names to be able to work with.
  • Remember to enable the protection mode of WAF. I have audited deployments and found situations where people thought they had Layer-7 security but only had the default “alert-only” configuration of WAFv1.
  • In large environments, don’t forget to ensure that the NSGs protecting any webservers allow traffic in from the WAG/WAF’s subnet into the web servers on the port(s) specified in the HTTP Setting(s). Also ensure that any guest OS firewall is similarly configured.
  • Possibly the biggest issue you will have is with devs not assigning hostnames to websites in their webservers. If you’re using shared WAGs/WAFs you must use multi-site listeners and the websites should be configured with the hostname.
  • And the biggest tip I can give is to work out a naming standard for each of the above components so you know what piece is associated with what site. I can’t share what we’re using at work, but we have some big configurations and they are very easy to troubleshoot because of how we have named things.

Locking Down Network Access to the Azure Application Gateway/Firewall

In this post, I will explain how you can use a Network Security Group (NSG) to completely lock down network access to the subnet that contains an Azure Web Application Gateway (WAG)/Web Application Firewall (WAF).

The stops are as follows:

  1. Deploy a WAG/WAF to a dedicated subnet.
  2. Create a Network Security Group (NSG) for the subnet.
  3. Associate the NSG with the subnet.
  4. Create an inbound rule to allow TCP 65503-65534 from the Internet service tag to the CIDR address of the WAG/WAF subnet.
  5. Create rules to allow application traffic, such as TCP 443 or TCP 80, from your sources to the CIDR address of the WAG/WAF
  6. Create a low priority (4000) rule to allow any protocol/port from the AzureLoadBlanacer service tag to the CIDR address of the WAG/WAF
  7. Create a rule, with the lowest priority (4096) to Deny All from Any source.

The Scenario

It is easy to stand up a WAG/WAF in Azure and get it up and running. But in the real world, you should lock down network access. In the world of Azure, all network security begins with an NSG. When you deploy WAG/WAF in the real world, you should create an NSG for the WAG/WAF subnet and restrict the traffic to that subnet to what is just required for:

  • Health monitoring of the WAG/WAF
  • Application access from the authorised sources
  • Load balancing of the WAG/WAF instances

Everything else inbound will be blocked.

The NSG

Good NSG practice is as follows:

  1. Tiers of services are placed into their own subnet. Good news – the WAG/WAF requires a dedicated subnet.
  2. You should create an NSG just for the subnet – name the NSG after the VNet-Subnet, and maybe add a prefix or suffix of NSG to the name.

Health Monitoring

Azure will need to communicate with the WAG/WAF to determine the health of the backends – I know that this sounds weird, but it is what it is.

Note: You can view the health of your backend pool by opening the WAG/WAF and browsing to Monitoring > Backend Health. Each backend pool member will be listed here. If you have configured the NSG correctly then the pool member status should be “Healthy”, assuming that they are actually healthy. Otherwise, you will get a warning saying:

Unable to retrieve health status data. Check presence of NSG/UDR blocking access to ports 65503-65534 from Internet to Application Gateway.

OK – so you need to open those ports from “Internet”. Two questions arise:

  • Is this secure? Yes – Microsoft states here that these ports are “are protected (locked down) by Azure certificates. Without proper certificates, external entities, including the customers of those gateways, will not be able to initiate any changes on those endpoints”.
  • What if my WAG/WAF is internal and does not have a public IP address? You will still do this – remember that “Internet” is everything outside the virtual network and peered virtual networks. Azure will communicate with the WAG/WAF via the Azure fabric and you need to allow this communication that comes from an external source.

In my example, my WAF subnet CIDR is 10.0.2.4/24:

Application Traffic

Next, I need to allow application traffic. Remember that the NSG operates at the TCP/UDP level and has no idea of URLs – that’s the job of the WAG/WAF. I will use the NSG to define what TCP ports I am allowing into the WAG/WAF (such as TCP 443) and from what sources.

In my example, the WAF is for internal usage. Clients will connect to applications over a VPN/ExpressRoute connection. Here is a sample rule:

If this was an Internet-facing WAG or WAF, then the source service tag would be Internet. If other services in Azure need to connect to this WAG or WAF, then I would allow traffic from either Virtual Network or specific source CIDRs/addresses.

The Azure Load Balancer

To be honest, this one caught me out until I reasoned what the cause was. My next rule will deny all other traffic to the WAG/WAF subnet. Without this load balancer rule, the client could not connect to the WAG/WAF. That puzzled me, and searches led me nowhere useful. And then I realized:

  • A WAG/WAF is 1+ instances (2+ in v2), each consuming IP addresses in the subnet.
  • They are presented to clients as a single IP.
  • That single IP must be a load balancer
  • That load balancer needs to probe the load balancer’s own backend pool – which are the instance(s) of the WAG/WAF in this case

You might ask: isn’t there a default rule to allow a load balancer probe? Yes, it has priority 65001. But we will be putting in a rule at 4096 to prevent all connections, overriding the 65000 rule that allows everything from VirtualNetwork – which includes all subnets in the virtual network and all peered virtual networks.

The rule is simple enough:

Deny Everything Else

Now we will override the default NSG rules that allow all communications to the subnet from other subnets in the same VNet or peered VNets. This rule should have the lowest possible user-defined priority, which is 4096:

Why am I using the lowest possible priority? This is classic good firewall rule practice. General rules should be low priority, and specific rules should be high priority. The more general, the lower. The more specific, the higher. The most general rule we have in firewalls is “block everything we don’t allow”; in other words, we are creating a white list of exceptions with the previously mentioned rules.

The Results

You should end up with:

  • The health monitoring rule will allow Azure to check your WAG/WAF over a certificate-secured channel.
  • Your application rules will permit specified clients to connect to the WAG/WAF, via a hidden load balancer.
  • The load balancer can probe the WAG/WAF and forward client connections.
  • The low priority deny rule will block all other communications.

Job done!