Enabling DevSecOps with Azure Firewall

In this post, I will share how you can implement DevSecOps with Azure Firewall, with links to a bunch of working Bicep files to deploy the infrastructure-as-code (IaC) templates.

This example uses a “legacy” hub and spoke – one where the hub is VNet-based and not based on Azure Virtual WAN Hub. I’ll try to find some time to work on the code for that one.

The Concept

Hold on, because there’s a bunch of things to understand!

DevSecOps

The DevSecOps methodology is more than just IaC. It’s a combination of people, processes, and technology to enable a fail-fast agile delivery of workloads/applications to the business. I discussed here how DevSecOps can be used to remove the friction of IT to deliver on the promises of the Cloud.

The Azure features that this design is based on are discussed in concept here. The idea is that we want to enable Devs/Ops/Security to manage firewall rules in the workload’s Git repository (repo). This breaks the traditional model where the rules are located in a central location. The important thing is not the location of the rules, but the processes that manage the rules (change control through Git repo pull request reviews) and who (the reviewers, including the architects, firewall admins, security admins, etc).

So what we are doing is taking the firewall rules for the workload and placing them in with the workload’s code. NSG rules are probably already there. Now, we’re putting the Azure Firewall rules for the workload in the workload repo too. This is all made possible thanks to changes that were made to Azure Firewall Policy (Azure Firewall Manager) Rules Collection Groups – I use one Rules Collection Group for each workload and all the rules that enable that workload are placed in that Rules Collection Group. No changes will make it to the trunk branch (deployment action/pipelines look for changes here to trigger a deployment) without approval by all the necessary parties – this means that the firewall admins are still in control, but they don’t necessarily need to write the rules themselves … and the devs/operators might even write the rules, subject to review!

This is the killer reason to choose Azure Firewall over NVAs – the ability to not only deploy the firewall resource, but to manage the entire configuration and rule sets as code, and to break that all out in a controlled way to make the enterprise more agile.

Other Bits

If you’ve read my posts on Azure routing (How to Troubleshoot Azure Routing? and BGP with Microsoft Azure Virtual Networks & Firewalls) then you’ll understand that there’s more going on than just firewall rules. Packets won’t magically flow through your firewall just because it’s in the middle of your diagram!

The spoke or workload will also need to deploy:

  • A peering connection to the hub, enabling connectivity with the hub and the firewall. All traffic leaving the spoke will route through the firewall thanks to a user-defined route in the spoke subnet route table. Peering is a two-way connection. The workload will include some bicep to deploy the spoke-hub and the hub-spoke connections.
  • A route for the GatewaySubnet route table in the hub. This is required to route traffic to the spoke address prefix(es) through the Azure Firewall so on-premises>spoke traffic is correctly inspected and filtered by the firewall.

The IaC

In this section, I’ll explain the code layout and placement.

My Code

You can find my public repo, containing all the Bicep code here. Please feel free to download and use.

The Git Repo Design

You will have two Git repos:

  1. The first repo is for the hub. This repo will contain the code for the hub, including:
    • The hub VNet.
    • The Hub VNet Gateway.
    • The GatewaySubnet Route Table.
    • The Azure Firewall.
    • The Azure Firewall Policy that manages the Azure Firewall.
  2. The second repo is for the spoke. This skeleton example workload contains:

Action/Pipeline Permissions

I have written a more detailed update on this section, which can be found here

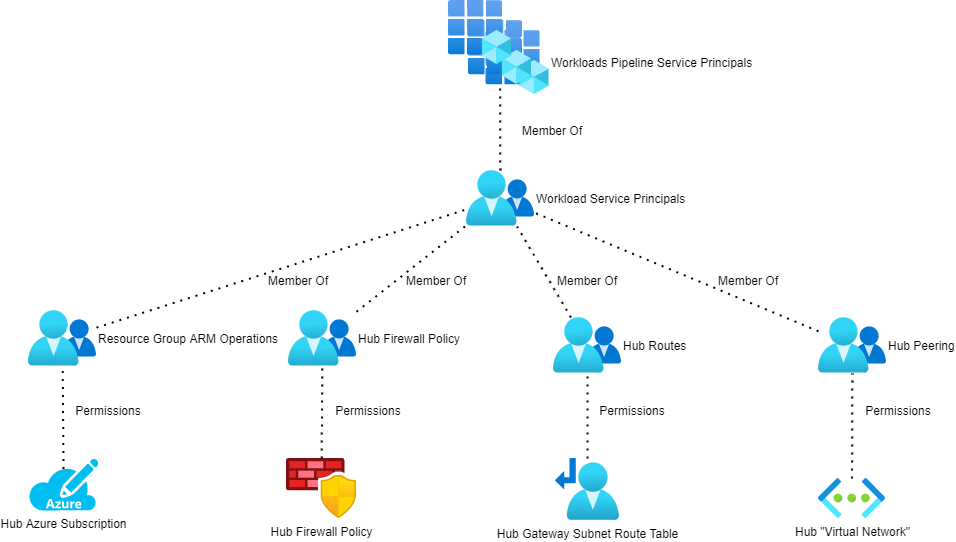
Each Git repo needs to authenticate with Azure to deploy/modify resources. Each repo should have a service principal in Azure AD. That service principal will be used to authenticate the deployment, executed by a GitHub action or a DevOps pipeline. You should restrict what rights the service principal will require. I haven’t worked out the exact minimum permissions, but the high-level requirements are documented below:


Trunk Branch Protection &  Pull Request

Some of you might be worried now – what’s to stop a developer/operator working on Workload A from accidentally creating rules that affect Workload X?

This is exactly why you implement standard practices on the Git repos:

  • Protect the Trunk branch: This means that no one can just update the version of the code that is deployed to your firewall or hub. If you want to create an updated, you have to create a branch of the trunk, make your edits in that trunk, and submit the changes to be merged into trunk as a pull request.
  • Enable pull request reviews: Select a panel of people that will review changes that are submitted as pull requests to the trunk. In our scenario, this should include the firewall admin(s), security admin(s), network admin(s), and maybe the platform & workload architects.

Now, I can only submit a suggested set of rules (and route/peering) changes that must be approved by the necessary people. I can still create my code without delay, but a change control and rollback process has taken control. Obviously, this means that there should be SLAs on the review/approval process and guidance on pull request, approval, and rejection actions.

And There You Have It

Now you have the design and the Bicep code to enable DevSecOps with Azure Firewall.

Azure Availability Zones in the Real World

I will discuss Azure’s availability zones feature in this post, sharing what they can offer for you and some of the things to be aware of.

Uptime Versus SLA

Noobs to hosting and cloud focus on three magic letters: S, L, A or service level agreement. This is a contractual promise that something will be running for a certain percentage of time in the billing period or the hosting/cloud vendor will credit or compensate the customer.

You’ll hear phrases like “three nines”, or “four nines” to express the measure of uptime. The first is a 99.9% measure, and the second is a 99.99% measure. Either is quite a high level of uptime. Azure does have SLAs for all sorts of things. For example, a service deployed in a valid virtual machine availability set has a connectivity (uptime) SLA of 99.9%.

Why did I talk about noobs? Promises are easy to make. I once worked for a hosting company that offers a ridiculous 100% SLA for everything, including cheap-ass generic Pentium “servers” from eBay with single IDE disks. 100% is an unachievable target because … let’s be real here … things break. Even systems with redundant components have downtime. I prefer to see realistic SLAs and honest statements on what you must do to get that guarantee.

Azure gives us those sorts of SLAs. For virtual machines we have:

  • 5% for machines with just Premium SSD disks
  • 9% for services running in a valid availability set
  • 99% for services running in multiple availability zones

Ah… let’s talk about that last one!

Availability Sets

First, we must discuss availability sets and what they are before we move one step higher. An availability set is anti-affinity, a feature of vSphere and in Hyper-V Failover Clustering (PowerShell or SCVMM); this is a label on a virtual machine that instructs the compute cluster to spread the virtual machines across different parts of the cluster. In Azure, virtual machines in the same availability set are placed into different:

  • Update domains: Avoiding downtime caused by (rare) host reboots for updates.
  • Fault domains: Enable services to remain operational despite hardware/software failure in a single rack.

The above solution spreads your machines around a single compute (Hyper-V) cluster, in a single room, in a single building. That’s amazing for on-premises, but there can still be an issue. Last summer, a faulty humidity sensor brought down one such room and affected a “small subset” of customers. “Small subset” is OK, unless you are included and some mission critical system was down for several hours. At that point, SLAs are meaningless – a refund for the lost runtime cost of a pair of Linux VMs running network appliance software won’t compensate for thousands or millions of Euros of lost business!

Availability Zones

We can go one step further by instructing Azure to deploy virtual machines into different availability zones. A single region can be made up of different physical locations with independent power and networking. These locations might be close together, as is typically the case in North Europe or West Europe. Or they might be on the other side of a city from each other, as is the case in some in North America. There is a low level of latency between the buildings, but this is still higher than that of a LAN connection.

A region that supports availability zones is split into 4 zones. You see three zones (round robin between customers), labeled as 1, 2, and 3. You can deploy many services across availability zones – this is improving:

  • VNet: Is software-defined so can cross all zones in a single region.
  • Virtual machines: Can connect to the same subnet/address space but be in different zones. They are not in availability sets but Azure still maintains service uptime during host patching/reboots.
  • Public IP Addresses: Standard IP supports anycast and can be used to NAT/load balance across zones in a single region.

Other network resources can work with availability zones in one of two ways:

  • Zonal: Instances are deployed to a specific zone, giving optimal latency performance within that zone, but can connect to all zones in the region.
  • Zone Redundant: Instances are spread across the zone for an active/active configuration.

Examples of the above are:

  • The zone-aware VNet gateways for VPN/ExpressRoute
  • Standard load balancer
  • WAGv2 / WAFv2

Considerations

There are some things to consider when looking at availability zones.

  • Regions: The list of regions that supports availability zones is increasing slowly but it is far from complete. Some regions will not offer this highest level of availability.
  • Catchup: Not every service in Azure is aware of availability zones, but this is changing.

Let me give you two examples. The first is VM Boot Diagnostics, a service that I consider critical for seeing the console of the VM and getting serial console access without a network connection to the virtual machine. Boot Diagnostics uses an agent in the VM to write to a storage account. That storage account can be:

  • LRS: 3 replicas reside in a single compute cluster, in a single room, in a single building (availability zone).
  • GRS: LRS plus 3 asynchronous replicas in the paired region, that are not available for write unless Microsoft declares a total disaster for the primary region.

So, if I have a VM in zone 1 and a VM in zone 2, and both write to a storage account that happens to be in zone 1 (I have no control over the storage account location), and zone 1 goes down, there will be issues with the VM in zone 2. The solution would be to use ZRS GPv2 storage for Boot Diagnostics, however, the agent will not support this type of storage configuration. Gotcha!

Azure Advisor will also be a pain in the ass. Noobs are told to rely on Advisor (it is several questions in the new Azure infrastructure exams) for configuration and deployment advice. Advisor will see the above two VMs as being not highly available because they are not (and cannot) be in a common availability set, so you are advised to degrade their SLA by migrating them to a single zone for an availability set configuration – ignore that advice and be prepared to defend the decision from Azure noobs, such as management, auditors, and ill-informed consultants.

Opinion

Availability zones are important – I use them in an architecture pattern that I am working on with several customers. But you need to be aware of what they offer and how certain things do not understand them yet or do not support them yet.


How to Troubleshoot Azure Routing?

This post will explain how routing works in Microsoft Azure, and how to troubleshoot your routing issues with Route Tables, BGP, and User-Defined Routes in your virtual network (VNet) subnets and virtual (firewall) appliances/Azure Firewall.

Software-Defined Networking

Right now, you need to forget VLANs, and how routers, bridges, routing switches, and all that crap works in the physical network. Some theory is good, but the practice … that dies here.

Azure networking is software-defined (VXLAN). When a VM sends a packet out to the network, the Azure Fabric takes over as soon as the packet hits the virtual NIC. That same concept extends to any virtual network-capable Azure service. From your point of view, a memory copy happens from source NIC to destination NIC. Yes; under the covers there is an Azure backbone with a “more physical” implementation but that is irrelevant because you have no influence over it.

So always keep this in mind: network transport in Azure is basically a memory copy. We can, however, influence the routing of that memory copy by adding hops to it.

Understand the Basics

When you create a VNet, it will have 1 or more subnets. By default, each subnet will have system routes. The first ones are simple, and I’ll make it even more simple:

  • Route directly via the default gateway to the destination if it’s in the same supernet, e.g. 10.0.0.0/8
  • Route directly to Internet if it’s in 0.0.0.0/0

By the way, the only way to see system routes is to open a NIC in the subnet, and click Effective Routes under Support & Troubleshooting. I have asked that this is revealed in a subnet – not all VNet-connected services have NICs!

And also, by the way, you cannot ping the subnet default gateway because it is not an appliance; it is a software-defined function that is there to keep the guest OS sane … and probably for us too 😊

When you peer a VNet with another VNet, you do a few things, including:

  • Instructing VXLAN to extend the plumbing of between the peered VNets
  • Extending the “VirtualNetwork” NSG rule security tag to include the peered neighbour
  • Create a new system route for peering.

The result is that VMs in VNet1 will send packets directly to VMs in VNet2 as if they were in the same VNet.

When you create a VNet gateway (let’s leave BGP for later) and create a load network connection, you create another (set of) system routes for the virtual network gateway. The local address space(s) will be added as destinations that are tunnelled via the gateway. The result is that packets to/from the on-prem network will route directly through the gateway … even across a peered connection if you have set up the hub/spoke peering connections correctly.

Let’s add BGP to the mix. If I enable ExpressRoute or a BGP-VPN, then my on-prem network will advertise routes to my gateway. These routes will be added to my existing subnets in the gateway’s VNet. The result is that the VNet is told to route to those advertised destinations via the gateway (VPN or ExpressRoute).

If I have peered the gateway’s VNet with other VNets, the default behaviour is that the BGP routes will propagate out. That means that the peered VNets learn about the on-premises destinations that have been advertised to the gateway, and thus know to route to those destinations via the gateway.

And let’s stop there for a moment.

Route Priority

We now have 2 kinds of route in play – there will be a third. Let’s say there is a system route for 172.16.0.0/16 that routes to virtual network. In other words, just “find the destination in this VNet”. Now, let’s say BGP advertises a route from on-premises through the gateway that is also for 172.16.0.0/16.

We have two routes for the 172.16.0.0/16 destination:

  • System
  • BGP

Azure looks at routes that clash like above and deactivates one of them. Azure always ranks BGP above System. So, in our case, the System route for 172.16.0.0/16 will be deactivated and no longer used. The BGP route for 172.16.0.0/16 via the VNet gateway will remain active and will be used.

Specificity

Try saying that word 5 times in a row after 5 drinks!

The most specific route will be chosen. In other words, the route with the best match for your destination is selected by the Azure fabric. Let’s say that I have two active routes:

  1. 16.0.0/16 via X
  2. 16.1.0/24 via Y

Now, let’s say that I want to send a packet to 172.16.1.4. Which route will be chosen? Route A is a 16 bit match (172.16.*.*). Route B is a 24 bit match (172.16.1.*). Route B is a closer match so it is chosen.

Now add a scenario where you want to send a packet to 172.16.2.4. At this point, the only match is Route A. Route B is not a match at all.

This helps explain an interesting thing that can happen in Azure routing. If you create a generic rule for the 0.0.0.0/0 destination it will only impact routing to destinations outside of the virtual network – assuming you are using the private address spaces in your VNet. The subnets have system routes for the 3 private address spaces which will be more specific than 0.0.0.0:

  1. 168.0.0/16
  2. 16.0.0/12
  3. 0.0.0/8
  4. 0.0.0/0

If your VNet address space is 10.1.0.0/16 and you are trying to send a packet from subnet 1 (10.1.1.0/24) to subnet 2 (10.1.2.0/24), then the generic Route D will always be less specific than the system route, Route C.

Route Tables

A route table resource allows us to manage the routing of a subnet. Good practice is that if you need to manage routing then:

  • Create a route table for the subnet
  • Name the route table after the VNet/subnet
  • Only use a route table with 1 subnet

The first thing to know about route tables is that you can control BGP propagation with them. This is especially useful when:

  • You have peered virtual networks using a hub gateway
  • You want to control how packets get to that gateway and the destination.

The default is that BGP propagation is allowed over a peering connection to the spoke. In the route table (Settings > Configuration) you can disable this propagation so the BGP routes are never copied from the hub network (with the VNet gateway) to the peered spoke VNet’s subnets.

The second thing about route tables is that they allow us to create user-defined routes (UDRs).

User-Defined Routes

You can control the flow of packets using user-defined routes. Note that UDRs outrank BGP routes and System Routes:

  1. UDR
  2. BGP routes
  3. System routes

If I have a system or BGO route to get to 192.168.1.0/24 via some unwanted path, I can add a UDR to 192.168.1.0/24 via the desired path. If the two routes are identical destination matches, then my UDR will be active and the BGP/system route will be deactivated.

Troubleshooting Tools

The traditional tool you might have used is TRACERT. I’m sorry, it has some use, but it’s really not much more than PING. In the software defined world, the default gateway isn’t a device with a hop, the peering connection doesn’t have a hop, and TRACERT is not as useful as it would have been on-premises.

The first thing you need is the above knowledge. That really helps with everything else.

Next, make sure your NSGs aren’t the problem, not your routing!

Next is the NIC, if you are dealing with virtual machines. Go to Effective Routes and look at what is listed, what is active and what is not.

Network Watcher has a couple of tools you should also look at:

  • Next Hop: This is a pretty simple tool that tells you the next “appliance” that will process packets on the journey to your destination, based on the actual routing discovered.
  • Connection Troubleshoot: You can send a packet from a source (VM NIC or Application Gateway) to a certain destination. The results will map the path taken and the result.

The tools won’t tell you why a routing plan failed, but with the above information, you can troubleshoot a (desired) network path.

Locking Down Network Access to the Azure Application Gateway/Firewall

In this post, I will explain how you can use a Network Security Group (NSG) to completely lock down network access to the subnet that contains an Azure Web Application Gateway (WAG)/Web Application Firewall (WAF).

The stops are as follows:

  1. Deploy a WAG/WAF to a dedicated subnet.
  2. Create a Network Security Group (NSG) for the subnet.
  3. Associate the NSG with the subnet.
  4. Create an inbound rule to allow TCP 65503-65534 from the Internet service tag to the CIDR address of the WAG/WAF subnet.
  5. Create rules to allow application traffic, such as TCP 443 or TCP 80, from your sources to the CIDR address of the WAG/WAF
  6. Create a low priority (4000) rule to allow any protocol/port from the AzureLoadBlanacer service tag to the CIDR address of the WAG/WAF
  7. Create a rule, with the lowest priority (4096) to Deny All from Any source.

The Scenario

It is easy to stand up a WAG/WAF in Azure and get it up and running. But in the real world, you should lock down network access. In the world of Azure, all network security begins with an NSG. When you deploy WAG/WAF in the real world, you should create an NSG for the WAG/WAF subnet and restrict the traffic to that subnet to what is just required for:

  • Health monitoring of the WAG/WAF
  • Application access from the authorised sources
  • Load balancing of the WAG/WAF instances

Everything else inbound will be blocked.

The NSG

Good NSG practice is as follows:

  1. Tiers of services are placed into their own subnet. Good news – the WAG/WAF requires a dedicated subnet.
  2. You should create an NSG just for the subnet – name the NSG after the VNet-Subnet, and maybe add a prefix or suffix of NSG to the name.

Health Monitoring

Azure will need to communicate with the WAG/WAF to determine the health of the backends – I know that this sounds weird, but it is what it is.

Note: You can view the health of your backend pool by opening the WAG/WAF and browsing to Monitoring > Backend Health. Each backend pool member will be listed here. If you have configured the NSG correctly then the pool member status should be “Healthy”, assuming that they are actually healthy. Otherwise, you will get a warning saying:

Unable to retrieve health status data. Check presence of NSG/UDR blocking access to ports 65503-65534 from Internet to Application Gateway.

OK – so you need to open those ports from “Internet”. Two questions arise:

  • Is this secure? Yes – Microsoft states here that these ports are “are protected (locked down) by Azure certificates. Without proper certificates, external entities, including the customers of those gateways, will not be able to initiate any changes on those endpoints”.
  • What if my WAG/WAF is internal and does not have a public IP address? You will still do this – remember that “Internet” is everything outside the virtual network and peered virtual networks. Azure will communicate with the WAG/WAF via the Azure fabric and you need to allow this communication that comes from an external source.

In my example, my WAF subnet CIDR is 10.0.2.4/24:

Application Traffic

Next, I need to allow application traffic. Remember that the NSG operates at the TCP/UDP level and has no idea of URLs – that’s the job of the WAG/WAF. I will use the NSG to define what TCP ports I am allowing into the WAG/WAF (such as TCP 443) and from what sources.

In my example, the WAF is for internal usage. Clients will connect to applications over a VPN/ExpressRoute connection. Here is a sample rule:

If this was an Internet-facing WAG or WAF, then the source service tag would be Internet. If other services in Azure need to connect to this WAG or WAF, then I would allow traffic from either Virtual Network or specific source CIDRs/addresses.

The Azure Load Balancer

To be honest, this one caught me out until I reasoned what the cause was. My next rule will deny all other traffic to the WAG/WAF subnet. Without this load balancer rule, the client could not connect to the WAG/WAF. That puzzled me, and searches led me nowhere useful. And then I realized:

  • A WAG/WAF is 1+ instances (2+ in v2), each consuming IP addresses in the subnet.
  • They are presented to clients as a single IP.
  • That single IP must be a load balancer
  • That load balancer needs to probe the load balancer’s own backend pool – which are the instance(s) of the WAG/WAF in this case

You might ask: isn’t there a default rule to allow a load balancer probe? Yes, it has priority 65001. But we will be putting in a rule at 4096 to prevent all connections, overriding the 65000 rule that allows everything from VirtualNetwork – which includes all subnets in the virtual network and all peered virtual networks.

The rule is simple enough:

Deny Everything Else

Now we will override the default NSG rules that allow all communications to the subnet from other subnets in the same VNet or peered VNets. This rule should have the lowest possible user-defined priority, which is 4096:

Why am I using the lowest possible priority? This is classic good firewall rule practice. General rules should be low priority, and specific rules should be high priority. The more general, the lower. The more specific, the higher. The most general rule we have in firewalls is “block everything we don’t allow”; in other words, we are creating a white list of exceptions with the previously mentioned rules.

The Results

You should end up with:

  • The health monitoring rule will allow Azure to check your WAG/WAF over a certificate-secured channel.
  • Your application rules will permit specified clients to connect to the WAG/WAF, via a hidden load balancer.
  • The load balancer can probe the WAG/WAF and forward client connections.
  • The low priority deny rule will block all other communications.

Job done!


Why Choose the Azure Firewall over a Virtual Firewall Appliance?

In this post, I will explain why you should choose Azure Firewall over third-party firewall network virtual appliances (NVAs) from the likes of Cisco, Palo Alto, Check Point, and so on.

Microsoft’s Opinion

Microsoft has a partner-friendly line on Azure Firewall versus third-parties. Microsoft says that third-party solutions offer more than Azure Firewall. If you want you can use them side-by-side.

Now that’s out of the way, let me be blunt … like I’d be anything else! 😊

The NVA Promise

At their base, a firewall blocks or allows TCP/UDP/etc and does NAT. Some firewalls offer a “security bundle” of extra features such as:

  • Malware scanning based on network patterns
  • Download scanning, including zero-days (detonation chamber)
  • Browser URL logging & filtering

But those cool things either make no sense in Azure or are just not available from the NVA vendors in their cloud appliances. So what you are left with is central logging and filtering.

Documentation

With the exception of Palo Alto (their whitepaper for Azure is very good – not perfect) and maybe Check Point, the vendors have pretty awful documentation. I’ve been reading a certain data centre mainstay’s documents this week and they are incomplete and rubbish.

Understanding of Azure

It’s quite clear that some of the vendors are clueless about The Cloud and/or Azure. Every single vendor has written docs about deploying everything into a single VNet – if you can afford NVAs then you are not putting all your VMs into a single VNet (see hub & spoke VNet peering). Some have never heard of availability zones – if you can afford NVAs then you want as high an SLA as you can get. Most do not offer scale-out (active/active clusters) – so a single VM becomes your bottleneck on VM performance (3000 Mbps in a D3_v2). Some don’t even support highly available firewall clusters – so a single VM becomes the single point of failure in your entire cloud network! And their lack of documentation or understanding of VNet peering or route tables in a large cloud deployment is laughable.

The Comparison

So, what I’m getting at is that the third-party NVAs suck. Azure Firewall isn’t perfect either, but it’s a true cloud platform service and it is improving fast – just last night Microsoft announced Threat Intelligence-Based Filtering and Service Tags Filtering (this appeared recently). I know more things are on the way too 😊

Here is my breakdown of how Azure Firewall stacks up against firewall NVAs:

Azure Firewall NVA
Deployment Platform Linux VM + Software
Licensing Consumption: instance + GB Linux VM + Software
Scaling Automatic Add VMs + Software
Ownership Set & monitor Manage VM / OS / Software
Layer -7 Logging & filtering Potentially* deep inspection
Networking 1 subnet & PIP 1+ subnets & 1 PIP
Complexity Simple Difficult

I know: you laugh when you hear “Microsoft” and “Firewall” in the same sentence. You think of ISA Server. Azure Firewall is different. This is baked into the fabric of Azure, the strategic future of Microsoft. It is already rapidly improving, and it does more than the third parties.

Heck, what does the third-party offer compared to NSGs? NSGs filter TCP/UDP, they can log to a storage account, you can centrally log using Event Hubs, and does advanced reporting/analysis using NSG Flo Logs with Azure Monitor Logs (Log Analytics). Azure Firewall takes that another step with a hub deployment, an understanding of HTTP/S, and is now using machine learning for dynamic threat prevention!

My Opinion

Some people will always prefer a non-Microsoft firewall. But my counter would be, what are you getting that is superior – really? With Azure Firewall, I create a firewall, set my rules, configure my logging, and I’m done. Azure Firewall scales and it is highly available. Logging can be done to storage accounts, event hubs (SIEM), and Azure Monitor Logs. And here’s the best bit … it is SIMPLE to deploy and there is almost no cost of ownership. Compare that to some of the HACK solutions from the NVA vendors and you’d laugh.

The Azure Firewall was designed for The Cloud. It was designed for the way that Azure works. And it was designed for how we should use The Cloud … at scale. And that scale isn’t just about Mbps, but in terms of backend services and networks. From what I have seen so far, the same cannot be said for firewall NVAs. For me, the decision is easy: Azure Firewall. Every time.

Cannot Create a Basic Tier Virtual Network Gateway in Azure

There is a bug in the Azure Portal that prevents you from selecting a virtual network when you pick the Basic Tier of the virtual network gateway, and you are forced into selecting the more expensive VpnGw1. I’ll show you how to workaround this bug in this post.

Background

I recently ran a hands-on Azure class in London. Part of the class required deploying & configuring a VPN gateway in the West Europe region. I always use the Basic tier because:

  • It’s cheaper – $26.79 for Basic versus $141.36 for VpnGw1 per month
  • That’s what most (by a long shot) of my customers deploy in production because it meets their needs.

I’ve had a customer in Northern Ireland report the same problem in North Europe.

The process goes like this:

  1. You select VPN gateway type
  2. Select Route-Based
  3. Select Basic as the SKU
  4. Then you attempt to select the virtual network that you want to use – it already has a gateway subnet
  5. You cannot continue because the virtual network is greyed out

image

The error shown is:

The following issues must be fixed to use this virtual network: The VPN gateway cannot have a basic SKU in order for it to coexist with an existing ExpressRoute gateway.

In all cases so far, the subscriptions have been either brand new CSP/trial subscriptions with no previous resources, or my lab subscription where I’ve used a new virtual network to demonstrate this scenario – and I have never deployed ExpressRoute in any subscription.

Workaround

Credit where credit is due – some of my attendees last week figured out how to beat the UI bug.

  1. Close the Choose Virtual Network blade if it is open.
  2. Select the VpnGw1 tier gateway in the Create Virtual Network Gateway blade – don’t worry, you won’t be creating it if you don’t want to pay the price.
  3. Click Choose A Virtual Network
  4. Select your virtual network
  5. Change the SKU of the gateway back to Basic
  6. Finish the wizard

image

I know – it’s a daft UI bug, but the above workaround works.