When To Add Subnets To An Azure Virtual Network

In this post, I want to explain the real reasons to add subnets to an Azure virtual network. This post is born out of frustration. I’ve seen post after post on social media, particularly on LinkedIn, where the poster has “Azure expert” in their description, and sharing advice from the year 2002 for cable-oriented (on-prem) networks.

The BS Advice

Consider the scenario below:

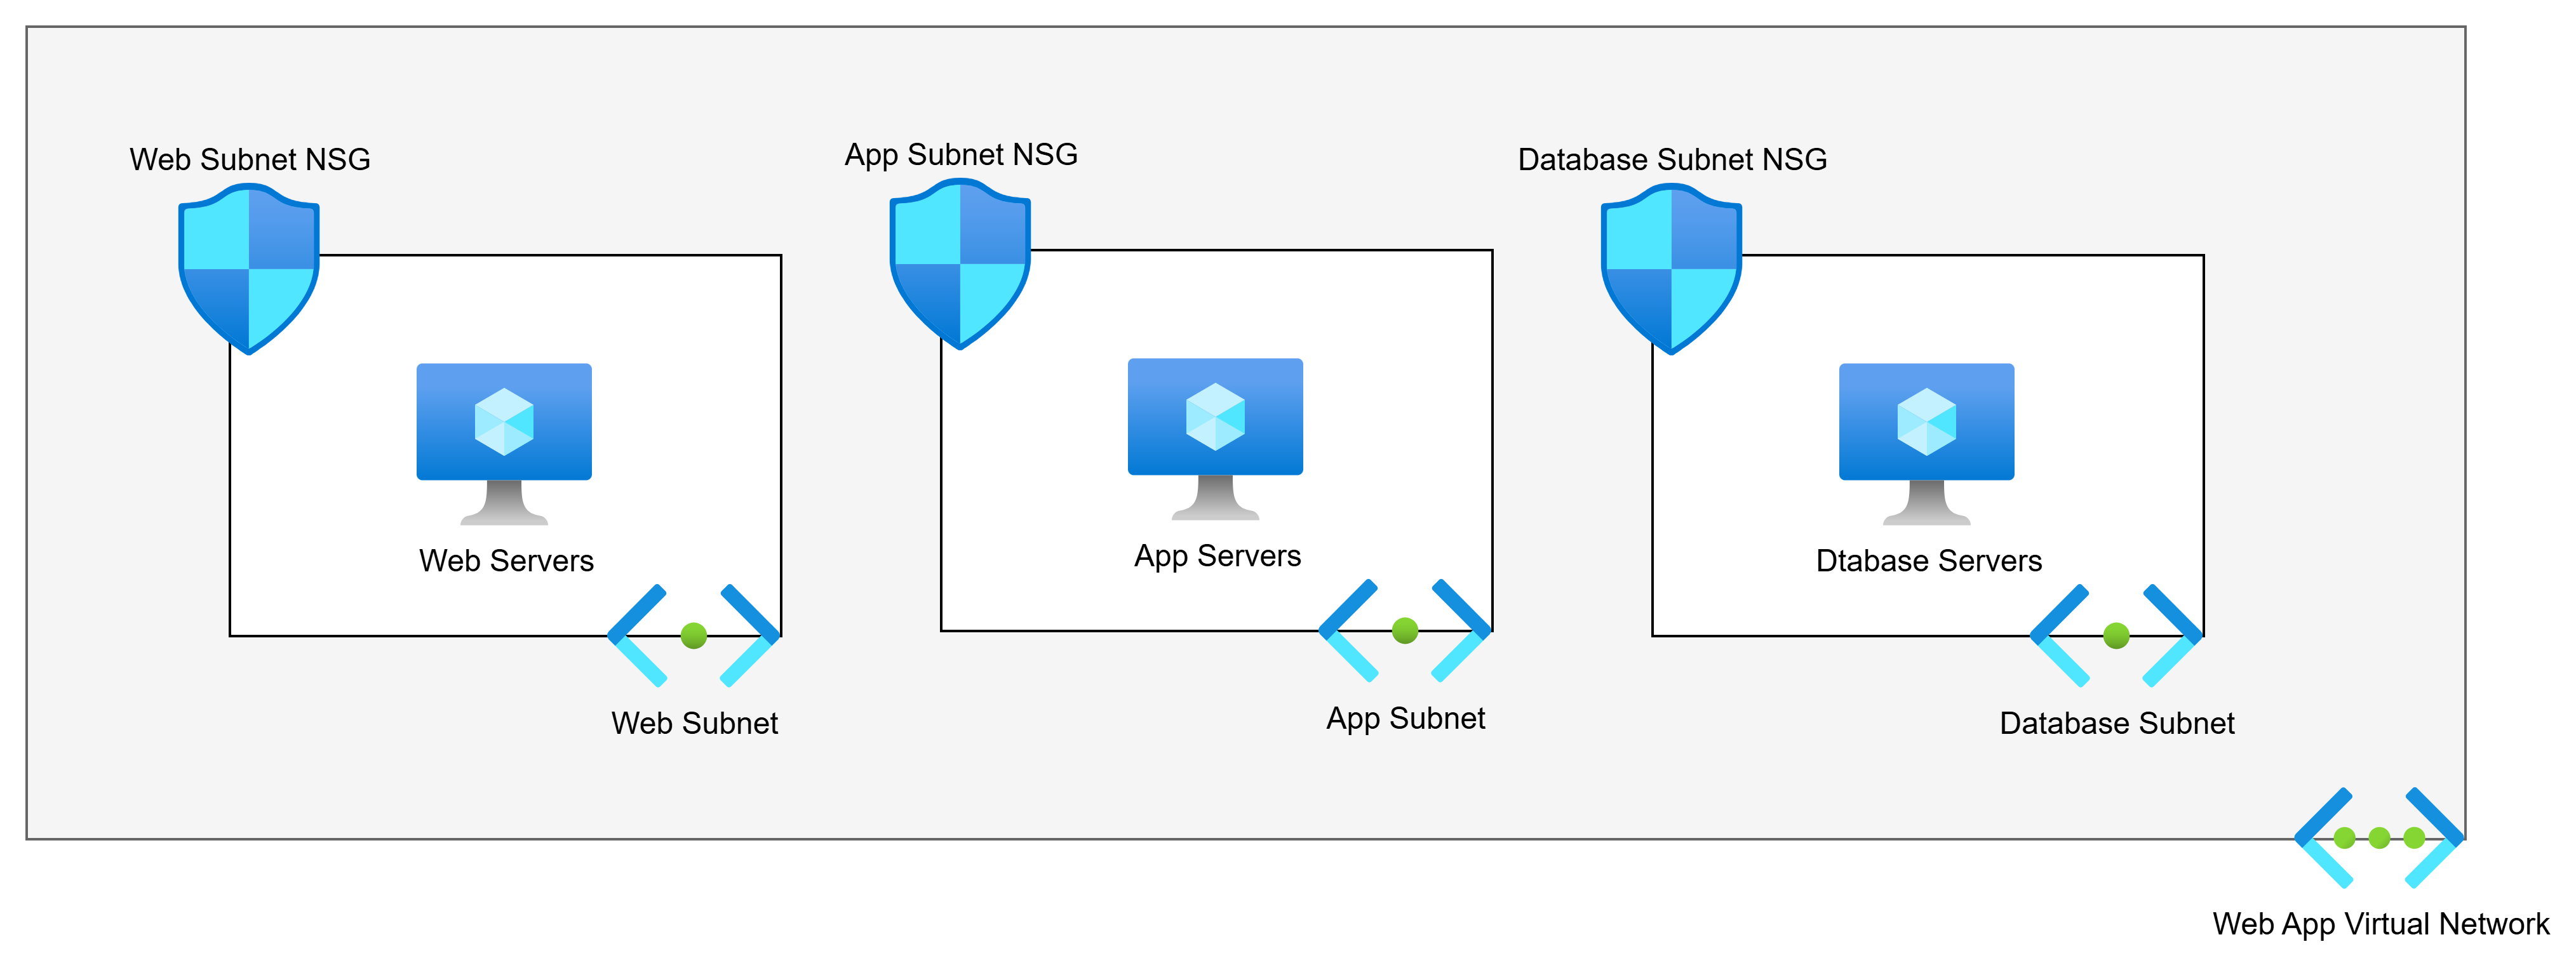
The above diagram shows us the commonly advised Virtual Network architecture for a 3-tier web app. There are 3 tiers. The poster will say:

Each tier should have its own subnet for security reasons. Each subnet will have an NSG.

So if we have web servers, app servers, and database servers, the logic is that the subnet + NSG combination provides security. The poster is half right:

  • The NSG does micro-segmentation of the machines.
  • The subnets do nothing.

Back To The Basics … Again

I want you to do this:

  1. Build a VNet with 2 subnets.
  2. Build 2 VMs, each attached to a different subnet.
  3. Log into one of the VMs.
  4. Run tracert to the second VM.

What will you see? The next and only hop is the second VM.

Ping the default gateway. What happens? Timeouts. The default gateway does not exist.

This is easily explained: Virtual Networks do not exist. Subnets do not exist.

Think of a Virtual Network as a Venn diagram. Our two virtual machines are in the same circle. That is an instruction to the Azure fabric to say:

These machines are permitted to route to each other

That’s how Coca-Cola and PepsiCo could both have Virtual Networks with overlapping address spaces in the same Azure room and not be able to talk to each other.

Note: This is functionality of VXLAN implemented through the Hyper-V switch extension capability that was introduced in Windows Server 2012.

Simple Example

Let us fix that simple example. We will first understand that NSGs offer segmentation. No matter how I associate an NSG, the rules are always applied on the host virtual switch port (in Hyper-V, that’s on the NIC). If a rule says “no” then that packet is automatically dropped. If a rule says “yes”, then the packet is permitted.

In the diagram below, we accept that subnets play no role in security segmentation. We have flattened the network to a single subnet. There is a single web server, app server, and database server – we will add complexity later:

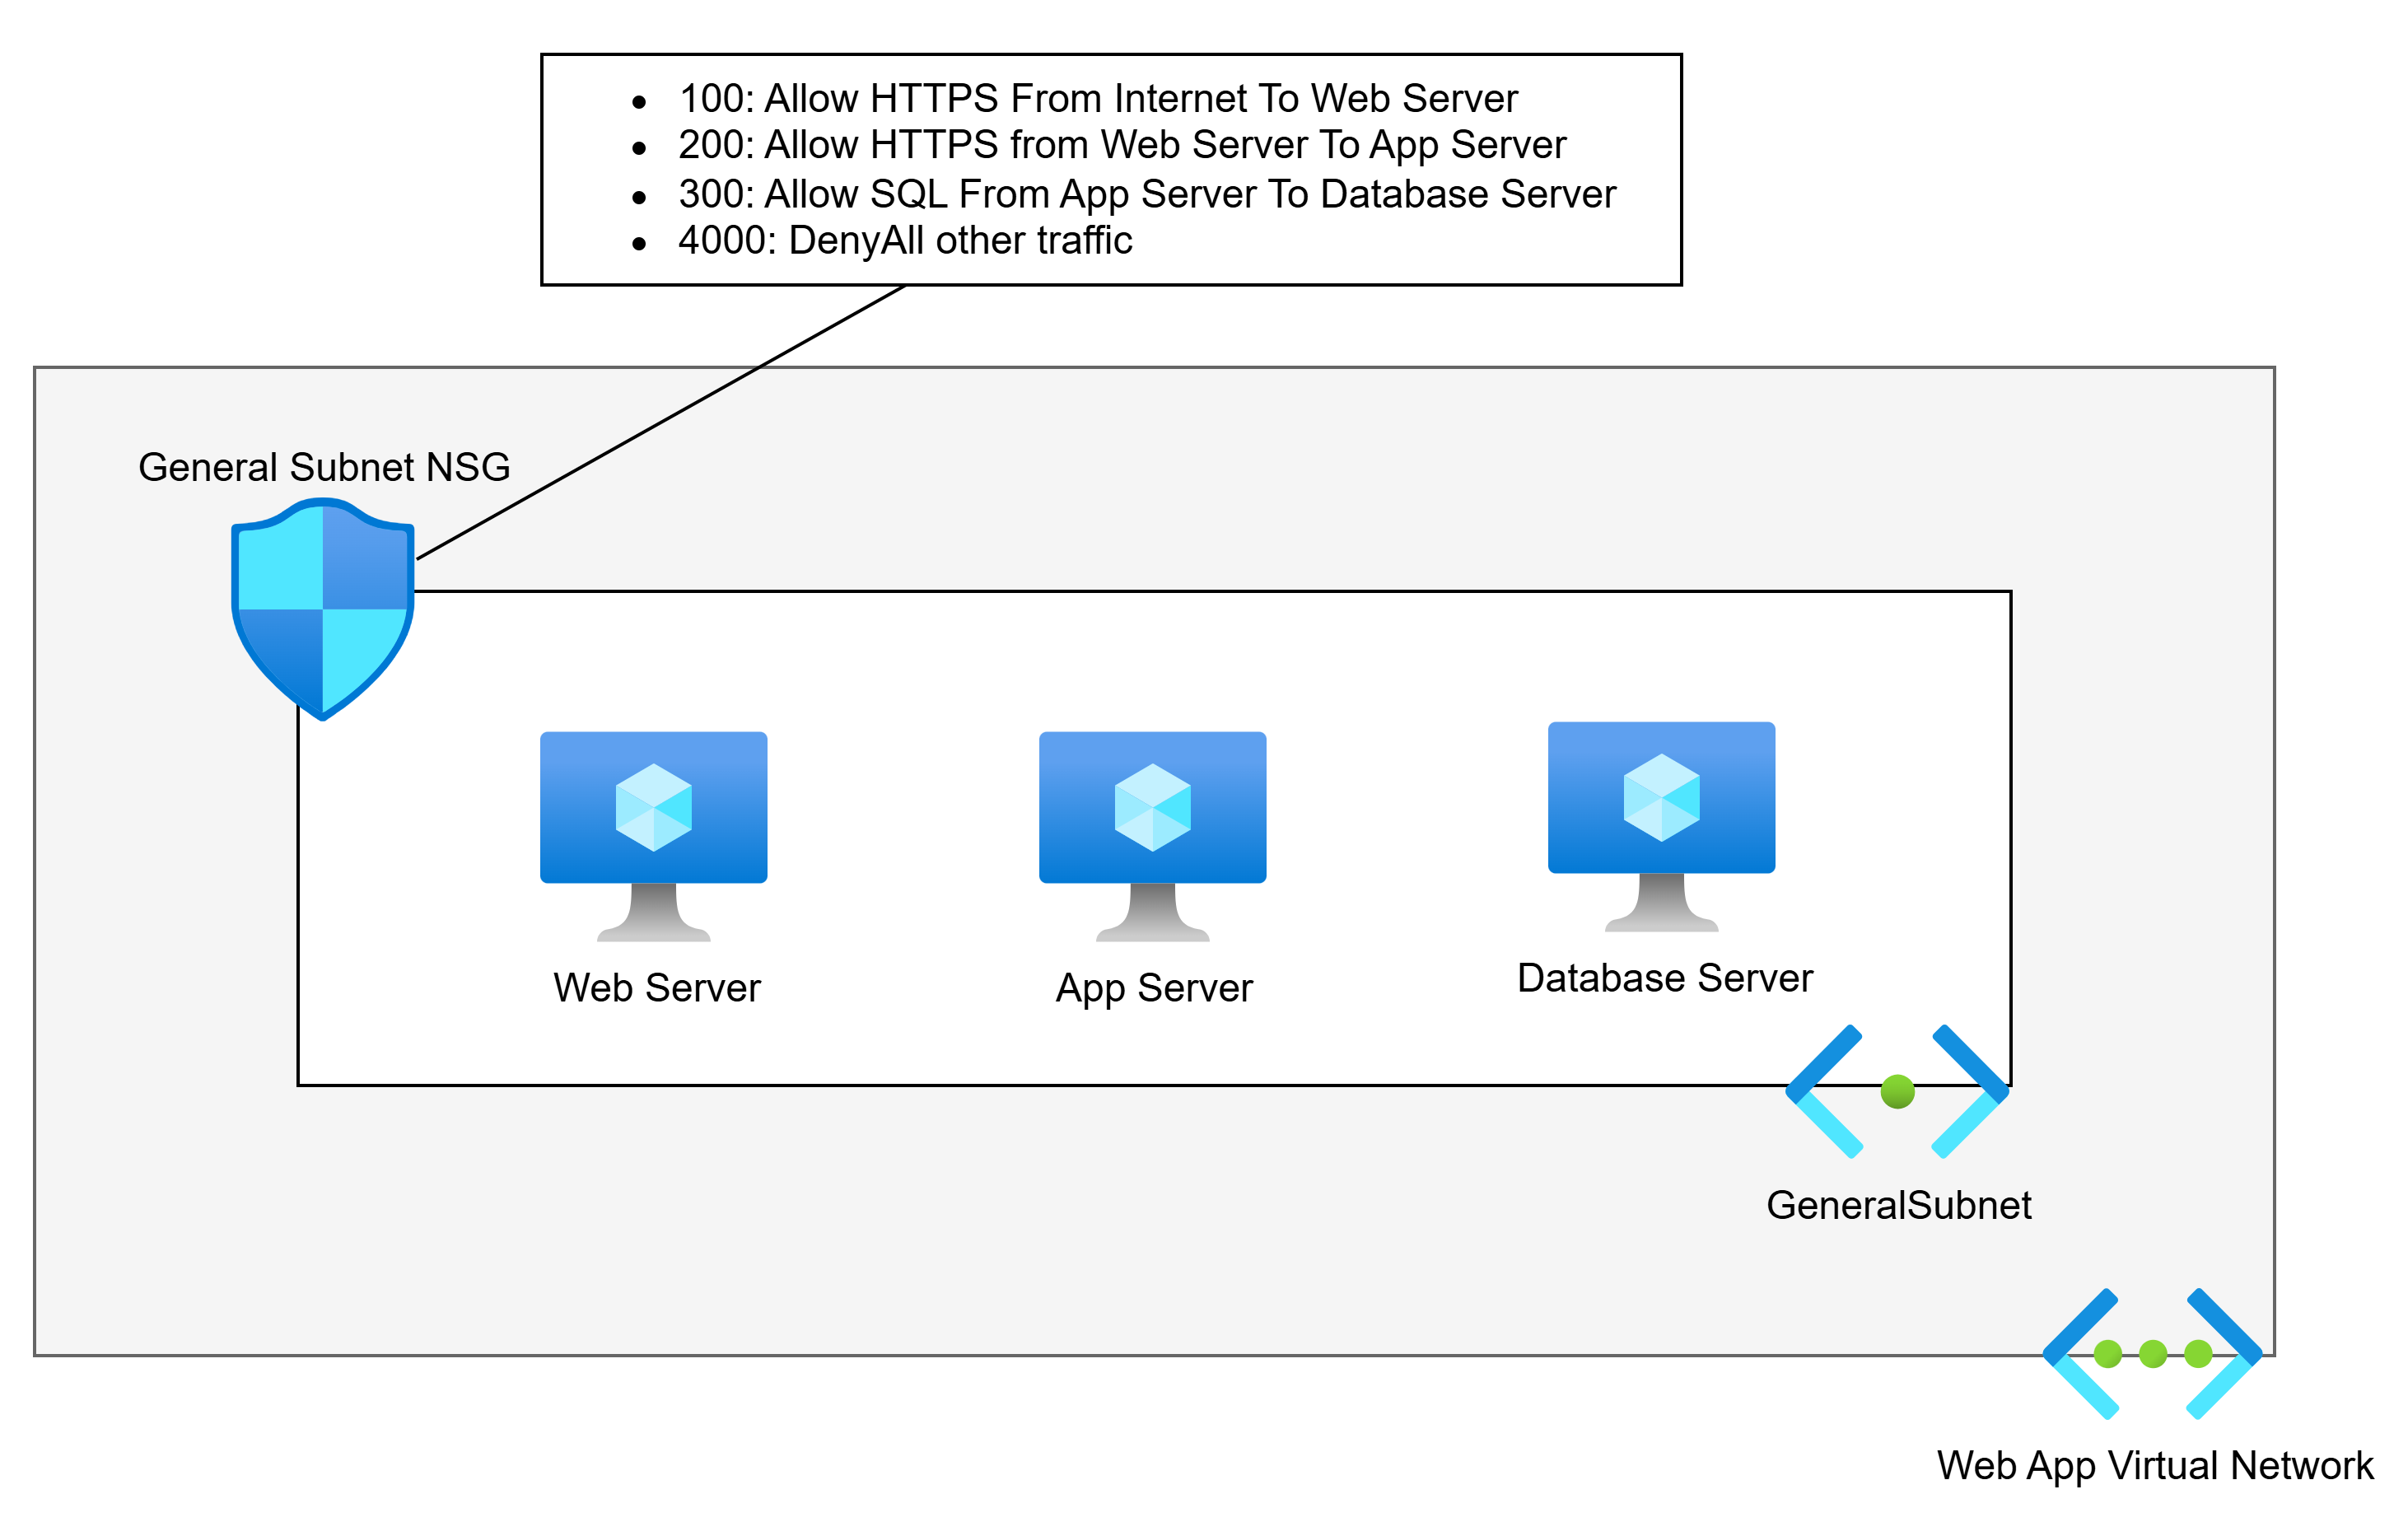
This network is much simpler, right? And it offers no less security than the needlessly more complicated first example. An NSG is associated with the subnet. NSG rules allow the required traffic, and a low-priority rule denies all other traffic. Only the permitted traffic can enter any specific NIC.

I’ve seen arguments that this will create complicated rules. Pah! I’ve built/migrated more apps than I care to remember. The rules for these apps are hardly ever that numerous.

Aidan, what if I am going to run a highly available application? Lucky for you if the code supports that (seriously!). Whether you’re using availability sets or availability zones (lucky you, these days), we will make a tiny design change.

We will create a (free) Application Security Group (ASG) for each tier. We will then use the ASG as the source and destination instead of the VM IP addresses.

Aidan, what if I’m going to use Virtual Machine Scale Sets (VMSS)? It’s no different: you add the ASG for the tier to the networking properties of the VMSS. Each created VMSS instance will automatically be associated with the ASG.

When Should I Add Subnets?

There are several reasons why you should add subnets. I’ll list them first before I demonstrate them:

  • Azure requires it
  • Unique routing
  • Remote network sources
  • Scaling

Azure Requires It

There are scenarios when Azure requires a dedicated subnet. Some that I can immediately think of are:

  • Virtual Network Gateway
  • Azure Route Server
  • SQL Managed Instance (MI)
  • App Service Regional Virtual Network Integration
  • App Service Environment (ASE – App Service Isolated Tier) VNet injection

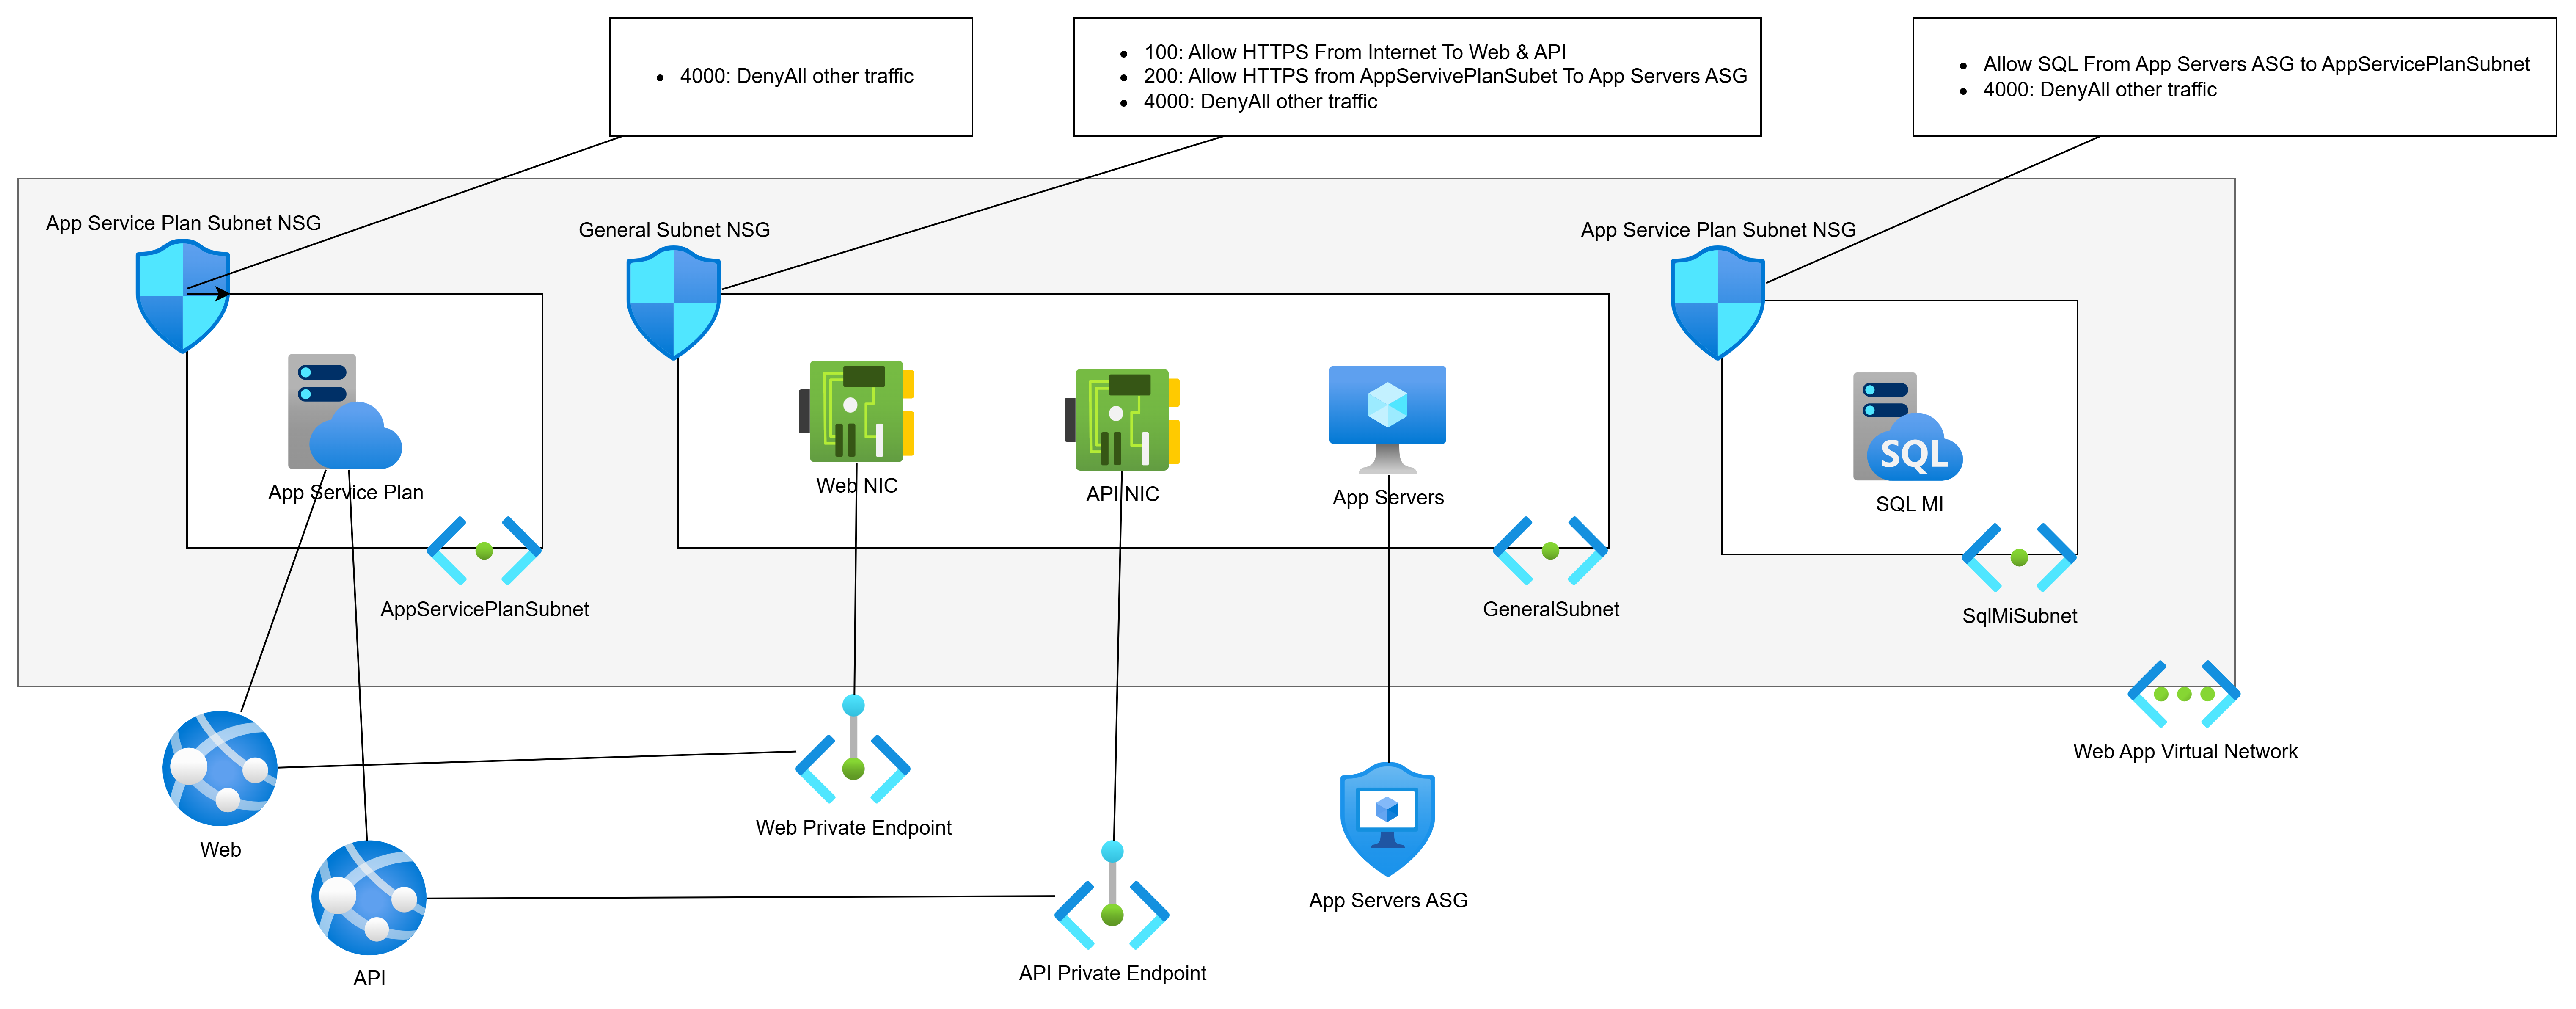
Let’s PaaS-ify the developers (see what I did there :D) and move from VMs to PaaS. We will replace the web servers with App Services and the database with SQL MI:

  • The web servers ran two apps, Web and API. Each will have a Private Endpoint for ingress traffic. The Private Endpoints can remain in the General Subnet.
  • The web servers must talk to the app servers (still VMs) over the VNet, so they will get Regional VNet Integration via the App Service Plan. This will require a dedicated subnet for egress only. This subnet will have no ingress.
  • SQL MI requires a dedicated subnet.

Unique Routing

Next-hop routing is always executed by the source Azure NIC. Every subnet has a collective set of routes to destination prefixes (network addresses). Those routes are propagated to the NICs in that subnet (subnets do not exist). The NICs decide the next hop for each packet, and the Azure network fabric sends the packet (by VXLAN) directly to the NIC of the next hop

There may be a situation where you want to customise routing.

For the sake of consistency, I’m going to use our web app, but in a little wonky way. My app is expanding. Some more VMs are being added for custom processing. Those VMs are being added to the GeneralSubnet.

My wonky scenario is that the security team have decided that traffic from the App Servers to the SQL VM must go through a firewall – that implies that the return traffic must also go through the firewall. No other traffic inside the app needs to go through the firewall. The firewall is deployed in a peered hub.

That means that I must split the GeneralSubnet into two source routing domains (subnets):

  1. GeneralSubnet: Containing the Private Endpoint NICs and my new custom processing VMs.
  2. AppServerSubnet: Containing only the app server VMs.

We will implement the desired via-firewall routing using User-Defined Routes in Route Tables:

  • AppServerSubnet: Go via the hub firewall to get to SqlMiSubnet.
  • SqlMiSubnet: Go via the hub firewall to get to AppServerSunet.

Remote Network Sources

So far, we have been using Application Security Groups (ASGs) to abstract IP addresses in our NSGs. ASGs are great, but they have restrictions:

  • Firewalls, including Azure Firewall, have no idea what an ASG is. You will have to use IP addresses as the sources in the firewall rules – possibly abstracted as IP Groups (Azure Firewall) or similar in third-party firewalls.
  • ASGs can only be used inside their parent subscription. You’re not going to be able to use them as sources in other workloads if you follow the subscription/workload approach of application landing zones.

Using an IP address(es) as a source is OK if the workload does not autoscale. What happens if your app tier/role uses autoscaling and addresses are mixed with addresses from other tiers/roles that should not have access to a remote resource?

There is only one way to solve this: break the source resource(s) out into their own subnet. I recently saw this one with a multi-subscription workload where there was going to be an Azure-hosted DevOps agent pool. Originally, the autoscaling pool was going to share a subnet with other VMs. However, I needed to grant HTTPS access to the DevOps pool only to all other resources. I couldn’t do that if the DevOps pool remained in a shared subnet. I split the pool into its own subnet and was able to use that subnet’s prefix as the source in the various firewall/NSG rules.

Scaling

There are two scaling scenarios that I can think of at the moment. You will have some workload component that will autoscale. The autoscaling role/tier requires a large number of IPs that you want to dedicate to that role/tier. In this case, yes, you may dedicate a subnet to that role/tier.

The second scenario is that you have followed a good practice of deploying a relatively small VNet for your workload, with some spare capacity for additional subnets. However, the scope of the workload has changed significantly. The spare capacity will not be enough. You need to expand the VNet, so you add a second IP prefix to the VNet. This means that new IP capacity requires additional subnets from the new prefix.

In Summary

Every diagram for a new VNet in Azure should start very simply: 1 subnet. Do not follow the overly-simple advice from “Azure expert”LinkedIn posts that say “create a subnet for every tier to create a security boundary”. You absolutely do not need to do that! Most workloads, even in large enterprises, are incredibly simple, and one subnet will suffice. You should only add subnets when the need requires it, as documented above.

How to Troubleshoot Azure Routing?

This post will explain how routing works in Microsoft Azure, and how to troubleshoot your routing issues with Route Tables, BGP, and User-Defined Routes in your virtual network (VNet) subnets and virtual (firewall) appliances/Azure Firewall.

Software-Defined Networking

Right now, you need to forget VLANs, and how routers, bridges, routing switches, and all that crap works in the physical network. Some theory is good, but the practice … that dies here.

Azure networking is software-defined (VXLAN). When a VM sends a packet out to the network, the Azure Fabric takes over as soon as the packet hits the virtual NIC. That same concept extends to any virtual network-capable Azure service. From your point of view, a memory copy happens from source NIC to destination NIC. Yes; under the covers there is an Azure backbone with a “more physical” implementation but that is irrelevant because you have no influence over it.

So always keep this in mind: network transport in Azure is basically a memory copy. We can, however, influence the routing of that memory copy by adding hops to it.

Understand the Basics

When you create a VNet, it will have 1 or more subnets. By default, each subnet will have system routes. The first ones are simple, and I’ll make it even more simple:

  • Route directly via the default gateway to the destination if it’s in the same supernet, e.g. 10.0.0.0/8
  • Route directly to Internet if it’s in 0.0.0.0/0

By the way, the only way to see system routes is to open a NIC in the subnet, and click Effective Routes under Support & Troubleshooting. I have asked that this is revealed in a subnet – not all VNet-connected services have NICs!

And also, by the way, you cannot ping the subnet default gateway because it is not an appliance; it is a software-defined function that is there to keep the guest OS sane … and probably for us too 😊

When you peer a VNet with another VNet, you do a few things, including:

  • Instructing VXLAN to extend the plumbing of between the peered VNets
  • Extending the “VirtualNetwork” NSG rule security tag to include the peered neighbour
  • Create a new system route for peering.

The result is that VMs in VNet1 will send packets directly to VMs in VNet2 as if they were in the same VNet.

When you create a VNet gateway (let’s leave BGP for later) and create a load network connection, you create another (set of) system routes for the virtual network gateway. The local address space(s) will be added as destinations that are tunnelled via the gateway. The result is that packets to/from the on-prem network will route directly through the gateway … even across a peered connection if you have set up the hub/spoke peering connections correctly.

Let’s add BGP to the mix. If I enable ExpressRoute or a BGP-VPN, then my on-prem network will advertise routes to my gateway. These routes will be added to my existing subnets in the gateway’s VNet. The result is that the VNet is told to route to those advertised destinations via the gateway (VPN or ExpressRoute).

If I have peered the gateway’s VNet with other VNets, the default behaviour is that the BGP routes will propagate out. That means that the peered VNets learn about the on-premises destinations that have been advertised to the gateway, and thus know to route to those destinations via the gateway.

And let’s stop there for a moment.

Route Priority

We now have 2 kinds of route in play – there will be a third. Let’s say there is a system route for 172.16.0.0/16 that routes to virtual network. In other words, just “find the destination in this VNet”. Now, let’s say BGP advertises a route from on-premises through the gateway that is also for 172.16.0.0/16.

We have two routes for the 172.16.0.0/16 destination:

  • System
  • BGP

Azure looks at routes that clash like above and deactivates one of them. Azure always ranks BGP above System. So, in our case, the System route for 172.16.0.0/16 will be deactivated and no longer used. The BGP route for 172.16.0.0/16 via the VNet gateway will remain active and will be used.

Specificity

Try saying that word 5 times in a row after 5 drinks!

The most specific route will be chosen. In other words, the route with the best match for your destination is selected by the Azure fabric. Let’s say that I have two active routes:

  1. 16.0.0/16 via X
  2. 16.1.0/24 via Y

Now, let’s say that I want to send a packet to 172.16.1.4. Which route will be chosen? Route A is a 16 bit match (172.16.*.*). Route B is a 24 bit match (172.16.1.*). Route B is a closer match so it is chosen.

Now add a scenario where you want to send a packet to 172.16.2.4. At this point, the only match is Route A. Route B is not a match at all.

This helps explain an interesting thing that can happen in Azure routing. If you create a generic rule for the 0.0.0.0/0 destination it will only impact routing to destinations outside of the virtual network – assuming you are using the private address spaces in your VNet. The subnets have system routes for the 3 private address spaces which will be more specific than 0.0.0.0:

  1. 168.0.0/16
  2. 16.0.0/12
  3. 0.0.0/8
  4. 0.0.0/0

If your VNet address space is 10.1.0.0/16 and you are trying to send a packet from subnet 1 (10.1.1.0/24) to subnet 2 (10.1.2.0/24), then the generic Route D will always be less specific than the system route, Route C.

Route Tables

A route table resource allows us to manage the routing of a subnet. Good practice is that if you need to manage routing then:

  • Create a route table for the subnet
  • Name the route table after the VNet/subnet
  • Only use a route table with 1 subnet

The first thing to know about route tables is that you can control BGP propagation with them. This is especially useful when:

  • You have peered virtual networks using a hub gateway
  • You want to control how packets get to that gateway and the destination.

The default is that BGP propagation is allowed over a peering connection to the spoke. In the route table (Settings > Configuration) you can disable this propagation so the BGP routes are never copied from the hub network (with the VNet gateway) to the peered spoke VNet’s subnets.

The second thing about route tables is that they allow us to create user-defined routes (UDRs).

User-Defined Routes

You can control the flow of packets using user-defined routes. Note that UDRs outrank BGP routes and System Routes:

  1. UDR
  2. BGP routes
  3. System routes

If I have a system or BGO route to get to 192.168.1.0/24 via some unwanted path, I can add a UDR to 192.168.1.0/24 via the desired path. If the two routes are identical destination matches, then my UDR will be active and the BGP/system route will be deactivated.

Troubleshooting Tools

The traditional tool you might have used is TRACERT. I’m sorry, it has some use, but it’s really not much more than PING. In the software defined world, the default gateway isn’t a device with a hop, the peering connection doesn’t have a hop, and TRACERT is not as useful as it would have been on-premises.

The first thing you need is the above knowledge. That really helps with everything else.

Next, make sure your NSGs aren’t the problem, not your routing!

Next is the NIC, if you are dealing with virtual machines. Go to Effective Routes and look at what is listed, what is active and what is not.

Network Watcher has a couple of tools you should also look at:

  • Next Hop: This is a pretty simple tool that tells you the next “appliance” that will process packets on the journey to your destination, based on the actual routing discovered.
  • Connection Troubleshoot: You can send a packet from a source (VM NIC or Application Gateway) to a certain destination. The results will map the path taken and the result.

The tools won’t tell you why a routing plan failed, but with the above information, you can troubleshoot a (desired) network path.

Locking Down Network Access to the Azure Application Gateway/Firewall

In this post, I will explain how you can use a Network Security Group (NSG) to completely lock down network access to the subnet that contains an Azure Web Application Gateway (WAG)/Web Application Firewall (WAF).

The stops are as follows:

  1. Deploy a WAG/WAF to a dedicated subnet.
  2. Create a Network Security Group (NSG) for the subnet.
  3. Associate the NSG with the subnet.
  4. Create an inbound rule to allow TCP 65503-65534 from the Internet service tag to the CIDR address of the WAG/WAF subnet.
  5. Create rules to allow application traffic, such as TCP 443 or TCP 80, from your sources to the CIDR address of the WAG/WAF
  6. Create a low priority (4000) rule to allow any protocol/port from the AzureLoadBlanacer service tag to the CIDR address of the WAG/WAF
  7. Create a rule, with the lowest priority (4096) to Deny All from Any source.

The Scenario

It is easy to stand up a WAG/WAF in Azure and get it up and running. But in the real world, you should lock down network access. In the world of Azure, all network security begins with an NSG. When you deploy WAG/WAF in the real world, you should create an NSG for the WAG/WAF subnet and restrict the traffic to that subnet to what is just required for:

  • Health monitoring of the WAG/WAF
  • Application access from the authorised sources
  • Load balancing of the WAG/WAF instances

Everything else inbound will be blocked.

The NSG

Good NSG practice is as follows:

  1. Tiers of services are placed into their own subnet. Good news – the WAG/WAF requires a dedicated subnet.
  2. You should create an NSG just for the subnet – name the NSG after the VNet-Subnet, and maybe add a prefix or suffix of NSG to the name.

Health Monitoring

Azure will need to communicate with the WAG/WAF to determine the health of the backends – I know that this sounds weird, but it is what it is.

Note: You can view the health of your backend pool by opening the WAG/WAF and browsing to Monitoring > Backend Health. Each backend pool member will be listed here. If you have configured the NSG correctly then the pool member status should be “Healthy”, assuming that they are actually healthy. Otherwise, you will get a warning saying:

Unable to retrieve health status data. Check presence of NSG/UDR blocking access to ports 65503-65534 from Internet to Application Gateway.

OK – so you need to open those ports from “Internet”. Two questions arise:

  • Is this secure? Yes – Microsoft states here that these ports are “are protected (locked down) by Azure certificates. Without proper certificates, external entities, including the customers of those gateways, will not be able to initiate any changes on those endpoints”.
  • What if my WAG/WAF is internal and does not have a public IP address? You will still do this – remember that “Internet” is everything outside the virtual network and peered virtual networks. Azure will communicate with the WAG/WAF via the Azure fabric and you need to allow this communication that comes from an external source.

In my example, my WAF subnet CIDR is 10.0.2.4/24:

Application Traffic

Next, I need to allow application traffic. Remember that the NSG operates at the TCP/UDP level and has no idea of URLs – that’s the job of the WAG/WAF. I will use the NSG to define what TCP ports I am allowing into the WAG/WAF (such as TCP 443) and from what sources.

In my example, the WAF is for internal usage. Clients will connect to applications over a VPN/ExpressRoute connection. Here is a sample rule:

If this was an Internet-facing WAG or WAF, then the source service tag would be Internet. If other services in Azure need to connect to this WAG or WAF, then I would allow traffic from either Virtual Network or specific source CIDRs/addresses.

The Azure Load Balancer

To be honest, this one caught me out until I reasoned what the cause was. My next rule will deny all other traffic to the WAG/WAF subnet. Without this load balancer rule, the client could not connect to the WAG/WAF. That puzzled me, and searches led me nowhere useful. And then I realized:

  • A WAG/WAF is 1+ instances (2+ in v2), each consuming IP addresses in the subnet.
  • They are presented to clients as a single IP.
  • That single IP must be a load balancer
  • That load balancer needs to probe the load balancer’s own backend pool – which are the instance(s) of the WAG/WAF in this case

You might ask: isn’t there a default rule to allow a load balancer probe? Yes, it has priority 65001. But we will be putting in a rule at 4096 to prevent all connections, overriding the 65000 rule that allows everything from VirtualNetwork – which includes all subnets in the virtual network and all peered virtual networks.

The rule is simple enough:

Deny Everything Else

Now we will override the default NSG rules that allow all communications to the subnet from other subnets in the same VNet or peered VNets. This rule should have the lowest possible user-defined priority, which is 4096:

Why am I using the lowest possible priority? This is classic good firewall rule practice. General rules should be low priority, and specific rules should be high priority. The more general, the lower. The more specific, the higher. The most general rule we have in firewalls is “block everything we don’t allow”; in other words, we are creating a white list of exceptions with the previously mentioned rules.

The Results

You should end up with:

  • The health monitoring rule will allow Azure to check your WAG/WAF over a certificate-secured channel.
  • Your application rules will permit specified clients to connect to the WAG/WAF, via a hidden load balancer.
  • The load balancer can probe the WAG/WAF and forward client connections.
  • The low priority deny rule will block all other communications.

Job done!