In this Azure Networking deep dive, I’m going to share some of my experience around planning the creation and association of Route Tables in Microsoft Azure.
Quick Recap
The purpose of a Route Table is to apply User-Defined Routes (UDRs). The Route Table is associated with a subnet. The UDRs in the Route Table are applied to the NICs in the subnet. The UDRs override System and/or BGP routes to force routes on outgoing packets to match your desired flows or security patterns.
Remember: There are no subnets or default gateways in Azure; the NIC is the router and packets go directly from the source NIC t the destination NIC. A route can be used to alter that direct flow and force the packets through a desired next hop, such as a firewall, before continuing to the destination.
Route Table Association
A Route Table is associated with one or more subnets. The purpose of this is to cause the UDRs of the Route Table to be deployed to the NICs that are connected to the subnet(s).
Technically speaking, there is nothing wrong with asosciating a single Route Table with more than one subnet. But I would the wisdom of this practice.1:N
1:N Association
The concept here is that one creates a single Route Table that will be used across many subnets. The desire is to reduce effort – there is no cost saving because Route Tables are free:
You create a Route Table
You add all the required UDRs for your subnets
You associate the Route Table with the subnets
It all sounds good until you realise:
That individual subnets can require different routes. For example a simple subnet containing some compute might only require a route for 0.0.0.0/0 to use a firewall as a next hop. On the other hand, a subnet containing VNet-integrated API Management might require 60+ routes. Your security model at this point can become complicated, unpredictable, and contradictory.
Centrally managing network resources, such as Route Tables, for sharing and “quality control” contradicts one of the main purposes of The Cloud: self-service. Watch how quick the IT staff that the business does listen to (the devs) rebel against what you attempt to force upon them! Cloud is how you work, not where you work.
Certain security models won’t work.
1:1 Association
The purpose of 1:1 association is to:
Enable granular routing configuration; routes are generated for each subnet depending on the resource/networking/security requirements of the subnet.
Enable self-service for developers/operators.
The downside is that you can end up with a lot of subnets – keep in mind that some people create too many subnets. One might argue that this is a lot of effort but I would counter that by saying:
I can automate the creation of Route Tables using several means including infrastructure-as-code (IaC), Azure Policy, or even Azure Virtual Network Manager (with it’s new per-VNet pricing model).
Most subnets will have just one UDR: 0.0.0.0/0 via the firewall.
What Do I Do & Recommend?
I use the approach of 1:1 association. Each subnet, subject to support, gets its own Route Table. The Route Table is named after the VNet/subnet and is associatded only with that subnet.
I’ve been using that approach for as long as I can remember. It was formalised 6 years ago and it has worked for at scale. As I stated, it’s no effort because the creation/association of the Route Tables is automated. The real benefit is the predictability of the resulting security model.
Here comes yet another “How does it work” post on Azure networking. I have observed many folks who assume that routing in Azure works one way, but are shocked to learn that there are more layers than they anticipated. In this post, I will explain how routing really works in Azure networking.
The challenge with the above architecture is to make traffic flow through the firewall. Most people will answer that User-Defined Routes (UDRs) via Route Tables are required. Yes, that is true. But they fail to understand that two (I would argue three) other sources of routes are also present in this diagram. The lack of that additional knowledge may impact this simple scenario. And I know for certain that if this scenario were the typical mid-large organisation, then the lack of knowledge would become:
An operational issue
A security issue
A troubleshooting issue
A connectivity issue
The NIC Is The Router
One of my first posts in this series was “Azure Virtual Networks Do Not Exist“. In that post, I explained that all traffic routes directly from the source NIC to the destination NIC. There is no subnet, no default gateway, and no virtual network. Instead, a virtual network is a mapping of a mesh connectivity between all NICs in that virtual network. When you peer virtual networks, the mapping expands to mesh all NICs in the peered virtual networks.
Where does routing happen if there is no default gateway or subnet? The answer (just like “where are NSG rules processed?” is the NIC is the router.
Remember that everything is a virtual machine, including “serverless computing”, somewhere in the platform.
If packets travel directly from source to destination, then there is no router appliance between the source and the destination. That means that the source must be its own router.
Some Basic Routing Theory
A route is an instruction: if you want to get to address A then go to place X. X might be the destination, or it might be the first hop to get to the destination.
For example, I might have a remote network of 192.168.0.0/16. I have an Azure App Service that wants to use a site-to-site connection to reach out to a server with an address of 192.168.1.10. A route might say:
Prefix: 192.168.0.0/16
Next Hop Type: Virtual Network Gateway (VPN or ExpressRoute)
The NIC of the App Service will learn that route (see BGP later). Packets from the App Service will go directly to the NIC(s) of the Virtual Network Gateway and then route over VPN/ExpressRoute to 192.168.1.10.
Maybe I will manipulate that route a little to force egress traffic through a firewall. My firewall will have an internal IP address of 10.0.1.4. I can introduce a route (see User-Defined Routes later) of:
Prefix: 192.168.0.0/16
Next Hop Type: Virtual Appliance
Next Hop IP Address: 10.0.1.4
Now packets to 192.168.1.10 will go to my firewall. It’s important now that the firewall has a route to 192.168.0.0/16 – normally it would by default in a hub & spoke design.
The second piece of knowledge to have is that there must be a route for the response. There is no implied return route. Either a human or the network must implement that return route. And it’s really important that the return route is the same as the egress route; stateful firewalls will block TCP responses when they have not permitted the requests – this is one of those “you’ll learn it the hard way” things when dealing with site-to-site connections and firewalls.
The Laws Of Azure Routing
I will revisit this at the end, but here’s what you need to know when you are designing/troubleshooting routing in Azure:
Route source priority
Longest prefix match
Law 1: Route Source Priority
You might know that User-Defined Routes (UDRs) exist. But there are two (or three) other sources of routes and they each have a priority.
System Routes
The first source of routes that is always there is System (or Default) routes. System routes are created when you create or configure a virtual network. For example, every subnet in a brand-new virtual network has many system routes out of the box. The major routes we are concerned with are:
Route(s) to the address prefix(es) of the virtual network to route directly (VirtualNetwork) to the destination NICs.
A route to send all other traffic to the Internet (including Azure).
Yes, I am leaving out a bunch of other system routes that are implemented to protect Microsoft 365 from hacking but I want to keep this simple.
Another important System route is what is created when you peer two virtual networks. A route is created in each of the peered virtual networks to state that the next hop to the new neighbour is via peering. This is a human-friendly message; what it means is that the NICs in the connected peer are now part of the local virtual network’s mesh – packets from local NICs will route directly to NICs in the peered virtual network.
BGP Routes
Border Gateway Protocol (BGP) is a mechanism where one routing appliance shares its knowledge of routes with neighbours. For example, a router in Dublin might say “If you want to get to any NICs in Dublin then come to me”. A router in Paris might hear that message and relay it by saying “I know how to get to Dublin so if you want to get to Dublin, come to me”. A router in Munich might pick up that relay from Paris and advertise locally that it knows how to get to Dublin. A PC in Munich wants to send a packet to a NIC in Dublin. The Munich network says that the route to Dublin is via the router in Munich, so the flow of packets will be:
Munich PC > Munich router > Paris router > Dublin Router > Dublin IP NIC
Azure implements BGP in two scenarios:
Site-to-site networking
Azure Route Server
You must configure BGP when using ExpressRoute for remote site connections. You optionally configure BGP when configuring a BGP tunnel. What most people don’t realise is that you will still have BGP routes with a BGP-less VPN tunnel thanks to the Local Network Gateway which generates BGP routes for the remote site prefixes. In the case of site-to-site networking, BGP routes are propagated from the GatewaySubnet and propagate to all other subnets in the virtual network and (by default) to all peered virtual networks/subnets.
The other scenario is Azure Route Server (ARS), which also includes Virtual WAN, where the router is Azure Route Server – Azure Route Server originated in Virtual WAN. ARS can peer with other appliances, such as a router Network Virtual Appliance (NVA), and share routes with it:
Routes of remote connected networks are learned from the NVA and propagated to the Azure hub/spokes. The hub/spokes now know that the route to the remote networks is to use the router as the next hop (not your firewall!).
The prefixes of the hub/spokes are shared with the NVA to enable remote networks to know how to get to them.
User-Defined Routes (UDRs)
This is the one kind of route that we can directly manage as Azure architects/administrators/operators. A resource called a Route Table is created. The Route Table is associated with a subnet and applies its settings to all NICs in the subnet. There are two important things we can use the Route Table for:
Disable BGP Propagation: We can disable inward BGP route propagation to the associated subnet. This means that we can prevent routes to remote sites from bypassing our firewall by using the Virtual Network Gateway/NVA as the next hop.
User-Defined Routes: We can implement routes that force traffic in ways that we want.
UDRs have several possible next hops for packets:
Virtual Appliance: A router or firewall – you additionally specify the IP address of the virtual appliance NIC to use.
Internet: Including the Internet and Azure
Virtual Network Gateway: An Azure site-to-site connection in the virtual network or shared with the virtual network via peering.
Virtual Network: Send packets to the same virtual network.
None: The packets are dropped at the source NIC and are never transmitted – a useful security feature.
Hidden Programmed Routes
You won’t find this one in any official documentation on routing but it does exist and you’ll learn about them either by accident or by educated observation of behaviour.
Microsoft will sometimes introduce a system route to fix an issue where if you do X, they will program a route to be generated. Unfortunately, this (probably a) type of System route cannot be visibly observed in any way because no diagnostics tools exist for that subnet.
One example of this is Private Endpoint. When you create a subnet, network policies for Private Endpoint are disabled by default. This causes a chain of things to happen:
UDRs are ignored by Private Endpoints in the subnet
Each Private Endpoint in the subnet will create its own /32 (the IP address of the Private Endpoint is the destination prefix) System Route in the virtual network and directly peered virtual networks. This means that a /32 route for the Private Endpoint is added to the GatewaySubnet of the hub/spoke depending on your design.
That GatewaySubnet System route has broken the spirit of many Azure admins over the years. You can’t see it and, from our perspective, it shouldn’t exist. The result was that traffic from on-premises to Private Endpoints went directly to the Private Endpoint, even if we set up a UDR to force traffic to the spoke virtual network to go via the firewall. This is because of the second law of routing: Longest Prefix Match.
Route Deactivation
We have established that there are three* sources of routes. What happens if two or three of them create routes to the same prefix? That can happen; in fact, you will probably make it happen if you want to force traffic through a firewall.
Let’s imagine a scenario where there are 3 routes to 192.168.0.0/16 from:
System
BGP
UDR
What happens? The fabric handles this automatically and applies a prioritisation rule to deactive the routes from lesser sources. The priority is as follows:
UDR: Routes that you explicity create in Azure will deactive routes from BGP & System to the same prefix. UDR beats BGP & System.
BGP: Routes that are created by admins/networks in other locations will deactivate routes from System to the same prefix. BGP beats System.
System: System routes are Azure generated and get beat by BGP and UDR routes to the same prefix.
Let’s consider a simple/common example. We have a virtual network with a subnet. If you want to see this in action, add a VM to the subnet, power it up, open the Azure NIC resource, and go to Effective Routes (wait 30 seconds). Withotu doing anything to the subnet/virtual network a System Route will be created for all NICs in the subnet:
Prefix: 0.0.0.0/0
Next Hop Type: Internet
What that means is that any traffic that doesn’t have a route will be sent to Internet.
Let’s say that I want to force that traffic through a firewall appliance with an IP address of 10.0.1.4. I can associate a new Route Table to the subnet and add a UDR to the subnet:
Prefix: 0.0.0.0/0
Next Hop Type: Virtual Appliance
Next Hop IP Address: 10.0.1.4
Two routes to 0.0.0.0/0 are present. Which one will be used? That decision is already made. The System route to 0.0.0.0/0 is automatically deactivated by the fabric as soon as a higher (BGP or UDR) route is added to the subnet. The only active route to 0.0.0.0/0 in that subnet is my UDR via the firewall.
Law 2: Longest Prefix Match
There is another scenario where there may be multiple route options. A packet might be destined to an IP address and multiple active routes might be applicable. In this case, Azure applies “Longest Prefix Match” – you can think of it as the best matching route. This one is best explained with an example.
Let’s say a packet is going 10.10.10.4. However, the source NIC has 3 possible routes that could apply:
System: 0.0.0.0/ via Internet
BGP: 10.10.10.0/24 via Virtual Network Gateway
UDR: 10.0.0.0/8 via a firewall
All of the routes are active because the prefixes are different. Which one is chosen? Tip: Route priority (UDR/BGP/System) is irrelevant now.
I don’t know the internal mechanics of this but I suspect that an AND operation is done using the destination address and the route prefix. Remember that each octet in a 32 bit IP address is 8 bits:
Here is the calculation for the System route, which sums to 0 bits:
Route Prefix
0
0
0
0
Destination
10
10
10
4
AND Bits
0
0
0
0
Here is the calculation for the BGP route, which sums to 24 bits:
Route Prefix
10
10
10
0
Destination
10
10
10
4
AND Bits
8
8
8
0
Here is the calculation for the UDR route, which sums to 8 bits:
Route Prefix
10
0
0
0
Destination
10
10
10
4
AND Bits
8
0
0
0
Which route is the best match? The BGP route is because it has the longest prefix match to the destination IP address.
Review: The Laws of Azure Routing
Now you’ve learned how Azure routes are generated, how they are prioritised, and how they are chosen when a packet is sent. Let’s summarise the laws of Azure routing:
Route Source Priority: When there are routes to the same prefix, BGP beats Sytem, and UDR beats BGP & System.
Longest Prefix Match: When multiple routes can be used to send a packet to a destination, the route with the longest bit match will be selected.
It’s Always DNS: Ask any Windows admin – when routing isn’t the cause of issues, then it’s DNS 🙂
In this post, I want to explain why routing is so important in Microsoft Azure. Without truly understanding routing, and implementing predictable and scaleable routing, you do not have a secure network. What one needs to understand is that routing is the security cabling of Azure.
My Favourite Interview Question
Now and then, I am asked to do a technical interview of a new candidate at my employer. I enjoy doing technical interviews because you get to have a deep tech chat with someone who is on their career journey. Sometimes is a hopeful youngster who is still new to the business but demonstrates an ability and a desire to learn – they’re a great find by the way. Sometimes its a veteran that you learn something from. And sometimes, they fall into the trap of discussing my favourite Azure topic: routing.
Before I continue, I should warn potential interviewees that the thing I dislike most in a candidate is when they talk about things that “happened while I was there” and then they claim to be experts in that stuff.
The candidate will say “I deployed a firewall in Azure”. The little demon on my shoulder says “ask them, ask them, ASK THEM!”. I can’t help myself – “How did you make traffic go through the firewall?”. The wrong answer here is: “it just did”.
Look at that beauty. You’ve got Azure networks in the middle (hub) and the right (spoke). And on the left is the remote network connected by some kind of site-to-site networking. The deployment even has the rarely used and pricey Network SKU of DDoS protection. Fantastic! Security is important!
And to re-emphasise that security is important, the firewall (it doesn’t matter what brand you choose in this scenario) is slap-bang in the middle of the whole thing. Not only is that firewall important, but all traffic will have to go through it – nothing happens in that network without the firewall controlling it.
Except, that the firewall is seeing absolutely no traffic at all.
Everything is a VM in the platform, including NVA routers and Virtual Network Gateways (2 VMs).
Packets always route directly from the source NIC to the destination NIC.
In our above firewall scenario, let’s consider two routes:
Traffic from a client in the remote site to an Azure service in the spoke.
A response from the service in the Azure spoke to the client in the remote site.
The client sends traffic from the remote site across the site-to-site connection. The physical part of that network is the familiar flow that you’d see in tracert. Things change once that packet hits Azure. The site-to-site connection terminates in the NVA/virtual network gateway. Now the packet needs to route to the service in the spoke. The scenario is that the NVA/virtual network gateway is the source (in Azure networking) and the spoke service is the destination. The packet leaves the NIC of the NVA/virtual network and routes directly (via the underlying physical Azure network) directly to the NIC of one of the load-balanced VMs in the spoke. The packet did not route through the firewall. The packet did not go through a default gateway. The packet did not go across some virtual peering wire. Repeat it after me:
Packets route directly from source to destination.
Now for the response. The VM in the spoke is going to send a response. Where will that response go? You might say “The firewall is in the middle of the diagram, Aidan. It’s obvious!”. Remember:
Packets route directly from source to destination.
In this scenario, the destination is the NVA/virtual network gateway. The packet will leave the VM in the spoke and appear in the NIC of the NCA/virtual network gateway.
It doesn’t matter how pretty your Visio is (Draw.io is a million times better, by the way – thanks for the tip, Haakon). It doesn’t matter what your intention was. Packets … route directly from source to destination.
User-Defined Routes – Right?
You might be saying, “Duh, Aidan, User-Defined Routes (UDRs) in Route Tables will solve this”. You’re sort of on the right track – maybe even mostly there. But I know from talking to many people over the years, that they completely overlook that there are two (I’d argue three) other sources of routes in Azure. Those other routes are playing a role here that you’re not appreciating and if you do not configure your UDRs/Route Tables correctly you’ll either change nothing or break your network.
Routing Is The Security Cabling of Azure
In the on-premises world, we use cables to connect network appliances. You can’t get from one top-of-rack switch/VLAN to another without going through a default gateway. That default gateway can be a switch, a switch core, a router, or a firewall. Connections are made possible via cables. Just like water flow is controlled by pipes, packets can only transit cables that you lay down.
If you read my Azure Virtual Networks Do Not Exist post then you should understand that NICs in a VNet or in peered VNets are a mesh of NICs that can route directly to each other. There is no virtual network cabling; this means that we need to control the flows via some other means and that means is routing.
One must understand the end state, how routing works, and how to manipulate routing to end up in the desired end state. That’s the obvious bit – but often overlooked is that the resulting security model should be scaleable, manageable, and predictable.
You’re designing a new virtual network in Azure. You’re going to have three different security zones in your application. How many subnets do you need? I will help you understand why many of you gave the incorrect answer.
Back To Basics
In a previous post, I explained that virtual networks do not exist. Therefore, subnets do not exist. That’s why you cannot ping a default gateway. Packets do not leave a source NIC and route via default gateway to enter another subnet. Packets go from the source NIC, disappear in the physical network of Azure, and reappear at the destination NIC, whether it is on the same host, in the same data centre, in a neighbouring data centre, or on the other side of the world. Say it after me:
Subnets do not exist.
If packets go straight from source to destination, what is the logic of creating subnets to isolate resources?
Why Did We Segment Networks Using Subnets?
In the on-premises world, there are many reasons to segment a network. A common reason was to control the size of broadcast/multicast domains. That’s not an issue in Azure because virtual networks do not support broadcasts/multicasts.
From a security perspective, we segmented networks because we needed to isolate a firewall. The firewall is a central resource. A network runs from a top-of-rack switch to an ethernet interface in the firewall. That subnet uses the firewall to route to other subnets, possibly using the same cable (VLANs) or using different cables to other top-of-rack switches.
Earlier I asked you to imagine a workload with three security zones. Let’s call them:
Web
Application
Database
That’s not too crazy. My security model requires me to ensure:
Internet users can only reach the web servers on HTTPS
The Application server can only be talked to by the web servers.
The database servers can only be talked to by the application servers.
How would I create that? I’d set up three VLANs or subnets. Each VLAN would use a default gateway which is either the firewall or uses the firewall as a next hop to reach other VLANs. The firewall would then enforce my security intent, ensuring that only desired traffic could enter a VLAN to reach the required machines.
This design works perfectly well in on-premises cable-oriented networks because the networks (physical or virtual) are connected via cable(s) running to the firewall.
Bringing Cable-Oriented Designs To Azure
There is no finger-pointing here – I still have nightmares about an early Azure design I did where I created a VNet diagram with somewhere between 10-20 subnets. We all learn, and I’m hoping you learn from my mistakes.
Using the same requirements as before for our workload, we can produce the below design … based on cable-oriented patterns.
We create a single virtual network broken into 3 subnets. Each subnet has VMs for each role in the application. We then isolate each of the machines using NSGs.
That seems perfect, right? It is secure. Traffic will get from A to B. If we implement the rules correctly, then only the correct traffic will flow. But this design does display a lack of understanding.
Remember: packets go directly from source to destination. There is no default gateway. If an NSG that is processing rules on an Application Server NIC is allowing or denying traffic, then what is the point of the subnet? The subnet is not doing the segmentation; the NSG is doing the segmentation.
How Can We Segment Networks In Azure?
The most basic segmentation method in an Azure virtual network is the Network Security Group (NSG). While the previous Azure diagram is not technically wrong, the below diagram displays a better understanding of the underlying technology:
In this design, we are accepting that neither the virtual network nor the subnet exist. We are using rules in the NSG to isolate each tier of the application:
Look at the below NSG to see how this isolation can be done with a very simple example:
The NSG denies all traffic by default (rule 4000). Then the only traffic permitted is what we modeled previously using subnets. The rules are processed on the NICs, so the only way traffic enters a VM is if it is compliant with the above NSG.
Yes, I could use groups of IP addresses, or better, Application Security Groups that make the rules more readable and allow aggregation/abstraction of NICs & IP addresses.
So Why Do We Create Subnets In Azure
The primary reason is quite boring: technical requirements. Let me adjust my design a little. The database is going to be implemented using SQL Managed Instance instead of a VM. In the original VM-only design, there were no impediments to using a single subnet. SQL Managed Instance changes the technical requirements because it must be connected to a dedicated subnet.
That’s a simple example. A different example might be that I must use different address prefixes – see an older post by me on using a Linux VM as a NAT gateway where the VM has an internal NIC on a regularly addressed subnet and a second NIC in a subnet that is addressed based on NAT requirements.
Another example might be that you need to create custom routes for different NICs to the same prefix. For example, some NICs will go via your firewall to 0.0.0.0/0. Other NICs might go to “None” (a blackhole that drops packets) for traffic going to 0.0.0.0/0. The only way to implement that is to have one subnet for each Route Table. I’m not going to dive into routing here – let’s save that for another day.
Taking This Bigger
I am eventually going to explain enough things so I can show you why the classic Azure “big VNet” likely called production, test, or dev, is both an operational and security nightmare. But the above content, along with my other recent posts, are just part of the puzzle. Watch out for more content coming soon.
The Network Security Group (NSG) is the primary mechanism for segmenting a subnet in Microsoft Azure. NSGs are commonly implemented. Unfortunately, people assume quite a bit about NSGs, and I want to tackle that by explaining why you need to be aware of the default rules in Network Security Groups.
The Assumption
Let’s say I have an extremely simple workload consisting of:
A virtual machine acting as a web server.
A virtual machine acting as a database server.
Yes, this could be VNet-connected PaaS services and have the same issues, but I want the example to be as clear as possible.
I want to lock down and protect that subnet so I will create an NSG and associate it with the subnet. Traffic from the outside world is blocked, right? Now, I will create an inbound rule to allow HTTPS/TCP 443 from client external addresses to the web server.
Name
Source
Protocol
Port
Destination
Action
AllowWeb
<clients>
TCP
443
Web VM
Allow
The logic I expect is:
Allow web traffic from the clients to the web server.
Allow SQL traffic from the web server to the database server in the same subnet.
Everything else is blocked.
I check the Inbound Rules in the NSG and I can see my custom rules and the built-in default rules. This confirms my logic, right?
All is well, until one day, every computer in the office has a ransomware demand screen and both of my Azure VMs are offline. Now my boss is screaming at me because the business’s online application is not selling our products to customers.
Where It All Went Wrong
Take a look at the default rules in the above screenshot. Rule 65500 denies all traffic. That’s what we want; block all traffic where a higher priority rule doesn’t allow it. That’s the rule that we were banking on to protect our Azure workload.
But take a look at rule 65000. That rule allows all traffic from VirtualNetwork to VirtualNetwork. We have assumed that VirtualNetwork means the virtual network that the NSG of the subnet that it is associated with – in other words, the virtual network that we are working on.
The virtual network address space (all IP address ranges defined for the virtual network), all connected on-premises address spaces, peered virtual networks, virtual networks connected to a virtual network gateway, the virtual IP address of the host, and address prefixes used on user-defined routes. This tag might also contain default routes.
In summary, this means that VirtualNetwork contains:
The prefixes in your virtual network
Any peered virtual networks
Any remote networks connected by site-to-site networking
Any networks where you have referenced in a user-defined route in your subnets.
Or, pretty much every network you can route to/from. And that’s how the ransomware got from someone’s on-premises PC into the virtual network. The on-premises networks were connected with the Azure virtual network by VPN. The built-in 65000 rule allowed all traffic from on-premises. There was nothing to block the ransomware from spreading to the Azure VMs from the on-premises network.
Solving This Problem
There are a few ways to solve this issue. I’ll show you a couple. I am a believer in true micro-segmentation to create trust-noone networks. The goal here is that no traffic is allowed anywhere on any Azure network without a specific rule to permit flows that are required by the business/technology.
The logic of the below is that all traffic will be denied by default, including traffic inside the subnet.
I have added a low-priority (4000) rule to deny everything that is not allowed in the higher-priority rules. That will affect all traffic from any source, including sources in the same virtual network or subnet.
By the way, the above is the sort of protection that many national cyber security agencies are telling people to implement to stop modern threats – not just the threats of 2003.
I know that some of you will prefer to treat the NSG as an edge defence, allowing all traffic inside the virtual network. You can do that too. Here’s an example of that:
My rule at 3900 allows all traffic inside the address prefix of the virtual network. The following rule, 4000, denies everything, which means that anything from outside the network (not including the traffic in rule 100) will be blocked.
The Lesson
Don’t assume anything. You now know that VirtualNetwork means everything that can route to your virtual network. For example the Internet service tag includes The Internet and Microsoft Azure!
A Greek Phalanx, protected by a shield wall made up of many individuals working under 1 instruction as a unit – like an NSG.
Yesterday, I explained how packets travel in Azure networking while telling you Azure virtual networks do not exist. The purpose was to get readers closer to figuring out how to design good and secure Azure networks without falling into traps of myths and misbeliefs. The next topic I want to tackle is Network Security Groups – I want you to understand how NSGs work … and this will also include Admin Rules from Azure Virtual Network Manager (AVNM).
Port ACLs
In my previous post, Azure Virtual Networks Do Not Exist, I said that Azure was based on Hyper-V. Windows Server 2012 introduced loads of virtual networking features that would go on to become something bigger in Azure. One of them was a mostly overlooked-by-then-customers feature called Port ACLs. I liked Port ACLs; it was mostly unknown, could only be managed using PowerShell and made for great demo content in some TechEd/Ignite sessions that I did back in the day.
Remember: Everything in Azure is a virtual machine somewhere in Azure, even “serverless” functions.
The concept of Port ACLs was it gave you a simple firewall feature controlled through the virtualisation platform – the virtual machine and the guest OS had no control and had to comply. You set up simple rules to allow or deny transport layer (TCP/UDP) traffic on specific ports. For example, I could block all traffic to a NIC by default with a low-priority inbound rule and introduce a high-priority inbound rule to allow TCP 443 (HTTPS). Now I had a web service that could receive HTTPS traffic only, no matter what the guest OS admin/dev/operator did.
Where are Port ACLs implemented? Obviously, it is somewhere in the virtualisation product, but the clue is in the name. Port ACLs are implemented by the virtual switch port. Remember that a virtual machine NIC connects to a virtual switch in the host. The virtual switch connects to the physical NIC in the host and the external physical network.
A virtual machine NIC connects to a virtual switch using a port. You probably know that a physical switch contains several ports with physical cables plugged into them. If a Port ACL is implemented by a switch port and a VM is moved to another host, then what happens to the Port ACL rules? The Hyper-V networking team played smart and implemented the switch port as a property of the NIC! That means that any Port ACL rules that are configured in the switch port move with the NIC and the VM from host to host.
NSG and Admin Rules Are Port ACLs
Along came Azure and the cloud needed a basic rules system. Network Security Groups (NSGs) were released and gave us a pretty interface to manage security at the transport layer; now we can allow or deny inbound or outbound traffic on TCP/UDP/ICMP/Any.
What technology did Azure use? Port ACLs of course. By the way, Azure Virtual Network Manager introduced a new form of basic allow/deny control that is processed before NSG rules called Admin Rules. I believe that this is also implemented using Port ACLs.
A Little About NSG Rules
This is a topic I want to dive deep into later, but let’s talk a little about NSG rules. We can implement inbound (allow or deny traffic coming in) or outbound (allow or deny traffic going out) rules.
A quick aside: I rarely use outbound NSG rules. I prefer using a combination of routing and a hub firewall (dey all by default) to control egress traffic.
When I create a NSG I can associate it with:
A NIC: Only that NIC is affected
A subnet: All NICs, including Vnet integrated PaaS resources and Private Endpoints, are affected
The association is simply a management scaling feature. When you associate a NSG with a subnet the rules are not processed at the subnet.
Associating a NSG resource with a subnet propagates the rules from the NSG to all NICs that are connected to that subnet. The processing is done by Port ACLs at the NIC.
This means:
Inbound rules prevent traffic from entering the virtual machine.
Outbound rules prevent traffic from leaving the virtual machine.
Which association should you choose? I advise you to use subnet association. You can see/manage the entire picture in one “interface” and have an easy-to-understand processing scenario.
If you want to micro-manage and have an unpredictable future then go ahead and associate NSGs with each NIC.
The subnet NSG is processed first for inbound traffic.
The NIC NSG is processed first for outbound traffic.
Keep it simple, stupid (the KISS principle).
Micro-Segmentation
As one might grasp, we can use NSGs to micro-segment a subnet. No matter what the resources do, they cannot bypass the security intent of the NSG rules. That means we don’t need to have different subnets for security zones:
We zone using NSG rules.
Virtual networks and their subnets do not exist!
The only time we need to create additional subnets is when there are compatibility issues such as NSG/Route table association or a PaaS resource requires a dedicated subnet.
Watch out for more content shortly where I break some myths and hopefully simplify some of this stuff for you. And if I’m doing this right, you might start to look at some Azure networks (like I have) and wonder “Why the heck was that implemented that way?”.
I see many bad designs where people bring cable-oriented designs from physical locations into Azure. I hear lots of incorrect assumptions when people are discussing network designs. For example: “I put shared services in the hub because they will be closer to their clients”. Or my all-time favourite: people assuming that ingress traffic from site-to-site connections will go through a hub firewall because it’s in the middle of their diagram. All this is because of one common mistake – people don’t realise that Azure Virtual Networks do not exist.
Some Background
Azure was designed to be a multi-tenant cloud capable of hosting an “unlimited” number of customers.
I realise that “unlimited” easily leads us to jokes about endless capacity issues 🙂
Traditional hosting (and I’ve worked there) is based on good old fashioned networking. There’s a data centre. At the heart of the data centre network there is a network core. The entire facility has a prefix/prefixes of address space. Every time that a customer is added, the network administrators carve out a prefix for the new customer. It’s hardly self-service and definitely not elastic.
Azure settled on VXLAN to enable software-defined networking – a process where customer networking could be layered upon the physical networks of Microsoft’s physical data centres/global network.
Falling Into The Myth
Virtual Networks make life easy. Do you want a network? There’s no need to open a ticket? You don’t need to hear from a snarky CCIE who snarls when you ask for a /16 address prefix as if you’ve just asked for Flash “RAID10” from a SAN admin. No; you just open up the Portal/PowerShell/VS Code and you deploy a network of whatever size you want. A few seconds later, it’s there and you can start connecting resources to the new network.
You fire up a VM and you get an address from “DHCP”. It’s not really DHCP. How can it be when Azure virtual networks do not support broadcasts or multicasts? You log into that VM and have networking issues so you troubleshoot like you learn how to:
Ping the local host
Ping the default gateway – oh! That doesn’t work.
Traceroute to a remote address – oh! That doesn’t work either.
And then you start to implement stuff just like you would in your own data centre.
How “It Works”
Let me start by stating that I do not know how the Azure fabric works under the covers. Microsoft aren’t keen on telling us how the sausage is made. But I know enough to explain the observable results.
When you click the Create button at the end of the Create Virtual Machine wizard, an operator is given a ticket, they get clearance from data center security, they grab some patch leads, hop on a bike, and they cycle as fast as they can to the patch panel that you have been assigned in Azure.
Wait … no … that was a bad stress dream. But really, from what I see/hear from many people, they think that something like that happens. Even if that was “virtual”, the who thing just would not be scaleable.
Instead, I want you to think of an Azure virtual network as a Venn diagram. The process of creating a virtual network instructs the Azure fabric that any NIC that connects to the virtual network can route to any other NIC in the virtual network.
Two things here:
You should take “route” as meaning a packet can go from the source NIC to the destination NIC. It doesn’t mean that it will make it through either NIC – we’ll cover that topic in another post soon.
Almost everything in Azure is a virtual machine at some level in Azure. For example, “serverless” Functions run in Microsoft-managed VMs in a Microsoft tenant. Microsoft surfaces the Function functionality to you in your tenant. If you connect those PaaS services (like ASE or SQL Manage Instance) to your virtual network then there will be NICs that connect to a subnet.
Connecting a NIC to a virtual network adds the new NIC to the Venn Diagram. The Azure fabric now knows that this new NIC should be able to route to other NICs in the same virtual network and all the previous NICs can route to it.
Adding Virtual Network Peering
Now we create a second virtual network. We peer those virtual networks and then … what happens now? Does a magic/virtual pipe get created? Nope – it’s fault tolerant so two magic/virtual lines connect the virtual networks? Nope. It’s Venn diagram time again.
The Azure fabric learns that the NICs in Virtual Network 1 can now route to the NICs in Virtual Network 2 and vice versa. That’s all. There is no magic connection. From a routing/security perspective, the NICs in Virtual Network 1 are no different to the NICs in Virtual Network 2. You’ve just created a bigger mesh from (at least) two address prefixes.
Repeat after me:
Virtual networks do not exist
How Do Packets Travel?
OK Aidan (or “Joe” if you arrived here from Twitter), how the heck do packets get from one NIC to another?
Let’s melt some VMware fanboy brains – that sends me to my happy place. Aure is built using Windows Server Hyper-V; the same Hyper-V that you get with commercially available Windows Server. Sure, Azure layers a lot of stuff on top of the hypervisor, but if you dig down deep enough, you will find Hyper-V.
Virtual machines, your or those run by Microsoft, are connected to a virtual switch on the host. The virtual switch is connected to a physical ethernet port on the host. The host is addressable on the Microsoft physical network.
You come along and create a virtual network. The fabric knows to track NICs that are being connected. You create a virtual machine and connect it to the virtual network. Azure will place that virtual machine on one host. As far as you are concerned, that virtual machine has an address from your network.
You then create a second VM and connect it to your virtual network. Azure places that machine on a different host – maybe even in a different data centre. The fabric knows that both virtual machines are in the same virtual network so they should be able to reach each other.
You’ve probably use a 10.something address, like most other customers, so how will your packets stay in your virtual network and reach the other virtual machine? We can thank software-defined networking for this.
Let’s use the addresses of my above diagram for this explanation. The source VM has a customer IP address of 10.0.1.4. It is sending a packet to the destination VM with a customer address of 10.0.1.5. The packet will leave the source NIC, 10.0.1.4 and reaches the host’s virtual switch. This is where the magic happens.
The packet is encapsulated, changing the destination address to that of the destination virtual machine’s host. Imagine you are sending a letter (remember those?) to an apartment number. It’s not enough to say “Apartment 1”; you have to include other information to encapsulate it. That’s what the fabric enables by tracking where your NICs are hosted. Encapsulation wraps the customer packet up in an Azure packet that is addressed to the host’s address, capable of travelling over the Microsoft Global Network – supporting single virtual networks and peered (even globally) virtual networks.
The packet routes over the Microsoft physical network unbeknownst to us. It reaches the destination host, and the encapsulation is removed at the virtual switch. The customer packet is dropped into the memory of the destination virtual machine and Bingo! the transmission is complete.
From our perspective, the packet routes directly from source to destination. This is why you can’t ping a default gateway – it’s not there because it plays no role in routing because: the virtual network does not exist.
I want you to repeat this:
Packets go directly from source to destination
Two Most Powerful Pieces Of Knowledge
If you remember …
Virtual networks do not exist and
Packets go directly from source to destination
… then you are a huge way along the road of mastering Azure networking. You’ve broken free from string theory (cable-oriented networking) and into quantum physics (software-defined networking). You’ll understand that segmenting networks into subnets for security reasons makes no sense. You will appreciate that placing “shared services” in the hub offered no performance gain (and either broke your security model or made it way more complicated).
This is a topic that has been “top of mind” (I sound like a management consulting muppet) recently: how can I recover from an Azure region being destroyed?
Why Am I Thinking About This?
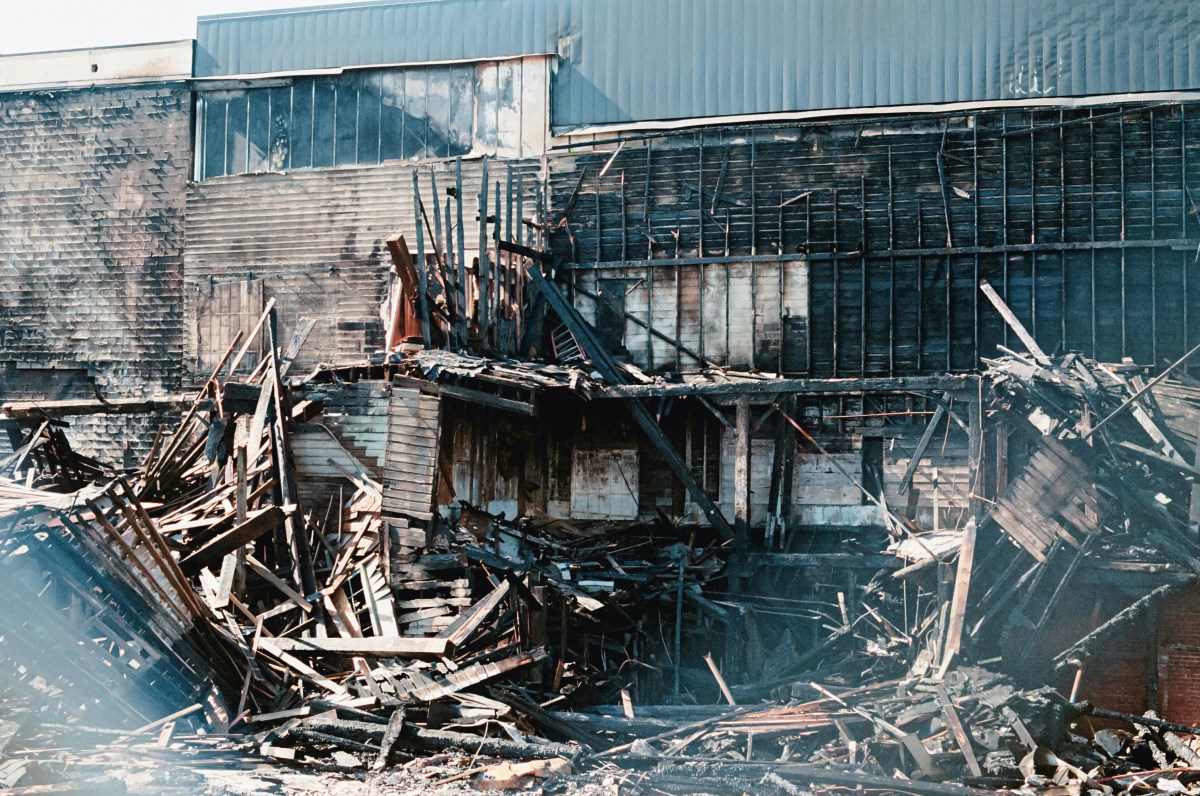
Data centres host critical services. If one of these data centres disappears then everything that was hosted in them is gone. The cause of the disaster might be a forest fire, a flood, or even a military attack – the latter was once considered part of a plot for a far-fetched airport novel but now we have to consider that it’s a real possibility, especially for countries close to now-proven enemies.
We have to accept that there is a genuine risk that an area that hosts several data centres could be destroyed, along with everything contained in those data centres.
Azure Resilience Features
Availability Sets
The first level of facility resilience in Microsoft’s global network (hosting all of their cloud/internal services) is the availability set concept; this is the default level of high availability designed to keep highly-available services online during a failure in a single fault domain (rack of computers) or deployment of changes/reboots to an update domain (virtual selection of computers) in a single row/room (rooms are referred to as colos). With everything in a single room/building we cannot consider an availability set to be a disaster resilience feature.
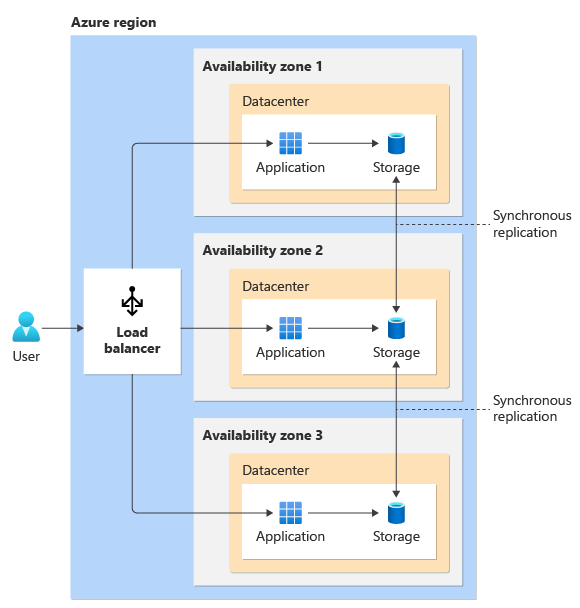
Availability Zones
The next step up is availability zones. Many Azure regions have multiple data centres. Those data centres are split into availability zones. Each availability zone has independent resources for networking, cooling and power. The theory is that if you spread a highly-available service across three zones, then if should remain operational if even two of the zones go down.
Paired Regions
An Azure region is a collection of data centres that are built close to each other (in terms of networking latency). For example, North Europe (Grangecastle, Dublin Ireland) has many physical buildings hosting Microsoft cloud services. Microsoft has applied to build more data centres in Newhall, Naas, Kildare, which is ~20 miles away but will only be a few milliseconds away on the Microsoft global network. Those new data centres will be used to expand North Europe – the existing site is full and more land would be prohibitively expensive.
Many Azure regions are deployed as pairs. Microsoft has special rules for picking the locations of those paired regions, including:
They must be a minimum distance apart from each other
They do not share risks of a common natural disaster
For example, North Europe in Dublin, Ireland is paired with West Europe in Middenmeer, Netherlands.
The pairing means that systems that have GRS-based storage are able to replicate to each other. The obvious example of that is a Storage Account. Less obvious examples are things like Recovery Services Vaults and some PaaS database systems that are built on Storage Account services such as blob or file.
Mythbusting
Microsoft Doesn’t Do Your Disaster Recovery By Default
Many people enter the cloud thinking that lots of things are done for them which are not. For example, when one deploys services in Azure, Azure does not replicate those things to the paired region for you unless:
You opt-in/configure it
You pay for it
That means if I put something in West US, I will need to configure and pay for replication somewhere else. If my resources use Virtual Networks, then I will need to have those Virtual Networks deployed in the other Azure Region for me.
The Paired Region Is Available To Me
In the case of hero regions, such as East US/West US or North Europe/West Europe, then the paired region is available to you. But in most cases that I have looked into, that is not the case with local regions.
Germany North is not available to customers of Germany West Central
Korea South is not available to users of Korea Central
Australia Central 2 is not available to customers of Australia Central
Norway West is not available to users of Norway East
The Norway case is a painful one. Many Norwegian organisations must comply with national laws that restrict the placement of data outside of Norwegian borders. This means that if they want to use Azure, they have to use Norway East. Most of those customers assume that Norway West will be available to them in the event of a disaster. Norway West is a restricted region; I am led to believe that:
Norway West is available to just three important Microsoft customers (3 or 10, it’s irrelevant because it’s not generally available to all customers).
It is hosted by a third-party company called Green Mountain near Stavanger, which is considerably smaller than an Azure region. This means that it will be small and offer a small subset of typical Azure services.
Let’s Burn Down A Region! (Hypothetically)
What’ll happen we this happens to an Azure region?
The Disaster
We can push the cause aside for one moment – there are many possible causes and the probability of each varies depending on the country that you are talking about. Certainly, I have discovered, both public and private organisations in some countries genuinely plan for some circumstances that one might consider a Tom Clancy fantasy.
I have heard Microsoft staff and heard of Microsoft staff telling people that we should use availability zones as our form of disaster recovery, not paired regions. What good will an availability zone do me if a missile, fire, flood, chemical disaster, or earthquake takes out my Azure region? Could it be that there might be other motivations for this advice?
Paired Region Failover
Let’s just say that I was using a region with an available pair. In the case of GRS-based services, we will have to wait for Microsoft to trigger a failover. I wonder how that will fare? Do you think that’s ever been tested? Will those storage systems ever have had the load that’s about to be placed on them?
As for your compute, you can forget it. You’re not going to start up/deploy your compute in the paired region. We all know that Azure is bursting at the seams. Everyone has seen quota limits of one kind of another restrict our deployments. The advice from Microsoft is to reserve your capacity – yes, you will need to pre-pay for the compute that you hope you will never need to use. That goes against the elastic and bottomless glass concepts we expect from The Cloud but reality bites – Azure is a business and Microsoft cannot afford to have oodles of compute sitting around “just in case”.
Non-Available Pair Failover
This scenario sucks! Let’s say that you are in Sweden Central or the new, not GA, region in Espoo, Finland. The region goes up in a cloud of dust & smoke, and now you need to get up and running elsewhere. The good news is that stateless compute is easy to bring online anywhere else – as long as there is capacity. But what about all that data? Your Data Lake is based on blob storage and couldn’t replicate anywhere. Your databases are based on blob/file storage and couldn’t replicate anywhere. Azure Backup is based on blob and you couldn’t enable cross-region restore. Unless you chose your storage very carefully, your data is gone along with the data centres.
Resource Groups
This one is fun! Let’s say I deploy some resources in Korea Central. Where will my resource group be? I will naturally pick Korea Central. Now let’s enable DR replication. Some Azure services will place the replica resources in the same resource group.
Now let’s assume that Korea Central is destroyed. My resources are hopefully up and running elsewhere. But have you realised that the resource IDs of those resources include the resource group that is in Korea Central (the destroyed region) then you will have some problems. According to Microsoft:
If a resource group’s region is temporarily unavailable, you might not be able to update resources in the resource group because the metadata is unavailable. The resources in other regions still function as expected, but you might not be able to update them. This condition might also apply to global resources like Azure DNS, Azure DNS Private Zones, Azure Traffic Manager, and Azure Front Door. You can view which types have their metadata managed by Azure Resource Manager in the list of types for the Azure Resource Graph resources table.
The same article mentions that you should pick an Azure region that is close to you to optimise metadata operations. I would say that if disaster recovery is important, maybe you should pick an Azure region that is independent of both your primary and secondary locations and likely to survive the same event that affects your primary region – if your resource types support it.
The Solution?
I don’t have one, but I’m thinking about it. Here are a few thoughts:
Where possible, architect workloads where compute is stateless and easy to rebuild (from IaC).
Make sure that your DevOps/GitHub/etc solutions will be available after a disaster if they are a part of your recovery strategy.
Choose data storage types/SKUs/tiers (if you can) that offer replication that is independent of region pairing.
Consider using IaaS for compute. IaaS, by the way, isn’t just simple Windows/Linux VMs. AKS is a form of very complicated IaaS. IaaS has the benefit of being independent of Azure, and can be restored elsewhere.
Use a non-Microsoft backup solution. Veeam for example (thank you Didier Van Hoye, MVP) can restore to Azure, on-premises, AWS, or GCP.
What Do You Think?
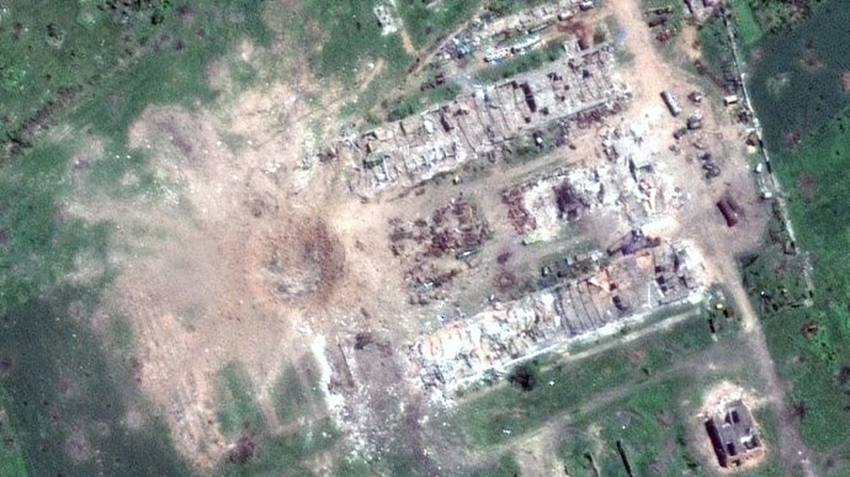
I know that there are people in some parts of the world will think I’ve fallen off something and hit my head 🙂 I get that. But I also know, and it’s been confirmed by recent private discussions, that my musings here are already considered by some markets when adoption of The Cloud is raised as a possibility. Some organisations/countries are forced to think along these lines. Just imagine how silly folks in Ukraine would have felt if they’d deployed all their government and business systems in a local (hypothetical) Azure region without any disaster recovery planning; one of the first things to be at the wrong end of a missile would have been those data centres.
Please use the comments or social media and ping me your thoughts.
In this post, I want to share the most important thing that you should know when you are designing connectivity and security solutions in Microsoft Azure: Azure virtual networks do not exist.
A Fiction Of Your Own Mind
I understand why Microsoft has chosen to use familiar terms and concepts with Azure networking. It’s hard enough for folks who have worked exclusively with on-premises technologies to get to grips with all of the (ongoing) change in The Cloud. Imagine how bad it would be if we ripped out everything they knew about networking and replaced it with something else.
In a way, that’s exactly what happens when you use Azure’s networking. It is most likely very different to what you have previously used. Azure is a multi-tenant cloud. Countless thousands of tenants are signed up and using a single global physical network. If we want to avoid all the pains of traditional hosting and enable self-service, then something different has to be done to abstract the underlying physical network. Microsoft has used VXLAN to create software-defined networking; this means that an Azure customer can create their own networks with address spaces that have nothing to do with the underlying physical network. The Azure fabric tracks what is running where, and what NICs can talk to each other, and forward packets as required.
In Azure, everything is either a physical (rare) or a virtual (most common) machine. This includes all the PaaS resources and even those so-called serverless resources. When you drill down far enough in the platform, you will find either a machine with an operating system with a NIC. That NIC is connected to a network of some kind, either an Azure-hosted one (in the platform) or a virtual network that you created.
The NIC Is The Router
The above image is from a slide I use quite often in my Azure networking presentations. I use it to get a concept across to the audience.
Every virtual machine (except for Azure VMware Services) is hosted on a Hyper-V host, and remember that most PaaS services are hosted in virtual machines. In the image, there are two virtual machines that want to talk to each other. They are connected to a common virtual network that uses a customer-defined prefix of 10.0.0.0/8.
The source VM sends a packet to 10.10.1.5. The packet exits the VM’s guest OS and hits the Azure NIC. The NIC is connected to a virtual switch in the host – did you know that in Hyper-V, the switch port is a part of the NIC to enable consistent processing no matter what host the VM is moved to? The virtual switch encapsulates the packet to enable transmission across the physical network – the physical network has no idea about the customer’s prefix of 10.0.0.0/8. How could it? I’d guess that 80% of customers use all or some of that prefix. Encapsulation allows the pack to hide the customer-defined source and destination addresses. The Azure Fabric knows where the customer’s destination (10.10.1.5) is running, so it uses the physical destination host’s address in the encapsulated packet.
Now the packet is free to travel across the physical Azure network – across the rack, data centre, region or even the global network – to reach the destination host. Now the packet moves up the stack, is encapsulated and dropped into the NIC of the destination VM where things like NSG rules (how the NSG is associated doesn’t matter) are processed.
Here’s what you need to learn here:
The packet went directly from source to destination at the customer level. Sure it travelled along a Microsoft physical network but we don’t see that. We see that the packet left the source NIC and arrived directly at the destination NIC.
Each NIC is effectively its own router.
Each NIC is where NSG rules are processed: source NIC for outbound rules and destination NIC for inbound rules.
The Virtual Network Does Not Exist
Have you ever noticed that every Azure subnet has a default gateway that you cannot ping?
In the above example, no packets travelled across a virtual network. There were no magical wires. Packets didn’t go to a default gateway of the source subnet, get routed to a default gateway of a destination subnet and then to the destination NIC. You might have noticed in the diagram that the source and destination were on different peered virtual networks. When you peer a virtual network, an operator is not sent sprinting into the Azure data centres to install patch cables. There is no mysterious peering connection.
This is the beauty and simplicity of Azure networking in action. When you create a virtual network, you are simply stating:
Anything connected to this network can communicate with each other.
Why do we create subnets? In the past, subnets were for broadcast control. We used them for network isolation. In Azure:
We can isolate items from each other in the same subnet using NSG rules.
We don’t have broadcasts – they aren’t possible.
Our reasons for creating subnets are greatly reduced, and so are our subnet counts. We create subnets when there is a technical requirement – for example, an Azure Bastion requires a dedicated subnet. We should end up with much simpler, smaller virtual networks.
How To Think of Azure Networks
I cannot say that I know how the underlying Azure fabric works. But I can imagine it pretty well. I think of it simply as a mapping system. And I explain it using Venn diagrams.
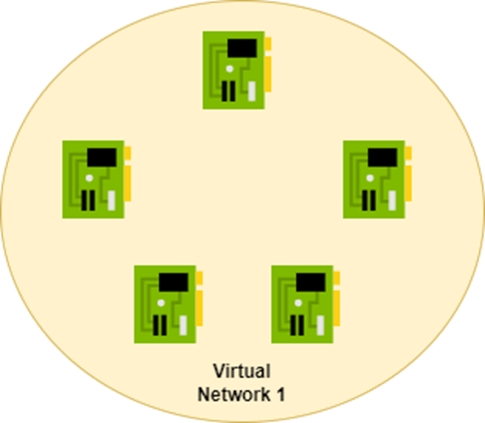
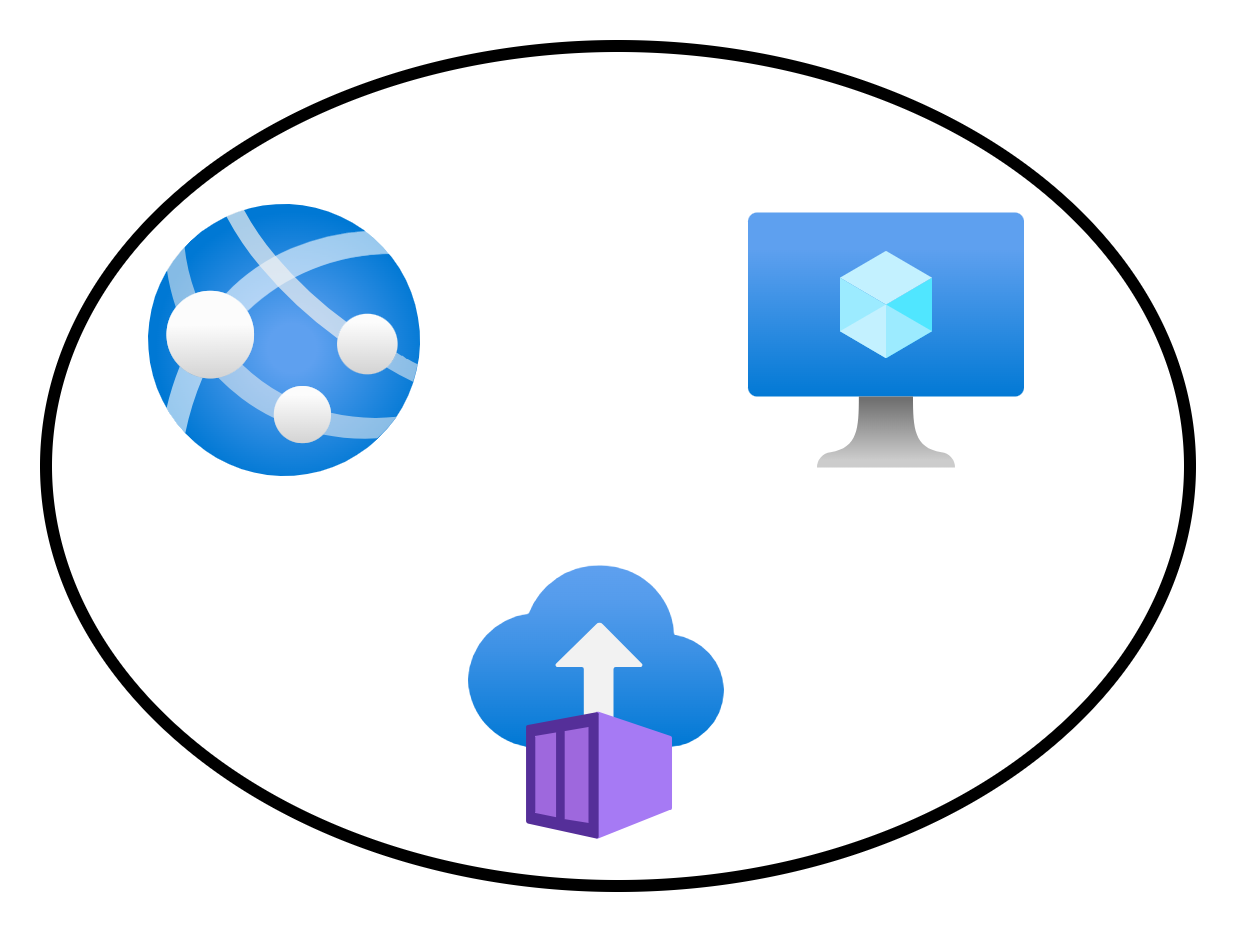
Here’s an example of a single virtual network with some connected Azure resources.
Connecting these resources to the same virtual network is an instruction to the fabric to say: “Let these things be able to route to each other”. When the app service (with VNet Integration) wants to send a packet to the virtual machine, the NIC on the source VM will send the packets directly to the NIC of the destination VM.
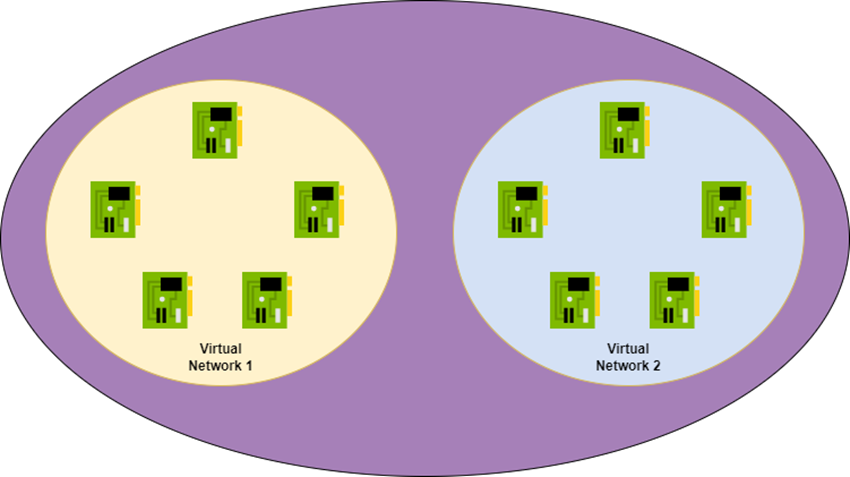
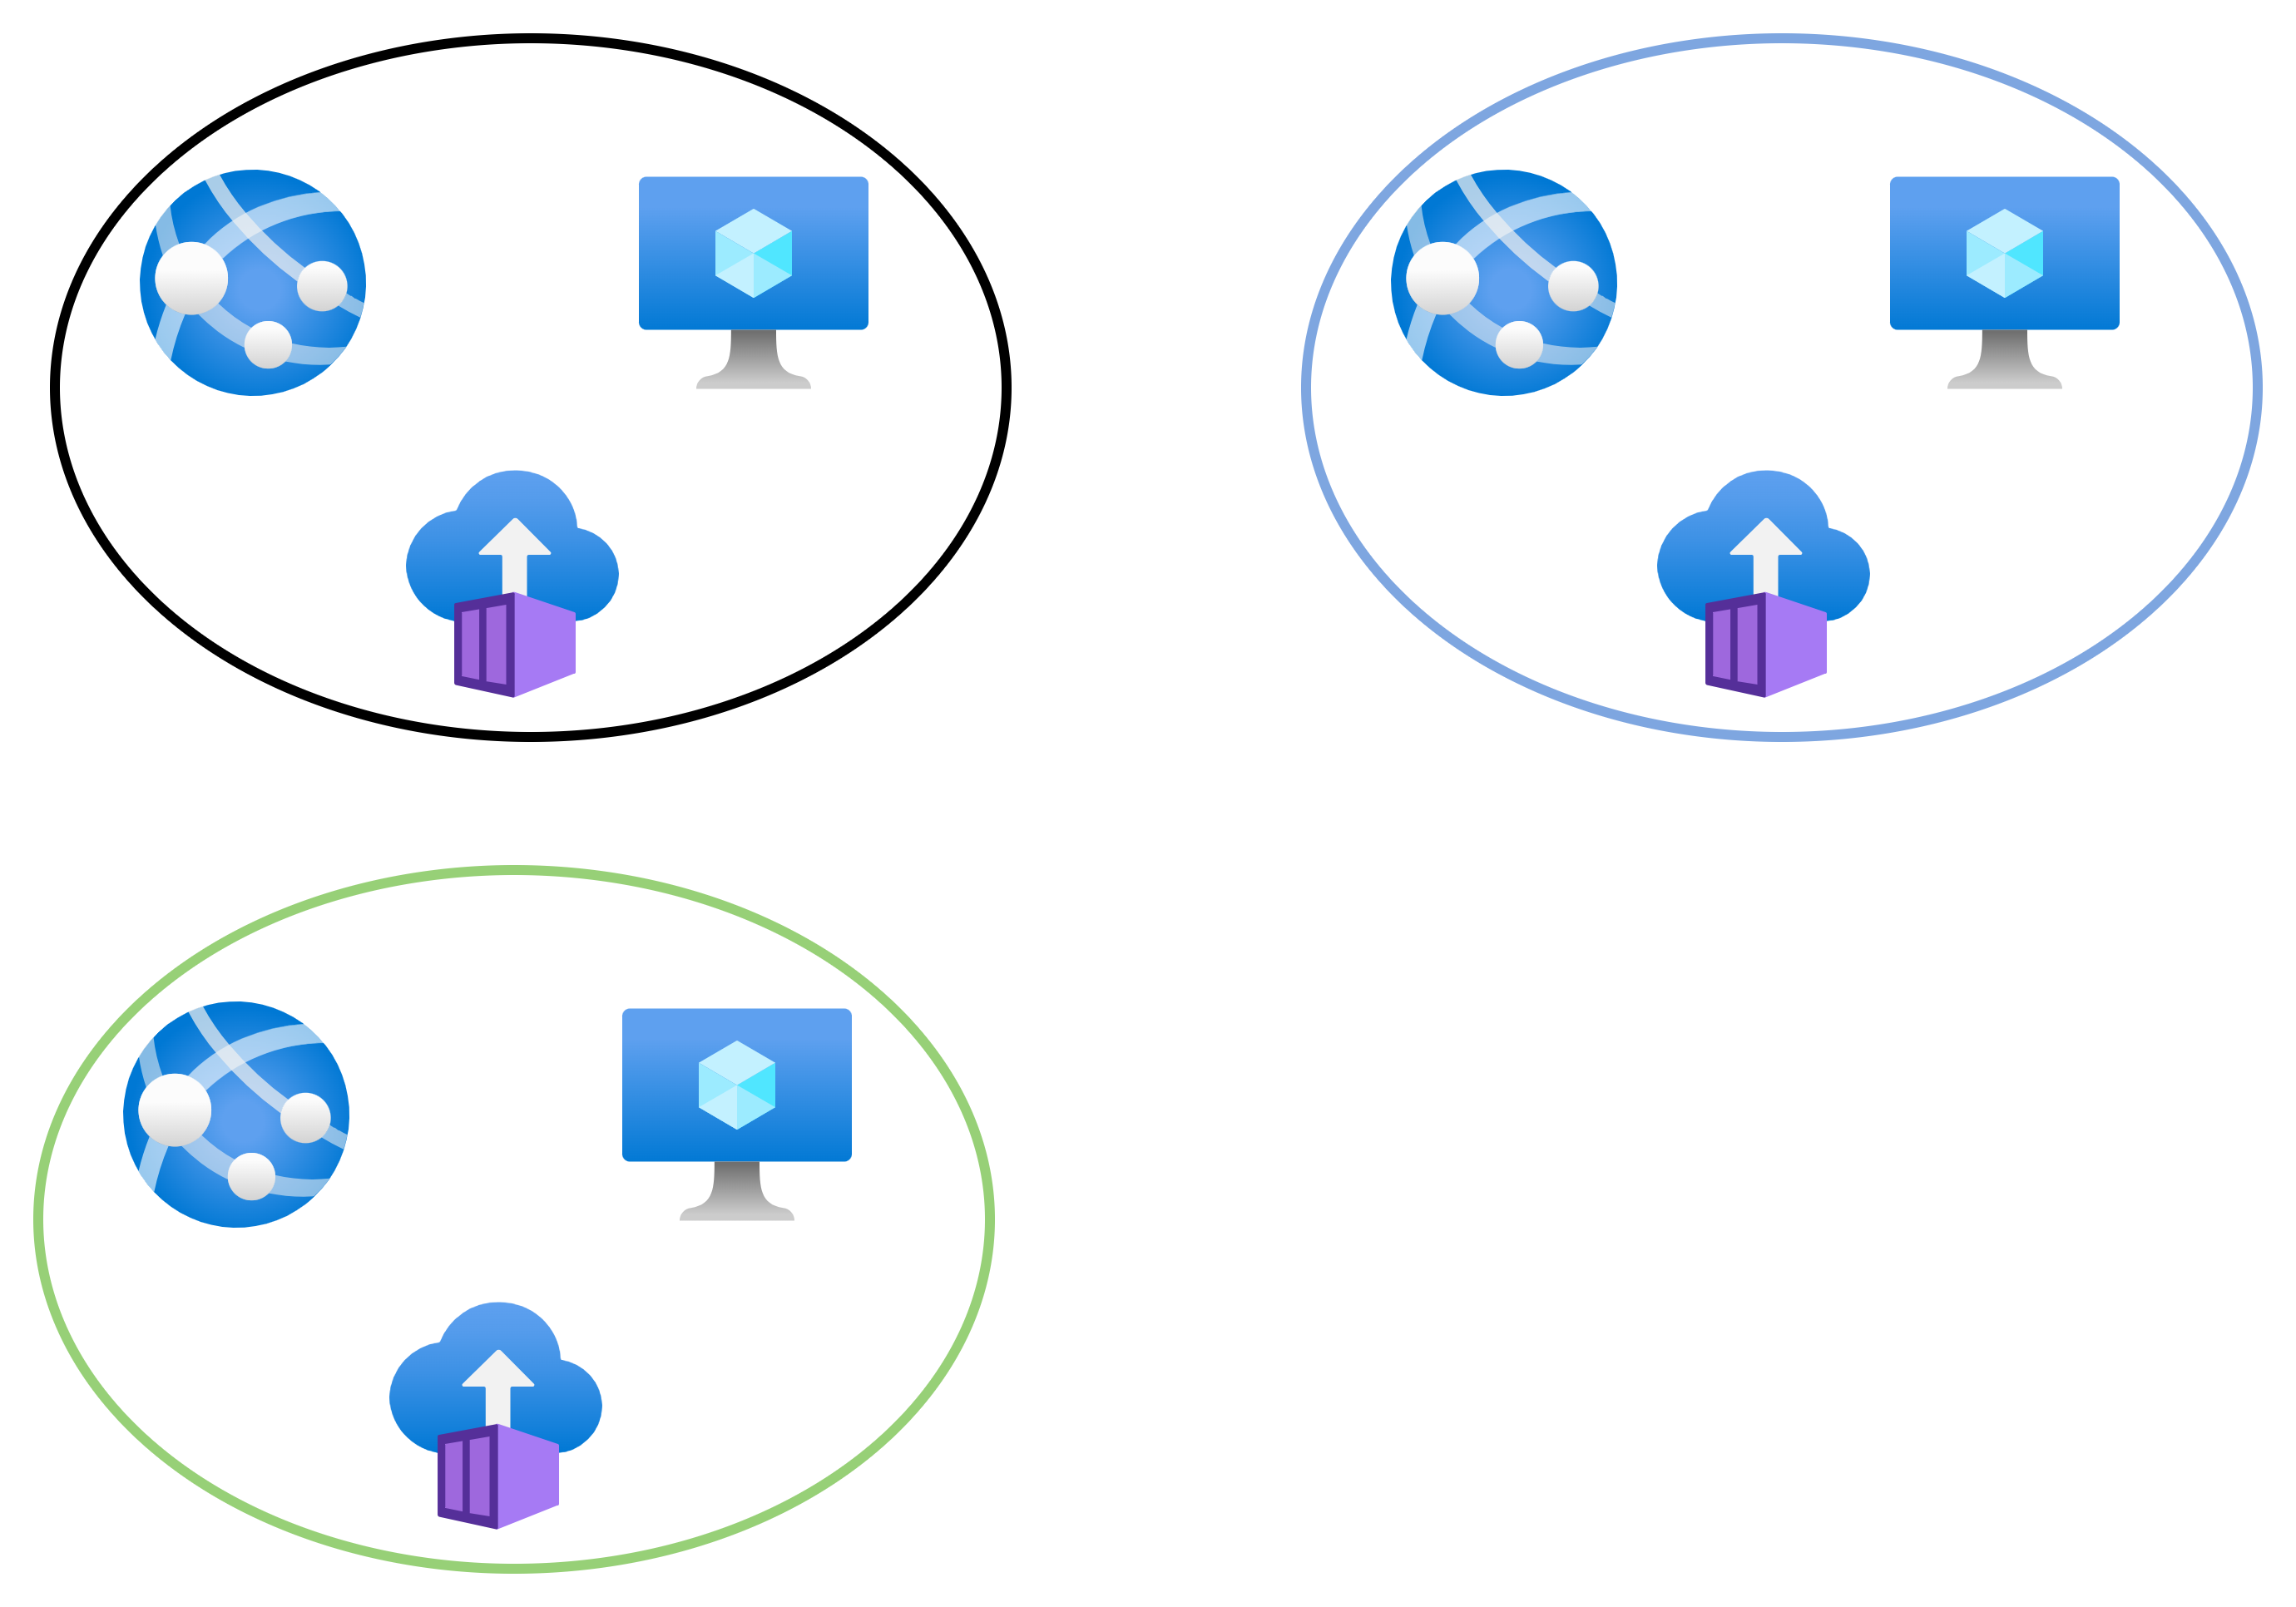
Two more virtual networks, blue and green, are created. Note that none of the virtual networks are connected/peered. Resources in the black network can talk only to each other. Resources in the blue network can talk only to each other. Resources in the green network can talk only to each other.
Now we will introduce some VNet peering:
Black <> Blue
Black <> Green
As I stated earlier, no virtual cables are created. Instead, the fabric has created new mappings. These new mappings enable new connectivity:
Black resources can talk with blue resources
Black resources can talk with green resources.
However, green resources cannot talk directly to blue resources – this would require routing to be enabled via the black network with the current peering configuration.
I can implement isolation within the VNets using NSG rules. If I want further inspection and filtering from a firewall appliance then I can deploy one and force traffic to route via it using BGP or User-Defined Routing.
Wrapping Up
The above simple concept is the biggest barrier I think that many people have when it comes to good Azure network design. If you grasp the fact that virtual networks do not exist and that packets route directly from source to destination and then be able to process those two facts then you are well on your way to designing well-connected/secured networks and being able to troubleshoot them.
If You Liked This Article
If you liked this article, then why don’t you check out my custom Azure training with my company, Cloud Mechanix. My next course is Azure Firewall Deep Dive, a two day virtual course where I go through how to design and implement Azure Firewall, including every feature. This two day course runs on February 12/13, timed for (but not limited to) European attendees.
You must have been hiding under a rock if you haven’t noticed how cloud computing has become the default in IT. I have started to wonder about the future of cloud computing. Certain international events have the potential to disrupt cloud computing in a major way. I’m going to play out two scenarios in this post and illustrate what the possible problems may be.
Bear In The East
Russia expanded their conflict with Ukraine in February 2024. This was the largest signal so far that the leadership of Russia wanted to expand their post-Soviet borders to include some of the former USSR nations. The war in Ukraine is taking much longer than expected and has eaten the Russian military, thanks to the determination of the Ukrainian people. However, we know that Russia has eyes elsewhere.
The Baltic nations (Lithuania, Latvia and Estonia) provide a potential land link between Russia and the Baltic Sea. North of those nations is Finland, a country with a long & wild border with Russia – and also one with a history of conflict with Russia. Finland (and Sweden) has recognised the potential of this expanded threat by joining NATO.
If you read “airport thrillers” like me, then you’ll know that Sweden has an island called Gotland in the Baltic Sea. It plays a huge strategic role in controlling that sea. If Russia were to take that island, they could prevent resupply via the Baltic Sea to the Baltic countries and Finland, leaving only air, land, and the long route up North – speaking of which …
Norway also shares a land border with Russia to the north of Finland. The northern Norwegian coast faces the main route from Murmansk (a place I attacked many times when playing the old Microprose F-19 game). Murmansk is the home of the Russian Atlantic fleet. Their route to the Atlantic is north of the Norwegian coast and south between Iceland and Ireland.
In the Artic is Svalbard, a group of islands that is host to polar bears and some pretty tough people. This island is also eyed up by Russia – I’m told that it’s not unusual to hear stories of some kind of espionage there.
So Russia could move west and attack. What would happen then?
Nordic Azure Regions
There are several Azure regions in the Nordics:
Norway East, paired with Norway West
Sweden Central, paired with Sweden South
One is “being built” in Espoo, Finland, just outside the capital of Helsinki.
Norway West is a small facility that is hosted in a third-party data centre and is restricted to a few customers.
I say “being built” with the Finish region because I suspect that its been active for a while with selected customers. Not long after the announcement of the region (2022) I had a nationally strategic customer tell me that the local Microsoft data centre salesperson was telling them to stop deploying in Azure West Europe (Netherlands) and to start using the new Finnish region.
FYI: the local Microsoft data centre salesperson has a target of selling only the local Azure region. The local subsidiary has to make a usage commitment to HQ before a region is approved. Adoption in another part of Azure doesn’t contribute to this target.
I remember this conversation because it was not long after tanks rolled into Ukraine and talk of Finland joining NATO began heating up. I asked my customer: “Let’s say you place nationally critical services into the new Finnish region. What is one of the first things that Russia will send missiles to?” Yes, they will aim to shut down any technology and communications systems first … including Azure regions. All the systems hosted in Espoo will disappear in a flaming pile of debris. I advised the customer that if I were them, I would continue to use cloud regions that were as far away as possible while still meeting legal requirements.
Norway’s situation is worse. Their local and central governments have to comply with a data placement law, which prevents the placement of certain data outside of Norway. If you’re using Azure, you have no choice, you must use Norway East, which is in urban Oslo (the capital on the south coast). Private enterprises can choose any of the European regions (they typically take West Europe/Netherlands, paired with North Europe/Ireland) so they have a form of disaster recovery (I’ll come back to this topic later). However, Norway East users cannot replicate into Norway West – the Stavanger-located region is only available to a select (allegedly) three customers and it is very small.
FYI: restricted access paired regions are not unusual in Azure.
Disaster Recovery
So a hypersonic missile just took out my Azure region – what do I do next? In an ideal world, all of your data was replicated in another location. Critical systems were already built with redundant replicas. Other systems can be rebuilt by executing pipelines with another Azure region selected.
Let’s shoot all of that down, shall we?
So I have used Norway East. And I’ve got a bunch of PaaS data storage systems. Many of those storage systems (Azure Backup recovery services vaults) are built on blob storage. Blob storage offers geo-redundancy which is restricted to the paired region. If my data storage can only replicate to the paired region and there is no paired region available to me, when there is no replication option. You will need to bake your own replication system.
Some compute/data resource types offer replication in any region. For example, Cosmos DB can replicate to other regions but that comes with potential sync/latency issues. Azure VMs offer Azure Site Recovery which enables replication to any region. This is where I expect the “cloud native” types to be “GitOps!” but they always seem to focus only on compute and forget things like data – no we won’t be putting massive data stores in an AKS container 🙂
Has anyone not experienced capacity issues in an Azure region in the last few years? There are probably many causes for that so we won’t go down that rabbit hole. But a simple task of deploying a new AVD worker pool or a firewall with zone resilience commonly results in a failure because the region doesn’t have capacity. What would happen if Norway East disappeared and all of the tenants started to failover/redeploy to other European regions? Let’s just say that there would be massive failures everywhere.
Orange Man In The West
Greenland is an autonomous territory of the Kingdom of Denmark. Being a Danish territory makes it a part of the EU. US president-elect, Donald Trump, has been sabre-rattling about Greenland recently. He either wants the US to take it over by economic (trade war) or military means.
If the USA goes into a trade war with Denmark, then it will go into a trade war with all of the EU. Neither side will win. If the tech giants continue to personally support Donald Trump then I can imagine the EU retaliating against them. Considering that Microsoft, Amazon, and Google are American companies, sanctions against those companies would be bad – the cost of cloud computing could rocket and make it unviable.
If the USA invaded Greenland (a NATO ally by virtue of being a Danish territory) then it would lead to very a unpleasant situation between NATO/EU and the USA. One could imagine that American companies would be shunned, not just emotionally but also legally. That would end Azure, AWS, and Google in the EU.
So how would one recover from losing their data and compute platform? It’s not like you can just live migrate a petabyte data lake or a workload based on Azure Functions.
The Answer
I don’t have a good answer. I know of an organisation that had a “only do VMs in Azure” policy. I remember bing dumbfounded at the time. They explained that it was for support reasons. But looking back on it, they abstracted themselves from Azure by use of an operating system. They could simply migrate/restore their VMs to another location if necessary – on-prem, another cloud, another country. They are not tied to the cloud platform, the location, or the hardware. But they do lose so many of the benefits of using the cloud.
I expect someone will say “use on-prem for DR”. OK, so you’ll build a private cloud, at huge expense and let it sit there doing nothing on the off-chance that it might be used. If I was in that situation then I wouldn’t be using Azure/etc at all!
I’ve been wondering for a while if the EU could fund/sponsor the creation of an IT sector in Europe that is independent from the USA. It would need an operating system, productivity software, and a cloud platform. We don’t have any tech giants as big or as cash rich as Microsoft in the EU so this would have to be sponsored. I also think that it would have to be a collaboration. My fear is that it would be bogged down in bureaucracy and have a heavy Germany/France first influence. But I am looking at the news every day and realsing that we need to consider a non-USA solution.
Wrapping Up
I’m all doom and gloom today. Maybe it’s all of the negativity in the news that is bringing me down. I see continued war in Ukraine, Russia attacking infrastructure in the Baltic sea, and threats from the USA. The world has changed and we all will need to start thinking about how we act in it.