Sizing Virtualisation CPU Requirements

I’ve been analysing our CPU utilisation figures and I’m impressed by how well Hyper-V is running and upset at how much hardware we’ve used.

We’re a hosting company.  We have no idea what our physical requirements will be for our private cloud.  A customer might come in wanting a low end virtual web server.  Or they might come in and want some highly available a working floating point number crunching VM.  I don’t have crystal ball or a Ouija board so how am I to know?

I looked at the figures this week and what I’m seeing is that we are barely touching the CPU resources in our hosts.  We started off guessing what our future requirements would be.  We put in dual quad core CPU’s and hoped for the best.  What I’m seeing today is full hosts (RAM-wise) that barely touch their available CPU resources.  I have a recently purchased and filled single CPU host that averages around 25% CPU utilisation.

Our unpredictability makes us different to most who are implementing virtualisation for the first time.  Most people already have existing physical servers that they plan to migrate to their new virtualisation platform.  They can run some monitoring (either done by a consultant for the specific task) or use something like Operations Manager with the additional VMM reports.  In this scenario if a server uses 50% of it’s existing single quad core CPU then it’s going to use 25% or thereabouts of the resources on a dual quad core CPU host (assuming similar generation of CPU).

What about low end requirements?  How many of those sorts of VM’s can you get on Hyper-V?  Windows Server 2008 R2 Hyper-V is very scalable.  You can have up to 64 logical processors (physical CPU cores) in a host (Enterprise and Datacenter editions).  Each logical processor can support up to a maximum of 8 virtual processors (that’s the CPU assigned to a VM).  A standalone host can have up to 384 virtual processors.  A clustered node can have up to 64 running virtual processors.  Make sure your storage and RAM can handle the associated loads on their resources first.

Now I have some empirical data that I can make semi-informed decisions on (no crystal ball, remember!).  Our next purchases will feature the Nehalem processors which increase the load capacity over our current hosts.  We will increase the RAM capacity per host, thus increasing the amount of VM’s per host.  I think I’ll be going single CPU.  That will reduce power, purchase and SPLA licensing costs.  Between VMM and OpsMgr, I’ll know if that needs to increase.

Cannot Delete Cluster Object From Operations Manager 2007

I recently decommissioned a Windows Server 2008 Hyper-V cluster.  It was monitored by OpsMgr 2007 R2.  When we shutdown the last cluster node I tried to remove both its agent object and the agentless managed cluster object from OpsMgr administration.  I couldn’t.  The cluster just refused to disappear.  The server agent would delete because there was a remaining dependency – the cluster object which relied on it as a proxy.

It had a red state (ruining my otherwise all green status view) and, more annoyingly, many of the migrated resources (VM’s) still seemed to be linked to the old cluster despite being moved to the new cluster.

I searched and found lots of similar queries.  The official line from MS is that there is no supported way to do this deletion.  There is a hack but the instructions didn’t work for me – I couldn’t find the key piece of info – plus it is unsupported.

So I uninstalled the agent manually.  No joy.  I waited.  No joy.  I rebuilt the server and added it to our Windows Server 2008 R2 Hyper-V cluster.  No joy.  I installed the OpsMgr agent and enabled the proxy setting.

That was yesterday.  This morning I logged in and the old cluster object is gone.  Vamoose!  I guess OpsMgr figured out that the server was now in a new cluster and everything was good.

How Hyper-V SCSI is Really IDE And It Doesn’t Matter

Ben Armstrong has done a good job at explaining how it doesn’t matter if you use IDE or SCSI disks in your VM.

It turns out that under the hood there’s no real difference between them.  And as you probably already know, the real decision is if you are using SAS or SATA disks underneath the virtualisation layer.

Hyper-V and VLAN’s

How do you run multiple virtual machines on different subnets?  Forget for for just a moment that these are virtual machines.  How would you do it if they were physical machines?  The network administrators would set up a Virtual Local Area Network or VLAN.  A VLAN is a broadcast domain, i.e. it is a single subnet and broadcasts cannot be transmitted beyond its boundaries without some sort of forwarder to convert the broadcast into a unicast.  Network administrators use VLAN’s for a bunch of reasons:

  • Control broadcasts because they can become noisy.
  • They need to be creative with IP address ranges.
  • The want to separate network devices using firewalls.

That last one is why we have multiple VLAN’s at work.  Each VLAN is firewalled from every other VLAN.  We open up what ports we need to between VLAN’s and to/from the Internet. 

Each VLAN has an ID.  That is used by administrators for configuring firewall rules, switches and servers.

How do you tell a physical server that it is on a VLAN?

There’s two ways I can think of:

  • The network administrators would assign the switch ports that will connect the server to a specific VLAN
  • The network administrators can create a “trunk” on a switch port.  That’s when all VLAN’s are available on that port.  Then on the server you need to use the network card driver or management software to specify which VLAN to bind the NIC to.  Some software (HP NCU) allows you to create multiple virtual network cards to bind the server to multiple VLAN’s using one physical NIC.

How about a virtual machine; how do you bind the virtual NIC of a virtual machine to a specific VLAN?  It’s a similar process.  I must warn anyone reading this that I’ve worked with a Cisco CCIE while working on Hyper-V and previously with another senior Cisco guy while working on VMware ESX and neither of them could really get their heads around this stuff.  Is it too complicated for them?  Hardly.  I think the problem was that it was too simple!  Seriously!

Let’s have a look at the simplest virtual networking scenario:

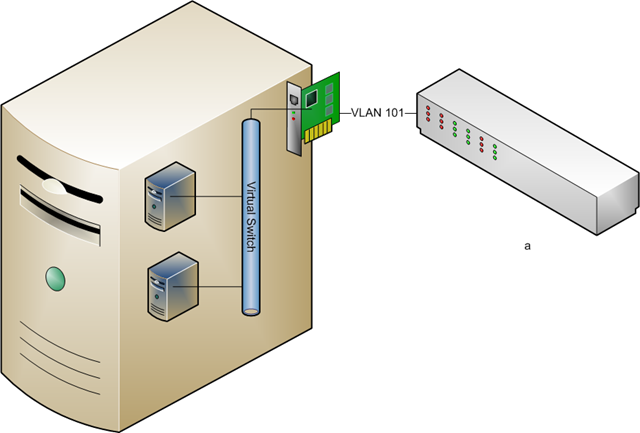
imageThe host server has a single physical NIC to connect virtual machines.  A virtual switch is created in Hyper-V to pass the physical network that is attached to that NIC to any VM that is bound to that virtual switch.

You can see above that the switch only operates with VLAN 101.  Every server on the network operates on VLAN 101.  The physical servers are on it, the parent partition of the host is on it, etc.  The physical switch port is connected to the virtual machine NIC in the host using a physical network cable.  In Hyper-V, the host administrator creates a virtual switch.

Network admins: Here’s where you pull what hair you have left out.  This is not a switch like you think of a switch.  There is no console, no MIB, no SNMP, no ports, no spanning tree loops, nada!  It is a software connection and network pass through mechanism that exists only in the memory of the host.  It interacts in no way with the physical network.  You don’t need to architect around them.

The virtual switch is a linking mechanism.  It connects the physical network card to the virtual network card in the virtual machine.  It’s as simple as that.  In this case both of the VM’s are connected to the single virtual switch (configured as an External type).  That means they too are connected to VLAN 101.

How do we get multiple Hyper-V virtual machines to connect to multiple VLAN’s?  There’s a few ways we can attack this problem.

Multiple Physical NIC’s

In this scenario the physical host server is configured with multiple NIC’s. 

*Rant Alert* Right, there’s a certain small number of journalists/consultants who are saying “you should always try to have 1 NIC for every VM on the host”.  Duh!  Let’s get real.  Most machines don’t use their GB connections in a well designed and configured network.  That nightly tape backup over the network design is a dinosaur.  Look at differential, block level continuous incremental backups instead, e.g. Microsoft System Center Data Protection Manager or Iron Mountain Live Vault.  Next, who has money to throw at installing multiple quad NIC’s with physical switch ports all over the place.  The idea here is to consolidate!  Finally, if you are dealing with blade servers you only have so many mezzanine card slots and enclosure/chassis device slots.  If a blade can have 144GB of RAM, giving maybe 40+ VM’s, that’s an awful lot of NIC’s you’re going to need :)  Sure there are scenarios where a VM might need a dedicated NIC but there are extremely rare. *Rant Over*

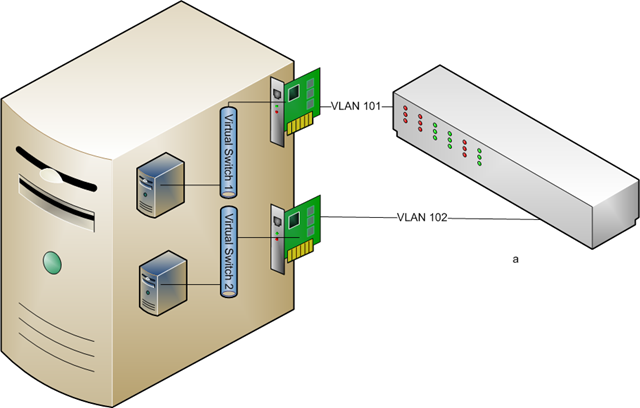
imageIn this situation the network administrator has set up two ports on the switches, one for each VLAN to connect to the Hyper-V host.  VLAN 101 has a physical port on the switch that is cabled to NIC 1 on the host.   VLAN 102 has a physical port on the switch that is cabled to NIC 2 on the host.  The parent partition has it’s own NIC, not shown.  Virtual Switch 1 is created and connected to NIC 1 and Virtual Switch 2 is created and connected to NIC 2.  Every VM that needs to talk on VLAN 101 will be connected to Virtual Switch 1 by the host administrator.  Every VM that needs to talk on VLAN 102 should be connected to Virtual Switch 2 by the host administrator.

Virtual Switch Binding

You can only bind one External type virtual switch to a NIC.  So in the above example we could not have matched up two virtual switches to the first NIC and changed the physical switch port to be a network trunk.  We can do something similar but different.

imageWhen we create an external virtual switch we can tell it to only communicate on a specific VLAN.  You can see in the above screenshot that I’ve built a new virtual switch and instructed it to use the VLAN ID (or tag) of 102.  That means that every VM virtual NIC that connects to this virtual switch will expect to be on VLAN 102 with no exceptions.

Taking our previous example, here’s how this would look:

imageThe network administrator has done things slightly different this time.  Instead of configuring the two physical switch ports to be bound to specific VLAN’s they’re simple configured trunks.  That means many VLAN’s are available on that port.  The device communicating on the trunk must specify what VLAN it is on to communicate successfully.  Worried about security?  As long as you trust the host administrator to get things right you are OK.  Users of the virtual machines cannot change their VLAN affiliation.

You can see that virtual switch 1 is now bound to VLAN 101.  Every VM that connects to virtual switch 1 will be only able to communicate on VLAN 101 via the trunk on NIC 1.  It’s similar on NIC 2.  It’s set up with a virtual switch on VLAN 102 and all bound VM’s can only communicate on that VLAN.

We’ve changed where the VLAN responsibility lies but we haven’t solved the hardware costs and consolidation issue.

VLAN ID on the VM

Here’s the solution you are most likely to employ.  For the sake of simplicity let’s forget about NIC teaming for a moment.

imageInstead of setting the VLAN on the virtual switch we can do it in the properties of the VM.  To be more precise we can do it in the properties of the virtual network adapter of the VM.  You can see that I’ve done this above by configuring the network adapter to only communicate on VLAN (ID or tag) 102.

This is how it looks in our example:
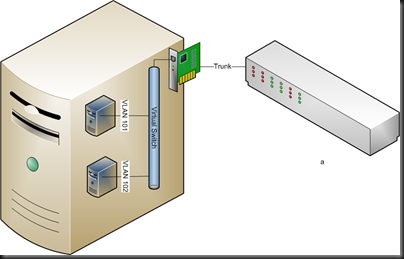
imageAgain, the network administrator has set up a trunk on the physical switch port.  A single external virtual switch is configured and no VLAN ID is specified.  The two VM’s are set up and connected to the virtual switch.  It is here that the VLAN specification is done.  VM 1 has it’s network adapter configured to talk on VLAN 101.  VM 2 is configured to operate on VLAN 102.  And it works, just like that!

Waiver: I’m seeing a problem where VMM created NIC’s do not bind to a VLAN.  Instead I have to create the virtual network adapter in the Hyper-V console.

Here’s one to watch out for if you use the self servicing console.  If you cannot trust delegated administrators/users to get VLAN ID configuration right or don’t trust them security-wise then do not allow them to alter VM configurations.  If you do then they can alter the VLAN ID and put their VM into a VLAN that it might not belong to.

Firewall Rules

Unless network administrators allow it, virtual machines on VLAN 101 cannot see virtual machines on VLAN 102.  A break out is theoretically impossible due to the architecture of Hyper-V leveraging the No eXecute Bit (AKA DEP or Data Execution Prevention).

Summary

You can see that you can set up a Hyper-V host to run VM’s on different VLAN’s.  You’ve got different ways to do it.  You can even see that you can use your VLAN’s to firewall VM’s from each other.  Hopefully I’ve explained this in a way that you can understand.
VMM 2008 R2 Quick Storage Migration

Without System Center Virtual Machine Manager 2008 R2 (and pre-Windows Server 2008 R2 Hyper-V) there is only one way to move a virtual machine between un-clustered hosts or between Hyper-V clusters.  That is to perform what is referred to as a network migration.  Think of this as an offline migration.  The VM must be powered down, exported, the files moved, the VM imported again and powered up, maybe with the integration components being manually added.  The whole process means a production VM can be offline for a significant amount of time.  Moving a 100GB VHD takes time, even over 10GB-E.

However, if you have Windows Server 2008 R2 (on both source and destination) and VMM 2008 R2 then you can avail of Quick Storage Migration:

image

This is a clever process where a VM can remain up and running for the bulk of the file move.  Microsoft claims that the VM only needs to be offline for maybe two minutes.  That really does depend, as you’ll see.

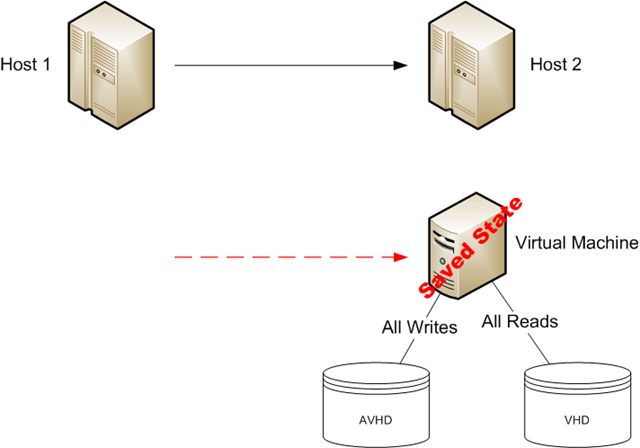
We need to discuss something first.  Hyper-V has lots of several different types of virtualised storage.  One of them is a virtual hard disk (VHD) called a differencing disk.  It is specially an AVHD (advanced virtual hard disk).  It is used during a snapshot.  That’s a Hyper-V term.  VMM refers to it as a checkpoint.  The AVHD is created and the VM switches all write activity from it’s normal VHD to the AVHD.  All new data goes into the AVHD.  All reads for old data come from the original VHD.  That means the VHD is no longer locked, preventing copies.  See where we’re going here?

Here we have two un-clustered host machines, 1 and 2.  Host 1 is running a VM which has a single VHD for all of its storage.  We want to move it from Host 1 to Host 2 with the minimum amount of downtime.  We have W2008 R2 Hyper-V on both hosts and manage them with VMM 2008 R2.

image

We open up the VMM 2008 R2 console, right-click on the VM and select Migrate.  In the wizard we select Host 2 as the destination and select the storage destination and the Virtual Network connection(s).  Once we finish the wizard you’ll see the original screenshot above.

image

The VMM job creates a checkpoint (AKA snapshot) of the VM to be migrated.  This means the VM will put all writes in the AVHD file.  All reads of non-changed data will be from the VHD file.  Now the VHD file is no-longer prevented from being copied.

imageThe VMM job uses BITS to copy the no-longer write-locked VHD from Host 1 to the destination storage location on Host 2.  During this time the VM is still running on Host 1.

Here’s where you have to watch out.  That AVHD file will grow substantially if the VM is writing like crazy.  Make sure you have sufficient disk space.  Anyone still doing 1-VM-per-LUN cluster deployments will need to be really careful, maybe pick a specific storage location for snapshots that has space.  Once the physical disk fills the VM will be paused by Hyper-V to save its continuity.  If your VM is write-happy then pick a quiet time for this migration.

image 

Start your stop watch.  Now the VM is put into a saved state (not paused) on Host 1.  We have to move that AVHD which is otherwise write locked.  If we don’t move it then we lose all the written data since the job started.  Again, BITS is used by VMM to move the file from Host 1 to Host 2.

imageWhen the files are moved VMM will export the configuration of the VM from Host 1 and import it onto Host 2.

imageThe checkpoint (AKA snapshot) is deleted.  The VM needs to be offline here.  Otherwise the AVHD would not be merged into the VHD.  That would eventually kill the performance of the VM.  But, the machine is offline and the AVHD can be merged into the VHD.  All those writes are stored away safely.

imageStop your stop watch.  The virtual network connection(s) are restored and then the very last step is to change the virtual machine’s running state, bringing it back to where it was before it went offline. 

The entire process is automated from when you finish the wizard and up to when you check on the machine after the job has ended.  It’s storage is moved and the VM continues running on the new host.

Note that a VM with multiple VHD’s will have multiple AVHD’s; it’s a 1-to-1 relationship.

How long does this take?

  • The offline time depends on how much data is written to the AVHD, ho fast your network can transmit that AVHD from Host 1 to Host 2 and how fast the disk is on Host 2 to merge the AVHD back into the VHD.
  • The entire process takes as long as it takes to copy the VHD and then complete the AVHD process and do the tidy up work at the end of the job.

In my tests with an idle VM, the offline time (not timed scientifically) felt to be under a minute.

I moved a VM from a cluster to an un-clustered lab machine and back again.  Both times, the highly available setting was appropriately changed.  I was able to modify the virtual network connections appropriately in the migrate wizard.

Live Migrations Are Serial, Not Concurrent

Normally when you move 2 VM’s from one host to another using Live Migration they move one at a time.  Yes, the VMM job pauses at 50% for the second machine for a while – that’s because it hasn’t started to replicate memory yet.  The live migrations are serial, not concurrent.  The memory of a running VM is being copied across a network so the network becomes a bottleneck.

I ran a little test across 3 Windows Server 2008 R2 Hyper-V cluster nodes to see what would happen.  I started moving a VM from Host A to Host C.  I also started moving a VM from Host B to host C.  The first one ran straight through.  The second one paused at 50% until the first one was moved – just like moving 2 VM’s from one host to another.

How Well Does Live Migration Perform?

Excellently.  But why believe me?  I’ve just added a node to our cluster and moved a VM throughout the infrastructure in every combination I could think of, from host A to B, from B to A, from A to C, from C to A, from B to C … you get the idea.

While I was going this I was RDP’d into that VM that was being moved using Live Migration.  I ran a continuous ping from that session to the physical default gateway, a Cisco firewall.  This is the result of the ping:

    Packets: Sent = 1174, Received = 1174, Lost = 0 (0% loss),
Approximate round trip times in milli-seconds:
    Minimum = 0ms, Maximum = 4ms, Average = 0ms

What was lost?  Zip!  Nada!  How many interruptions did I experience during my RDP session?  Zip!  Nada!

‘Nuff said.

Adding a Node To A VMM Managed Hyper-V Cluster

I’ve just gone through this process so I thought I’d document what I did:

  • Have a test VM ready and running on the cluster.  You’ll be moving it around to/from the new node. Don’t use a production machine in case something doesn’t work.
  • Built the new node.  Set up hardware, drivers and patches, making sure the machine was identical to the other nodes in the cluster.  I mean identical.
  • Enable Hyper-V role and Failover Clustering feature.
  • Configure the virtual networks to be identical as the other nodes – VMM won’t do this in the “add” step and we know it messes up the configuration of External networks.
  • Used the SAN manager to present all cluster disks to the new node.
  • Put the cluster, Hyper-V cluster nodes and VMM server into maintenance mode in OpsMgr.
  • Add the new node to the cluster in Failover Clustering.  Modified the cluster quorum settings to be recommended.
  • Refreshed the cluster in VMM 2008 R2.  Waited for the new node to appear under the cluster in a pending state.
  • Right-clicked on the new pending node and selected Add Node To Cluster.  Entered administrator credentials (good for all nodes in the cluster).  VMM ran a job to deploy the VMM agent.
  • If everything is good and matches up (watch out for virtual networks) then you won’t see the dreaded “Unsupported Cluster Configuration” error.
  • Move that test VM around from the new node to all the other nodes and back again using Live Migration.
  • Re-run the validation tests against your cluster ASAP.

All should be well at this point.  If so, deploy your OpsMgr agent and take the OpsMgr agents out of maintenance mode.

How W2008 R2 Live Migration Works

Let’s recap the different types of migration that we can get with Windows Server Hyper-V and System Center Virtual Machine Manager:

  • Quick Migration: Leveraging Windows Failover Clustering, a VM is treated as a clustered resource.  To quick migrate, the running state is saved to disk (hibernating the VM), the disk failed over to another node in the cluster, and the saved state is loaded (waking up the VM).
  • Offline Migration: This is when we use VMM to move a powered down VM from one un-clustered Hyper-V server to another or from one cluster to another.
  • Quick Storage Migration: This is a replacement for Offline Migration for Windows Server 2008 R2 Hyper-V servers when using VMM 2008 R2. A running VM can be moved from one un-clustered host to another or from one cluster to another with only around 2 minutes.
  • Live Migration: This is the process of moving a virtual machine from one cluster node to another with no perceivable downtime to network applications or users.  VMware refer to this as VMotion.  It was added in Windows Server 2008 R2 Hyper-V and is supported by VMM 2008 R2.

Live Migration was the big stick that everyone beat up Windows Server 2008 Hyper-V.  A few seconds downtime for a quick migration was often good enough for 75%-90% of VM’s but not for 100%.  But you can relax now; we have Live Migration.  I’m using it in production and it is good!  I can do host maintenance and enable completely automated PRO tips in VMM without worrying of any downtime, no matter how brief, for VM’s.  How does Live Migration Work?  Let’s look at how it works.

imageAbove, we have a virtual machine running on host 1.  It has a configuration and a “state”.

imageWhen we initiate a live migration the configuration of the VM is copied from host 1 when the VM is running to host 2, the destination host.  This builds up a new VM.  The VM is still running on host 1.

imageWhile the VM remains running on host 1, the memory of the VM is broken down and tracked using a bitmap.  Each page is initially marked as clean.  The pages are copied from the running VM on host 1 to the new VM sitting paused on host 2.  Users and network applications continue to use the VM on host 1.  If a RAM page changes in the running VM on host 1 after it has been copied to host 2 then Windows changes the state from clean to dirty.  This means that Windows needs to copy that page again during another copy cycle.  After the first RAM page copy cycle, only dirty pages are copied. As memory is copied again it is marked as clean.  As it changes again, it is marked as dirty.  This continues …

So when does all this stop?

  1. The process will cease if all pages have been copied over from host 1 to host 2 and are clean.
  2. The process cease if there is only a tiny, tiny amount of memory left to copy, i.e. the state. This is tiny.
  3. The process will cease if it has done 10 iterations of the memory copy. In this scenario the VM is totally trashing it’s RAM and it might never have a clean bitmap or tiny state remaining.  It really is a worst case scenario.

Note: The memory is being copied over a GB network.  I talked about this recently when I discussed the network requirements for Live Migration and Windows Server 2008 R2 Hyper-V clusters.

Remember, the VM is still running on host 1 right now.  No users or network applications have seen any impact on uptime.

imageStart your stop watch.  This next piece is very, very quick.  The VM is paused on host 1.  The remaining state is copied over to the VM on host 2 and the files/disk are failed over from host 1 to host 2.

imageThat stop watch is still ticking.  Once the state is copied from the VM on host 1 to host 2 Windows will un-pause it on host 2.  Stop your stop watch.  The VM is removed from host 1 and it’s running away on host 2 as it had been on host 1.

Just how long was the VM offline between being paused on host 1 and un-paused on host 2?  Microsoft claims the time is around 2 milliseconds on a correctly configured cluster.  No network application will time out and no user will notice.  I’ve done quite a bit of testing on this.  I’ve pinged, I’ve done file copies, I’ve used RDP sessions, I’ve run web servers, I’ve got OpsMgr agents running on them and not one of those applications has missed a beat.  It’s really impressive.

Now you should understand why there’s this "long" running progress bar when you initiate a live migration.  There’s a lot of leg work going on while the VM is running on the original host and then suddenly it’s running on the destination host.

VMware cluster admins might recognise the above technique described above.  I think it’s pretty much how they accomplish VMotion.

Are there any support issues?  The two applications that come to mind for me are the two most memory intensive ones.  Microsoft has a support statement to say that SQL 2005 and SQL 2008 are supported on Live Migration clusters.  But what about Exchange?  I’ve asked and I’ve searched but I do not have a definitive answer on that one.  I’ll update this post if I find out anything either way.

Edit #1

Exchange MVP’s Nathan Winters and Jetze Mellema both came back to me with a definitive answer for Exchange.  Jetze had a link (check under hardware virtualization).  The basic rule is that a DAG (Data Availability Group) does not support hardware virtualisation if the hosts are clustered, i.e. migration of an Exchange 2010 DAG member is not supported.