My Demo Environment For Next Friday

Here’s the demonstration setup I’ll be using for the deployment session I’m presenting on Friday.  I’ll be talking about Windows 7 and Windows Server 2008 R2 deployment.  The technologies covered are WAIK, WDS and MDT 2010.

The demo machine is a Dell Latitude 6500.  It normally boots Windows 7 but I have attached an eSATA 7.2K 250GB hard drive.  That gives me decent speed on external storage; it’s also storage you can install Windows on to.  I boot the laptop up from that drive.  On there is Windows Server 2008 R2 with Hyper-V enabled.

On the parent partition is VMM 2008 R2 which I use to deploy new machines from templates stored in the library.  I’ve also installed Office 2007 so I can run PowerPoint and Office LiveMeeting 2007 so I can run the webcast.  I run LiveMeeting with the entire desktop shared and use a Polycom room microphone to pick up sound.  If I’m at a podium then I like to get up and walk a little bit.  I’ll also be using my laser pointer/clicker; it’s a decent sized thing – I don’t like little fiddly clickers.

There’s 5 demo VM’s configured.  I have a domain controller running W2008 R2 with AD, DNS and DHCP enabled and configured.  There is a deployment server running W2008 R2 with WDS enabled configured.  I’ve also installed WAIK and MDT 2010, both partially configured.  Some of the demos take too long for the session so I have some stuff pre-done.  There’s an XP SP3 VM, a blank VM and a Windows 7 VM.  The blank VM will be used to show the 3 types of deployment that I’ll be demonstrating, maybe even 4 given the time.  The Windows 7 VM is there in case I have time to demonstrate capturing an image.

All VM’s have a snapshot of their demo ready state.  I’ve defragged the disk to make the most of its speed.  When I run the session I’ll be sharing the entire desktop and expanding each VM to full screen (it appears like an RDP session).  This is because I’ll be plugged into a projector with a 1024*768 resolution and I need to be aware that viewers of the webcast will not be able to deal with huge resolutions.  I’m not RDP’ing into VM’s because a lot of the time I’m working with machines when there is no RDP available, e.g. BIOS, setup, etc.

And here’s a little something for Technorati: ZYRDJGJYCDG8

Network Requirements for Live Migration

As more and more people start deploying Windows Server 2008 R2 Hyper-V, the most common question will be: “how many NIC’s or network cards do I need to implement Live Migration?”.  Here’s the answer for you.

Your minimum optimal configuration is:

  • NIC #1: Parent partition (normal network)
  • NIC #2: Cluster heartbeat (private network)
  • NIC #3: Live Migration (private network)
  • NIC #4: Virtual Switch (normal/trunked network)

You’ll need to add more NIC’s if you want NIC teaming or need to dedicate NIC’s to virtual switches or VM’s.  This does not account for iSCSI NIC’s which should obviously be dedicated to their role.

How does Windows know which NIC to use for Live Migration?  Failover Clustering picks a private network for the job.  You can see the results by launching the Failover Clustering MMC, opening up the properties of a VM, and going to the last tab.  Here you’ll see which network was chosen.  You can specify an alternative if you wish.

I’ve gone with a different layout.  We’re using HP Blade servers with virtual connects.  Adding NIC’s is a pricey operation because it means buying more pricey virtual connects.  I also need fault tolerance for the virtual machines so a balance had to be found.  Here’s the layout we have:

  • NIC #1: Parent partition (normal network)
  • NIC #2: Cluster heartbeat / Live Migration (private network)
  • NIC #3: Virtual Switch (trunked network)
  • NIC #4: Virtual Switch (trunked network)

I’ve tested this quite a bit and pairing live migration with the cluster heartbeat has had no ill effects.  But what happens if I need to live migrate all the VM’s on a host?  Won’t that flood the heartbeat network and cause failovers all over the place?

No.  Live Migration is serial.  That means only one VM is transferred at once.  It’s designed not to flood a network.  Say you initiate maintenance mode in VMM on a cluster node.  Each VM is moved one at a time across the Live Migration network.

You can also see I’ve trunked the virtual switch NIC’s.  That allows us to place VM’s onto different VLAN’s or subnets, each being firewalled from each other.  This barrier is controlled entirely by the firewalls.  I’ll blog about this later because it’s one that deserves some time and concentration.  It has totally wrecked the minds of very senior Cisco admins I’ve worked with in the past when doing Hyper-V and VMware deployments – eventually I just told them to treat virtualisation as a black box and to trust me 🙂

I just thought of another question.  “What if I had a configuration that was OK for Windows Server 2008 Hyper-V Quick Migration?”.  That’s exactly what I had and why I chose the last configuration.  Really, you could do that with 3 NIC’s instead of 4 (drop the last one for no virtual switch fault tolerance).

Recommended Reading:

W2008 R2 Hyper-V Hot-Add Storage

One of the features not being talked about too much in Windows Server 2008 R2 Hyper-V is the ability to add new storage.  What does this mean?  It means you can add new virtual hard disks (VHD’s) to a VM while it is running.   It does not mean you can resize a VHD while the VM is running.

Before we go forward, we need to cover some theory.  There are two types of controller in Hyper-V:

  • IDE: The VM must boot from an IDE controller.  You can have 2 virtual IDE controllers per VM and a total of 4 IDE devices attached per VM.
  • SCSI: You cannot boot from a SCSI controller.  You can have up to 4 SCSI controllers, each with 64 attached VHD’s for a total of 256 SCSI VHD’s per VM.

Now don’t panic!  Forget the VMware marketing often done by uninformed shills.  When you install your enlightenments or integration components (IC’s) you’ll get the same performance out of IDE as you will with SCSI.  The only time when SCSI is faster than IDE in Hyper-V is if you don’t or can’t install the enlightenments or IC’s.  That’s because IDE requires more context switches in that scenario.

I normally use a single IDE disk for the operating system and programs.  I then use at least 1 SCSI disk for data.  And here’s why.

image

With Windows Server 2008 R2 Hyper-V you can add additional SCSI VHD’s to a VM while it’s still running.  You can see the VM configuration above (from VMM 2008 R2).  Adding another disk is easy.  You can see on the top bar that the option to add all types of hardware is greyed out – except for disk.

imageI’ve clicked on disk to reveal the above panel on the right hand side.  I can configure the disk, e.g. select the next available channel, choose a disk type (use existing, pass through, dynamic or fixed), set the size and name the VHD file.  Once I click on OK the disk is created and then made available to the VM.

From then on in, all you have to do in the OS is what you normally would do if you added a hot-add disk.

W2008 R2 Hyper-V Memory More Efficient

I’m seeing the real world results of this.  We’re getting a little bit more out of the gigabytes of RAM that is in each of our hosts with Windows Server 2008 R2 Hyper-V instead of its predecessor, even with our hardware which does not have the very latest processor.

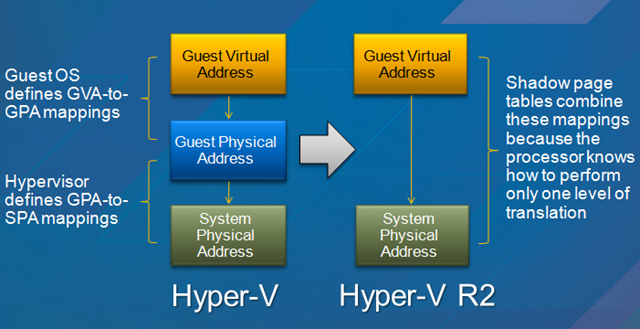
One of the main players in saving RAM on Hyper-V hosts with newer hardware will be SLAT or Second Level Address Translation.

image In Windows Server 2008 Hyper-V the parent partition (host operating system) is responsible for mapping the physical memory in the host with the memory that is running in the virtual machine.  Windows Server 2008 R2 Hyper-V removes that middle layer of management by offloading the responsibility to dedicated functions in the CPU.

CPU’s that have Intel’s Extended Page Tables (EPT) or AMD’s Nested Page Tables (NPT) or (Rapid Virtualization Indexing (RVI) have the ability to by delegated this responsibility.  This gets rid of the “shadow table” that the parent partition otherwise had to use … which was also consuming RAM.

It’s estimated that you will save 1MB of RAM per VM (there is an overhead of RAM for every VM and GB RAM in that VM) and there is also a small saving in CPU time required.

Extending a W2008 R2 Hyper-V Cluster Shared Volume

Unlike VMware’s VMFS, we can extend a Cluster Shared Volume (CSV) without doing trickery that compromises performance.  And has has been documented by Hans Vredevoort (clustering MVP) it is very scalable.

How do you resize or expand a CSV?  It’s a pretty simple process:

  1. Use your storage management solution (I’m using HP EVA Command View for the EVA SAN) to expand the size of the LUN or disk.
  2. Use the Failover Clustering MMC to identify who is the CSV coordinator, i.e. the owner of the disk.
  3. Log into the CSV coordinator.
  4. Use either Computer Management->Storage Management or DISKPART.
  5. Remember to rescan the disks.
  6. Extend the volume to use all available space.

The steps for using DISKPART are:

  • rescan
  • list volume get the ID number for the CSV from here
  • select volume <ID Number> using the ID number from the previous step>
  • extend
  • list volume to see the results

It’s a painless operation and has no impact on running VM’s.

Virtualisation: The Undersold Truth

Ease of administration.

To a sys admin, those 3 words mean a lot.  To a decision maker like a CIO or a CFO (often one and the same) they mean nothing.

It’s rare enough that I find myself working with physical boxes these days.  Most everyone is looking for a virtualised service which is cool with me.  Over the last 2 weeks I’ve been doing some physical server builds with Windows Server 2008 R2.  I know the techniques for a automated installation.  I just haven’t had time to deploy them for the few builds I needed to do.  Things like Offline Servicing for VM’s and MDT/WDS (upgrade) are in my plans but things had to be prioritised.  I’ve just kicked off a reboot of a blade server.  By the time that’s finished it’s POST I’ll have made and half drunk a cup of coffee.  After working with VM’s almost exclusively for the last 18 months, working with a physical box seems slow.  These are fine machines but the setup time required seems slow.  Those reboots take forever!  VM reboots: well there’s no POST and they reboot extremely quickly.

Let’s compare the process of deploying a VM and a physical box

Deploy a VM

  • Deploy a VM.
  • Log in and tweak.
  • Handover the VM.

Notes on this:

  • The free Offline Servicing Tool can allow you to deploy VM’s that already have all the security updates.
  • This process can be done by a delegate “end user” using the VMM self servicing web interface.
  • The process was probably just an hour or two from end to end.

Deploy a Physical Server

  • Create a purchase request for a new server.
  • Wait 1-7 days for a PO number.
  • Order the server.
  • Wait for up to 7 days for the server to be delivered.
  • Rack, power and network the server.
  • We’ll assume you have all your ducks in a row here: Use MDT 2010 or ConfigMgr to deploy an operating system.
  • The OS installs and the task sequence deploys updates (reboots), then applications (reboots), then more updates (reboots) and then makes tweaks (more updates and a reboot).
  • You have over the server.

Notes on this:

  • Most people don’t automate a server build.  Manual installs typically take 1 to 1.5 days.
  • There will probably be up to 1 day of a delay for networking.
  • The “end user” can’t do self service and must wait for IT, often getting frustrated.
  • The entire process will probably take 10.5 to 16.5 days.

Total Hardware Breakdown

Let’s assume the VM scenario used a cluster.  If the hardware failure crashed the host then the VM stops running.  The cluster moves the VM resource to another host (VMM will choose the most suitable one) and the VM starts up again.  Every VM on the cluster has hardware fault tolerance.  If the hardware failure was non-critical then you can use Live Migration to move all the VM’s to another host (VMM 2008 R2 maintenance mode) and then power down the host to work on it.  There’s no manual intervention at all in keeping things running.

What if you used standalone (un-clustered) hosts.  As long as you have an identical server chassis available you can swap the disks and network cables to get back up and running in a matter of minutes.

Unbelievably worst case scenario with un-clustered hosts: you can take the data disks and slap them into another machine and do some manual work to get running again.  As long as the processor is from the same manufacturer you’re good to go in a few hours.

If a physical box dies then you can do something similar to that.  However, physical boxes tend to vary quite a lot.  A farm of virtualisation hosts don’t usually vary too much at all.  If a DL380 dies then you can expect to put the disks into a DL160 and have a good result.  It might work. 

Most companies don’t purchase the “within 4 hours” response contracts.  And even if they do, some manufacturers will do their very best to avoid sending anyone out by asking for one diagnostic test after another and endless collections of logs.  It could be 1 to 3 days (and some angry phone calls) before an engineer comes out to fix the server.  In that time the hosted application has been offline, negatively affecting the business and potentially your customers.  If only a physical server was a portable container like a VM – see boot from VHD.

Summary

You’ve heard all those sales lines on virtualisation: carbon footprint, reduced rack space, lower power bills, etc.  Now you can see how easier administration can make your life easier but positively impact the business.

My experience has been that when you translate techie-speak into Euros, Dollars, Pounds, Rubles, Yen or Yuan then that get’s the budget owners attention.  The CFO will sit up and listen and probably decide in your favour.  And if you can explain how these technologies will have real positive impacts on the business then the other decision makers will also have your attention.

Finished Our W2008 R2 Hyper-V Cluster Migration

Last night we finished migrating the last of the virtual machines from our Windows Server 2008 Hyper-V cluster to the new Windows Server 2008 R2 Hyper-V cluster.  As before, all the work was done using System Center Virtual Machine Manager (VMM) 2008 R2.  The remaining host has been rebuilt and is half way to being a new member of the R2 Hyper-V cluster.

I also learned something new today.  There’s no supported way to remove a cluster from OpsMgr 2007.  Yuk!

W2008 R2 Hyper-V Network Tests on HP G6 Blades

I posted earlier today about my network transfer tests on HP ProLiant BL460C G5 blade servers with Windows Server 2008 R2 Hyper-V.  Hans Vredevoort also did some tests, this time using BL460C G6 blades.  This gave Hans the hardware to take advantage of some of the new technologies from Microsoft.  Check out his results.

W2008 R2 Hyper-V Networking Enhancements

Windows Server 2008 R2 includes some enhancements to optimise how networking works in Hyper-V.  I’m going to have a look at some of these now.

Virtual Machine Queue

Here’s the way things worked in Windows Server 2008.  The NIC (bottom left) runs at the hardware level.  VM1 has a virtual NIC. 

image When it communicates memory is copied to/from that NIC by the parent partition.  All routing and filtering and data copying is done by the parent partition in Windows Server 2008. 

Windows Server 2008 R2 takes advantage of Microsoft partnering with hardware manufacturers.

imageHow it works now is that the NIC, i.e. the hardware, handles the workload on behalf of the parent partition.  Hardware performs more efficiently than software.  All that routing, filtering and data copy is handled by the network card in the physical host.  This does rely on hardware that’s capable of doing this.

The results:

  • Performance is better overall.  The CPU of the host is less involved and more available.  Data transfer is more efficient.
  • Live Migration can work with full TCP offload.
  • Anyone using 10GB/E will notice huge improvements.

Jumbo Frames

TCP is pretty chatty.  Data is broken up and converted into packets that must be acknowledged by the recipient.  There’s an over head to this with the data being encapsulated with flow, control and routing information.  It would be more efficient if we could send fewer packets that contained more data, therefore with less encapsulation data being sent.

image

Jumbo Packets accomplish this.  Microsoft claims that you can get packets that contain 6 times more information with this turned on.  It will speed up large file transfers as well as reduce CPU utilisation.

Chimney Offload

This one has been around for a while with Windows but is support for Hyper-V was added with Windows Server 2008 R2.

imageIt’s similar to VMQ, requiring hardware support, and does a similar job.  The NIC is more involved in doing the work.  Instead of offloading from the parent partition, it’s offloading from the Virtual Machine’s virtual NIC.  The virtual NIC in the VM advertises connection offload capabilities.  The virtual switch in the parent partition offloads child partition TCP connections to the NIC.

Hardware Reliance

You need support from the hardware for these features.  During the RC release, the following NIC’s were included by MS in the media:

VM-Chimney Capable Drivers:

  • Broadcom Net-Xtreme II 1 Gb/s NICs (Models 5706, 5708, and 5709)
  • Broadcom 10Gb/s NICs (Models 57710, 57711)

VMQ Capable Drivers:

  • Intel Kawela (E1Q) 1 Gb/s NICs (also known as Pro/1000 ET NICs)
  • Intel Oplin NICs (IXE) 10Gb/s NICs (also known as 82598)

W2008 R2 Hyper-V Network Speed Comparisons

Hans Vredevoort asked what sort of network speed comparisons I was getting with Windows Server 2008 R2 Hyper-V.  With W2008 R2 Hyper-V you get new features like Jumbo Frames and VMQ (Virtual Machine Queue) but these are reliant on hardware support.  Hans is running HP G6 ProLiant servers so he has that support.  Our current hardware are HP G5 ProLiant servers.  I decided this was worth a test.

I set up a test on our production systems.  It’s not a perfect test lab because there are VM’s doing their normal workload and thing like continuous backup agents running.  This means other factors that are beyond my control have played their part in the test.

The hardware was a pair of HP BL460C “G5” blades in a C7000 enclosure with Ethernet Virtual Connects.  The operating system was Windows Server 2008 R2.  The 2 virtual machines were also running Windows Server 2008 R2.  I set them up with just 512MB RAM and a single virtual CPU.  Both VM’s had 1 virtual NIC, both in the same VLAN.  They had dynamic VHD’s. The test task would be to copy the W2008 R2 ISO file from one machine to the other.  The file is 2.79 GB (2,996,488 bytes) in size.

There were three tests.  In each one I would copy the file 3 times to get an average time required.

Scenario 1: Virtual to Virtual on the Same Host

I copied the ISO from VM1 to VM2 while both VM’s were running on host one.  After I ran this test I realised something.  The first iteration took slightly longer than all other tests.  The reason was simple enough – the dynamic VHD probably had to expand a bit.  I took this into account and reran the test.

With this test the data stream would never reach the physical Ethernet.  All data would stay within the physical host.  Traffic would route via the NIC in VM1 to the virtual switch via its VMBus and then back to the NIC in VM2 via its VMBus.

The times (seconds) taken were 51, 55 and 50 with an average of 52 seconds.

Scenario 2: Virtual to Virtual on Different Hosts

I used live migration to move VM2 to a second physical host in the cluster.  This means that data from VM1 would leave the virtual NIC in VM1, traverse VMBus and the Virtual Switch and physical NIC in host 1, the Ethernet (HP C7000 backplane/Virtual Connects) and then the physical NIC and virtual switch in physical host 2 to reach the virtual NIC of VM2 via its VMBus. 

I repeated the tests.  The times (seconds) taken were 52, 54 and 66 with an average of 57.333 seconds.  We appear to have added 5.333 seconds to the operation by introducing physical hardware transitions.

Scenario 3: Virtual to Virtual During Live Migration

With this test we would start with the scenario in the first set of tests.  We would introduce Live Migration to move VM2 from physical host 1 to physical host 2 during the copy.  This is why I used on 512MB RAM in the VMs; I wanted to be sure the live migration end-to-end task would complete during the file copy.  The resulting scenario would have VM2 on physical host 2, matching the second test scenario.  I want to see what impact Live Migration would have on getting from scenario 1 to scenario 2.

The times (seconds) taken were 59, 59 and 61 with an average of 59.666 seconds.  This is 7 seconds slower than scenario 1 and 2.333 seconds slower than scenario 2.

Note that Live Migration is routed via a different physical NIC than the virtual switch.

Scenario 4: Physical to Physical

This time I would copy the ISO file from one parent partition to another, i.e. from host 1 to host 2 via the parent partition NIC.  This removes the virtual NIC, virtual switch and the VMBus from the equation.

The times (seconds) taken were 34, 28 and 27 with an average of 29.666 seconds.  This makes the test scenario physical data transfer 22.334 seconds faster than the fastest of the virtual scenarios (scenario 1).

Comparison

Scenario Average Time Required (seconds)
Virtual to Virtual on Same Host

52

Virtual to Virtual on Different Hosts

57.333

Virtual to Virtual During Live Migration

59.666

Physical to Physical

29.666

Waiver

As I mentioned, these tests were not done in lab conditions.  The parent partition NIC’s had no traffic to deal with other than an OpsMgr agent.  The Virtual Switch NIC’s had to deal with application, continuous backup, AV and OpsMgr agent traffic.

It should also be noted that this should not be a comment on the new features Windows Server 2008 R2 Hyper-V.  Using HP G5 hardware I cannot avail of the new hardware offloading improvements such as VMQ and Jumbo Frames.  I guess I have to wait until our next host purchase to see some of that in play!

This is just a test of how things compare on the hardware that I have in a production situation.  I’m actually pretty happy with it and I’ll be happier when we can add some G6 hardware.